How to unscrew a bolt: 45 practical recommendations
How to unscrew a bolt? An article about effective methods with an overview of the best and non-standard tools.
In this material we will look at how to unscrew a torn bolt (with torn edges), a rusted bolt, a crankshaft pulley bolt, a wheel, an exhaust manifold, a cylinder head and other components and assemblies.
The recommendations will also be useful in household work - when repairing faucets, toilets, garage equipment, prefabricated buildings, etc.
How to unscrew a bolt
Bolts are usually unscrewed with spanners or open-end wrenches, screwdrivers, sockets using a wrench, ratchet or pneumatic impact wrench. However, other options are also possible.
Before unscrewing the bolt, from the available tool you need to choose the one that suits best:
- thin short open-end wrenches, especially with a too loose (broken) jaw, are the worst option, which is better to immediately abandon in a situation with unscrewing rusty stuck bolts (this will lead to torn edges);
- ring wrenches are preferable to open-end wrenches, since they cover the perimeter of the bolt head more tightly;
- A 6-point socket wrench or socket is preferable to their 12-point versions, since hex ones have a larger area of pressure on the flat working surfaces of the head and are less likely to tear off the edges;
- a tool with an extended handle or additional attachment is preferable to a short one;
- Due to its simplicity and strength, a crank is preferable to a ratchet, because for the latter, the application of increased forces can lead to damage to the mechanism (this is especially true for ratchets with a large number of teeth, each of which is smaller and not so durable);
- an air impact wrench is better than a hand tool;
- in combination with a wrench or an air impact wrench, the best solution would be the Super Lock head, in which the force is applied not to the corners (edges), but to the planes, which prevents the edges of the bolt head from being licked off;
- a torque amplifier (multiplier) will help apply a force to a large stuck bolt that exceeds human physical capabilities;
- a screwdriver with a large handle of a typical shape or a T-shaped power one will do a better job than traditional compact versions;
- a suitable clamping tool (pipe (“gas”), wrench, clamp, vice, pliers, etc.) will be useful in the absence of keys or when the edges are licked;
- if the head height is sufficient, in rare cases a pin driver of the appropriate size can be used.
Further, when describing the methods, we will show how to unscrew a bolt from an atypical tool.
It is worth purchasing a durable Super Lock socket for wheel bolts and carrying it with you in the car at all times, since wheel fasteners often get damaged during seasonal tire changes and can cause serious difficulties for the car owner on the road in the event of a puncture.
Which way to unscrew the bolt?
Most often, bolts with right-hand threads are used: they need to be unscrewed counterclockwise (look at the bolt from the head side). Unscrew the bolt with left-hand thread clockwise.
When deciding which way to unscrew the bolt, just look at it carefully:
- on the side you can see the inclination of the bolt threads at a small angle - unscrew the bolt in the direction in which the thread “rises”;
- even if the threaded thread is not visible, you can determine the direction from the end of the nut (or the through threaded channel in which the bolt sits) at the point where the last turn of its internal thread exits.
In the absence of visible signs, when only the cap pressed tightly to the surface of the part is visible, it is better to start unscrewing counterclockwise; if there is no result, then try counterclockwise.
How to unscrew a broken bolt
A bolt with torn edges can be unscrewed in several basic ways: ·
- use a Super Lock head, which acts on planes and not on edges;
- hold the torn bolt in a pipe wrench (in a vice, clamp, pliers, etc.) and unscrew it;
- make a cut in the head and unscrew it with a powerful screwdriver;
- combine the two previous methods, using both a clamping tool and a screwdriver, which will allow you to apply the force of two hands;
- grind the cap to a smaller size;
- use a special tool - an extractor (similar to a tap, the working part is conical, the thread direction is opposite to the thread of the stud): drill a hole in the center of the required diameter and depth, approximately 2/3 of the length of the working part of the extractor, insert the extractor and rotate with force until the bolt is unscrewed;
- drill a hole in the center of the cap no deeper than the height of the cap, drive a TORX nozzle (E-profile, or another similar one with longitudinal ribs) into it and unscrew it by the shank of the nozzle;
- hammer a suitable larger nut on top of the head of the bolt with licked edges, the inner diameter of which allows it to be tightly seated, for additional fixation, drill a recess in the contact area of the nuts, insert a suitable metal rod there as a key to prevent rotation, unscrew the bolt using tool to size nut of larger diameter;
- put on a nut of larger diameter and weld it to the head of the bolt using a semi-automatic welding machine, unscrew the large nut together with the bolt welded to it.
As you can see, unscrewing a bolt with torn edges is not so difficult.
How to unscrew a broken bolt
Information on how to unscrew a broken bolt that does not have a head can be obtained from the article “How to unscrew a hairpin: 25 effective methods and techniques,” which is posted in the “Useful” section on ZiSinfo.rf.
How to unscrew a rusty bolt
It is easier to unscrew a rusty bolt if you have access to the threaded part. As a rule, such an opportunity exists from the side of the end on which the nut is screwed (the bolt passes through the parts being fastened), less often - from the side of the head, when it does not fit tightly to the surface being fastened. You must proceed as follows: ·
- accessible threads must be thoroughly cleaned of rust with a wire brush and dirt must be removed;
- Apply the penetrating compound WD-40, “Liquid Key” and their analogues to the threads (so that the applied compound flows from top to bottom into the thread sticking zone of the rusty bolt), let the compound work for 20 minutes, unless a different time is specified by the manufacturer of the product;
- using the available tool, apply force in the direction of unscrewing;
- if the bolt does not give in, then use the walking method, alternately applying force to both tightening and tightening;
- if these actions do not lead to a positive result, then apply soaking in a penetrating or chemically active preparation against rust for a long time.
How to unscrew a bolt with soaking
The essence of the method is to expose the rusty threaded part of the bolt to a penetrating or chemically active composition against rust for a sufficiently long time.
- generously moisten the rusty fasteners in the thread area with the active agent, wrap the accessible threaded shank of the bolt with a rag soaked in this agent or place it on top (so that the chemical flows down the thread from top to bottom), close tightly to prevent drying, if necessary, adding fresh agent every few hours;
- Immerse the fasteners completely in the chemical, using a large volume of it in a suitable container.
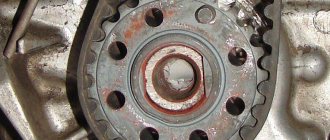
How to remove and install a system star
The system is a set of three front stars. If you often have to ride at speed, then most likely the largest sprocket will wear out. On the contrary, with frequent off-road travel, wear will affect the first (smallest) sprocket. By analogy with the second, middle chainring, when the bike is used at medium speeds in unpaved or poor asphalt conditions.
On a modern mountain or road bike, the system is dismountable, so removing all the sprockets is not difficult. Before work, you need to carefully prepare, namely, collect all the necessary tools:
Removing the system from the bicycle: 1. Place the frame in a straight position. If there is a stand, you should definitely use it.
2. Using a hexagon, remove the fixing axial bolt of the right connecting rod.
3. Unscrew the pedal from the right connecting rod. A standard open-end wrench is suitable for this.
4. Insert the puller into the connecting rod to remove it from the carriage. First, screw the tool into the thread until it stops. It is important that it sits evenly on the shaft, otherwise the axle can be damaged when unscrewing the connecting rod. Place the spanner wrench on the puller and firmly screw it in until it stops until the connecting rod is squeezed out of the carriage shaft.
5. Carefully remove the system from the chain.
6. Two stars are usually attached to each other on a so-called spider. The big one remains on the connecting rod itself. Unscrew them using hex bolts.
This is how the system works. Replacement and installation looks like the reverse process:
- Install the desired sprocket on the spider and tighten the fastenings. Change the large part together with the right connecting rod and screw the middle and small sprockets onto it.
- Next is installing the connecting rod on the carriage. Before doing this, it is advisable to clean and lubricate the carriage shaft.
- Carefully place the chain on the system and screw in the connecting rod by rotating the puller in the opposite direction.
- Tighten the fixing nuts and install the plugs.
- Screw the pedal onto the connecting rod.
When replacing one sprocket, it is advisable to clean the old ones. Before installing on the carriage, lightly lubricate the system components.
So just replace the front sprocket. All of the listed tools are required. The connecting rod is a sensitive thing, and a hammer and chisel is not the best option for removing it. The same goes for keys. It is difficult to replace them with pliers, and the nuts can easily be “eaten.” Well, without hexagons it is impossible to disassemble the system into parts.
When finished, check the operation of the transmission to see if everything is in order and whether adjustment of the speed switch is required.
Bolt with torn edges
Now we will figure out how to unscrew a bolt with torn edges . As a rule, the reasons for this problem lie in the following:
- The parts held by the bolt were misaligned in an unnatural way. This leads to pinching and damage.
- The bolt itself was very tight when tightening.
- The tool used to tighten it was the wrong size and improvised means were used (screwdrivers or chisels are often placed in larger keys when there are no suitable small ones).
Before unscrewing a broken bolt or nut, you need to do some preparation. This will allow you to spend less time and effort, and sometimes save expensive equipment.
Sequencing
- Coat the joint with liquid to aid unscrewing. Such a liquid can be the famous WD-40, brake fluid or kerosene. Take your time and let the liquid do its job. As practice shows, you can safely leave the part alone for thirty minutes, or even an hour.
- Take any available tool and lightly, not forcefully, tap the hardware from all accessible sides. Your goal, in this case, is not to launch the bolt like a golf ball, but just to slightly loosen it at the place where it is attached. While performing this activity, there is a danger of damaging the thread, so balance the strength and swing.
- If you have the opportunity and space, try heating the bolt. A gas burner is suitable for this. Make sure there are no flammable liquids or objects near the workplace. Also, before you start warming up, make sure that in case of an emergency you have somewhere to retreat. Do not heat the part with an open flame in enclosed spaces. It is better to open the gate or move the bolt to the air. Rust and grease scorched in this way will turn into ash and will no longer prevent the bolt from being unscrewed.
However, it often happens that it is the screw that jams that cannot be reached with a torch or tapping tool. In this difficult case, you should use a grinder or any available tool such as a chisel to make a deep cut on the preserved cap . This will become the hook that will allow you to pull out the entire bolt.
Now you can, clinging to this protrusion, try to unscrew the stubborn screw. Press the screwdriver into the recess, and while lightly hitting the handle of the hammer in the direction of unscrewing (not clockwise), slowly turn the bolt.
Changing the sprocket on the rear cassette
The set of transmission sprockets for the rear wheel is many times larger than the set for the front wheel. The standard set includes eight components, and in high-speed models (or on a sports bike) there are 9 or 11.
It is worth mentioning right away that a cassette or ratchet can be placed at the rear. The cassette is a modern version with internal spline mounting on the hub axis. Ratchets, as an outdated option, can only be found on budget high-speed bikes. The set usually includes 5-7 gears. The fastening is external, threaded, the removable tool differs from the cassette type.
The fundamental difference from a cassette is its integrity - you cannot change the sprocket separately on the ratchet. It’s either all at once, or nothing at all. Therefore, we will consider how to install a new sprocket on the cassette.
As with replacing drive sprockets, you will need special tools:
- cassette remover;
- chain whip-fixer;
- adjustable wrench or socket;
- additionally: wrenches, chain squeezer*.
*When removing the cassette you will need to first remove the rear wheel from the bike and then the axle nuts. At the same time, when replacing sprockets, you can clean the chain - to remove it, you need to squeeze it.
Sequence of work: 1. Remove the rear wheel with a 15 mm wrench, with an eccentric fastening everything is simple - open the lever and loosen the fixing nut.
2. The next step is to unscrew the axle nuts. You will need a 17mm wrench for it. To remove the mount from the rotating axle, add an additional nut to secure the axle.
3. Unscrew the bearing cone and pull out the bearing from the opposite side.
4. Remove the axle with cone and bearing. About the bushing components: if necessary, you can immediately replace them with new ones.
5. Insert the cassette puller into the slots.
6. Place the whip on the largest (lowest) star. We will rotate it clockwise.
7. Using an adjustable wrench or socket, rotate the puller counterclockwise.
It's so easy to shoot a cassette at home. Most modern star sets are dismountable; you can install one or two new stars. However, if there is severe wear, when half of the cassette is worn off, it makes no sense to change them separately. Difficulties can also arise if the largest sprocket, on which all the others are usually attached, has worn out.
Is it possible to dismantle the cassette without a puller and a whip? In principle, this can be done using a slotted tube and a spanner. You can make a whip yourself by welding a piece of an old chain to a metal knife handle.
When replacing individual sprockets, especially the middle ones, we carefully disassemble the cassette so as not to lose all the separating and fixing washers. Everything is simpler with a cassette on a spider - it does not need to be disassembled, the star is removed separately from its mount.
Rear transmission assembly:
- Place and fix the new star, assemble the cassette.
- Using a puller, install the drum onto the spline mount of the bushing. Before tightening, it is necessary to level the drum so that the connection does not wear out under load. You don't need a whip here - just forcefully rotate the puller clockwise.
- Assemble the hub: insert the axle from the cassette side, then the bearing and cone from the left side, secure the axle with nuts.
- Put on the chain and install the rear wheel.
Check the operation of the transmission and adjust the rear derailleur. Timely replacement of sprockets will eliminate unpleasant surprises on trips and will generally increase the service life of the bicycle transmission.
Hex bolt
The edges of the axis are convenient for both tightening and unscrewing. Clear and even, they provide a reliable support for the key. If the bolt is suitable for your hand and of the appropriate size, at first you can comfortably twist it by hand, later tightening it with the help of a tool. However, there are often cases when, due to excessive use of the screw itself, or heavy loads on the connection, the edges are torn off and the fastener remains sticking out in the joint. It is uncomfortable to handle; it slips out of your hands and tools. Let's look at several options for solving this problem, with corresponding solutions.
Star bolt
You can unscrew such a bolt in the same way as unscrewing a nut with torn edges. We discussed the main methods of unscrewing stubborn bolts and nuts in great detail earlier, and now we can summarize all the methods that are suitable for such a screw. So, if your star bolt has stripped edges:
- The easiest way is to use an extractor. This proven product will not let you down this time either. Make a hole in the fastener leg, fix a suitable extractor there and carefully unscrew the stuck bolt with careful movements. As we can see from this article, a set of extractors of various diameters is a really necessary thing on the farm if you regularly do such assemblies and disassemblies.
- Use the gas wrench. This adjustable wrench will tighten the bolt tightly, and you can remove it with a few turns. This method is good because you don’t need to buy a separate tool. There is a similar wrench in almost every home.
- Focus on the bolt head. If there is enough space around the bolt, make a notch on its head with a grinder or a hacksaw. You can rest a screwdriver or chisel against this notch and turn the bolt by hitting its free end with a hammer or other tool convenient for you.
We have looked at options for releasing bolts and nuts that are available for use by any home craftsman. Of course, methods used in professional workshops or car repair shops were left out of the discussion. However, they constantly use equipment that you might only need once or twice at home. And it costs a lot of money. Professionals use to release bolts with torn edges:
- Impact wrench.
- Hairpin driver.
- Specialized extractors.
However, if such situations occur to you no more than once a year, then there is little point in purchasing special tools.
When performing repair work, sometimes the question arises: how to unscrew a bolt or screw with torn edges. This problem has several solutions, knowing which you can unwind almost any hardware. Even if you overdid it and tore off the head or broke the stud, there are ways and tools that allow you to unscrew the broken fasteners.
Preparatory activities
It is better to prevent any problem than to solve it. Therefore, if you have applied sufficient force and the fastener has not moved, you do not need to continue until you completely damage it. Better do the following:
- First you need to remove the layer of rust and other contaminants. If the threaded part protrudes above the parts being fastened, clean it with a wire brush.
- Take a hammer and tap the head. The blows should be quite strong. It's okay if you make small dents in the metal, but you shouldn't allow the fastener itself to bend. This procedure helps to disrupt the integrity of the oxides, so the positive effect will only be at the initial stage, when the head is pressed against the part. Once you have removed the bolt from its place, it is not recommended to knock on it, since there is a high probability that you will damage the threads, thereby complicating the situation even more.
- Heating the attachment point gives very good results. All you need to do is heat the fastener and wait for it to cool. In this case, some of the substances burn out, the rust is destroyed, and the bolt is unscrewed with less effort. The heat must be strong. This can be done with a blowtorch, gas torch or acetylene torch. All use an open flame, so first ensure that you do not damage surrounding elements. Don't forget to follow safety regulations!
- Lubricate the hardware with any easily flowing liquid. This can be a special composition such as WD 40, kerosene or brake fluid. Their peculiarity is that they penetrate into all pores and crevices, lubricate the threads, and some destroy rust. It takes some time for a positive effect to occur. It is usually recommended to wait about an hour and get to work. In difficult cases, you will need to wait 10-12 hours.
The above steps will not be superfluous in the case when you decide how to unscrew a bolt with torn edges.
Removing the screw
Screws with torn edges cause a lot of trouble. Unscrewing such screws is not easy, but there are several ways to solve this problem. To make it easier to unscrew them, you need to do the same preparatory measures as for the bolts.
In the simplest case, when the screw protrudes above the surface, you can try to grab it with pliers, wire cutters or another similar tool and unscrew it in this way. But most often there is nothing to grab onto. Then you can try the following methods:
- Sometimes it helps to use thin rubber, for example, from a balloon. A piece of such rubber is placed on top of the screw and unscrewed, pressing the screwdriver through it. This increases friction and prevents the screwdriver from slipping.
- A screw with a curly head can be converted into a flat-head screwdriver by sawing through the groove with a hacksaw.
- In order to solve the problem of a screwdriver slipping, you can use cyanoacrylic-based glue; this glue dries quickly and holds metal surfaces together efficiently. The procedure is simple: the screw and screwdriver are degreased, glue is applied to the head of the screw and the screwdriver is pressed against it, maintaining alignment. To speed up the setting of the glue, you can sprinkle it with soda. Wait until the glue has completely hardened and try to unscrew the screw.
In order to avoid such problems in the future, renew all threaded connections with taps or taps before assembly. Replace any damaged fasteners. Be sure to lubricate the threads and fasteners in general. It is best to use graphite lubricant for these purposes.
Methods for unscrewing a screw without a screwdriver
Let's consider the most effective methods depending on the specific type of slot. Let's start with the cruciform.
Option No1. Phillips slot
Step 1. First, note that some screws may have one recess on the head longer than the other. If so, then you should only work with a longer recess to make the task easier. Let us also add that the edges of these recesses can be worn down, and therefore you should work carefully, otherwise you can damage the product.
Step 2. One of the easiest ways is to use a coin. The method often works only with small screws. The coin must be inserted into the groove and then turned counterclockwise.
Step 3. You can try to unscrew a loose screw with your fingernail. The steps are the same as in the previous method.
You can try to unscrew the screw with your fingernail
Step 4. Take a knife, place it in the recess (long if they are different lengths) and twist. Be careful, because if the screw is tightly tightened and the knife you are using is of poor quality, then it (the knife) can be bent without achieving the desired result.
Using a knife to remove a Phillips head screw
Step 5: Use the old CD. Place its edge in the groove and turn it. The CD itself may suffer as a result of such manipulations, so make sure in advance that it is no longer needed. This method will definitely not help with a tightly tightened screw.
Using an old CD
Step 6. You can cut a long groove on the head with a hacksaw, but this method is effective only when the hardware is not completely twisted, that is, if the head protrudes somewhat above the surface. Hold the saw at a right angle to the head, saw slowly and carefully. Next, when the groove is ready, the screw can be unscrewed with a flat-head screwdriver or improvised means (for example, a credit card).
A long groove is sawed on the head of the screw
Step 7. Take a flathead screwdriver of the appropriate size if you don't have a Phillips head screwdriver. Typically, this can only work with large/medium diameter screws. Be careful not to tear off the edges of the slot!
You can try to unscrew the cross-head screw with a flat-head screwdriver
Step 8 : Another option is to use a toothbrush. Melt one end of it with a lighter, then immediately insert it into the recess on the screw head. After waiting a bit for the melted plastic to harden, turn the brush counterclockwise. Of course, this will not help if the screw is tightened too tightly.
Unscrewing a screw with a toothbrush
Option No2. Flat spline
Step 1. As noted earlier, there is only one recess on the head of such a screw. If you do not have a flat-head screwdriver, you can unscrew the product using improvised means. Let's see how this can be done.
Read also: Reverse drill for metal
Flat head screws
Step 2. Use a credit card - insert it into the groove and try to turn it. Use only an unnecessary card, because it may well be damaged during unscrewing.
The screw is removed with a credit card
Step 3. You can also take the “ear” from a tin can (soda, beer). Insert the broken “ear” into the groove on the head of the hardware and twist.
Using the “ear” from a tin can
Step 4. Use a regular coin - insert it into the groove and try to turn it the same way.
The flat head screw can be removed with a coin.
Step 5. If the screw is not tightened very tightly, you can try to unscrew it with your fingernail. The method is not always effective due to obvious reasons.
Step 6. Try to unscrew the screw with a knife, inserting the blade of the latter into the groove. There will be a risk that you will bend the knife.
The knife blade is inserted into the recess and scrolled counterclockwise
Step 7. The last method is to use pliers. Suitable if the screw is not completely tightened. It is advisable to use needle-nose pliers for this rather than regular ones.
A flat-head screw is opened with pliers
Option No3. Unscrew the Torx screw
Step 1. We are talking about screws with a six-pointed star recess on the head. Such screws, by the way, are protected - with a rod in the center of the star. In any case, proceed with caution, because the edges of such a slot can easily be damaged.
Torx screw
Step 2. Try using a flathead screwdriver. Insert its tip into a pair of opposite rays, carefully scroll counterclockwise. And if the screw is protected, then insert the screwdriver between the rod and any of the beams, and turn in the opposite direction.
Use a small flathead screwdriver
Step 3. To unscrew a protected Torx screw, try using a screwdriver for an unprotected one, but in this case the rod on the head will have to be removed (this can be done, for example, using a center punch and a hammer).
Removing the center shank on the head of a secure Torx screw
Another possible option is to drill a hole on the tip of a regular screwdriver for the star rod.
Drill a hole in a screwdriver for a regular Torx screw
Step 4. Finally, you can use the same toothbrush by melting one end with a lighter (proceed in the same way as described in one of the previous methods).
Using the same toothbrush
Option No4. Unscrew the small screw
Let's say right away that small screws are especially difficult to unscrew without having the appropriate tools on hand. As a rule, such screws are found in various electronic devices. Ideally, tools designed for repairing glasses should be used for unscrewing (there will be no difficulties in finding them, and they are not very expensive). If such equipment is not available, resort to one of the methods described below.
Unscrewing small screws
Table No1. How to unscrew a small screw.
| Steps, photo | Description of actions |
| Step 1 | Use a knife - place its sharp end into the slot and try to turn it. It is advisable to insert the tip at a slight angle to increase the contact area. |
| Step 2 | Use a nail file. Proceed by analogy with the previous method. |
| Step 3 | If you have small scissors with pointed ends on hand, you can use them. But let us immediately note that such scissors are not the best option for removing screws. |
| Step 4 | Use tweezers. Insert its sharp end into the groove and try to turn it. |
On a note! Another good option is to use a regular nail, the tetrahedral point of which is ideal for a cross slot. For example, an 80mm nail will work for mobile phone screws.