Articles of brake pads Lada Granta
Let's denote that the Granta's brake circuit is presented in a classic style: front disc and rear drum pads. This type/scheme was borrowed from Kalina, Priora, and earlier models.
| № | Article/OEM/brand | Price, rub.)* |
| 1. | Original catalog items |
*Prices are current as of September 18, 2018.
The list presented is not exhaustive and is for informational purposes only. The manufacturer allows the purchase and subsequent installation of components not listed in the list. The main requirement for parts is quality workmanship and professional installation. Among foreign analogues, Lada Granta liftback brake pads are in high demand:
- BOSCH 0 986491700, 0 986495214;
- ICER 181308;
- Lucas – Girling E9 90R-01111/479;
- LYNXauto BD-4601, LYNXauto BD-4605;
- FENOX BP40005O7;
- FERODO FDB527;
- TRW 21170.
What you need to know about Granta Sport pads
In the Sport modification, all four calipers are disc type. Friction linings are metallic and semi-metallic. Ceramic and organic friction linings are not installed on the Lada model. The difference between the last two types is the presence of ceramic and Kevlar fiber.
There is no need to mention the advantages of organics and ceramics, since everyone knows that they are developed using the most modern technologies and provide maximum braking effect. The exorbitant cost is a significant drawback, which for many becomes a stumbling block.
Checking the condition of the Lada Granta brake system
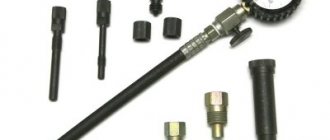
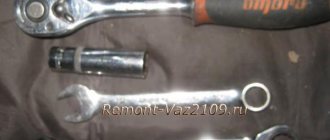
Tool:
- 12mm curved box spanner
- 14mm split box spanner
- 17mm split box spanner
- Wheel key
- Caliper or micrometer
Parts and consumables:
- Brake hoses
- Brake pipes
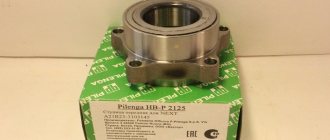
- Brake pads
- Rear brake cylinder
Notes:
According to the maintenance regulations, check the condition of the brake system every 15 thousand km. Carry out the work on an inspection ditch or overpass.
1. To check the operation of the vacuum brake booster when the engine is not running, press the brake pedal 5-6 times and, holding it down, start the engine.
Note:
If the vacuum booster is working properly, after starting the engine the pedal should move slightly forward. If this does not happen or the braking is not effective enough (you have to press the brake pedal with great force), check the tightness of the connections of the vacuum supply hose to the vacuum booster and the serviceability of the booster itself.
2. Check the condition of the brake pipes. The tubes must be securely fastened in the holders and must not have dents, mechanical damage, deep corrosion, or signs of brake fluid leakage. If necessary, tighten the connecting fittings or replace faulty parts.
3. Inspect the brake hoses; they should not be cracked, torn or frayed. Check the condition of each hose by creating fluid pressure in the brake system. To do this, the assistant must press the brake pedal firmly and hold it during the inspection.
Note:
The appearance of rubber swelling or brake fluid leakage from the hose and its tips is not allowed. If damage is found, replace the hoses as a set.
4. Check the condition and degree of wear of the brake pads and discs of the front wheels. To check, remove the front wheels one by one using a wheel wrench.
5. Through the caliper window, evaluate the thickness of the brake pads.
Note:
Replace the brake pads of both front wheels if the thickness of the friction lining of any of the pads has reached the maximum permissible value - 1.5 mm.
6. While turning the brake disc, inspect its working surfaces on both sides. There should be no cracks or deep grooves on the working surfaces of the disc.
7. Using a caliper we measure the thickness of the disk, which should be at least 17.8 mm.
Note:
If, as a result of wear, a high shoulder has formed on the maximum diameter of the disk, which prevents an accurate measurement, remove the shoulder using a file or other means, or measure the thickness of the disk with a micrometer. Replace the brake disc with defects in the working surfaces or extreme wear.
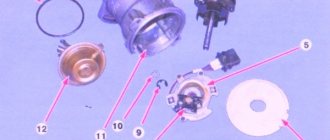
8. Assess the degree of wear on the brake pads of the rear wheel by the condition of the front pad, which wears out faster than the rear one. For this purpose, an inspection window is made in the brake mechanism shield, closed with a rubber plug.
9. Remove the plug and through the window evaluate the condition of the front brake pad lining.
Note:
If the lining thickness is less than 1.5 mm, the brake pads of both wheels must be replaced.
10. To check the condition of the wheel cylinders and brake drums of the rear wheels, remove the drums.
Notes:
There should be no cracks or chips on the drums. If the working surface is severely worn, or if grooves are present, replace the brake drum.
Its internal diameter should be no more than 201.5 mm; if it is greater than the specified value, then the drum must be replaced.
11. To check the condition of the wheel cylinder sealing collars, on each side one by one, slide the edge of the boot from the protrusion of the cylinder body.
Note:
If there is brake fluid under the boot, indicating a faulty seal, the wheel cylinder must be replaced.
12. Inspect the pressure regulator in the rear wheel brakes and its drive.
Note:
The regulator and drive must not be damaged; brake fluid must not leak from the regulator and brake pipes. The regulator piston should not be jammed - when the brake pedal is pressed, the regulator rod should move.
13. Inspect the parking brake cables.
Note:
There should be no damage to the sheaths on the cables. Cables in sheaths must move freely, without jamming. Replace defective cables with new ones. You also need to replace the cables if they are stretched so much that the parking brake cannot be adjusted.
14. Check the functionality of the parking brake. Adjust the parking brake if necessary.
The article is missing:
- Photo of the instrument
- Photos of parts and consumables
Source:
Diagnostics of friction lining wear level
Most modern cars are equipped with special digital wear sensors. When the programmed level is reached, an indicator light is activated on the central instrument panel, indicating a breakdown of the brake circuit.
Unfortunately, the Lada is not yet equipped with digital sensors; you need to navigate by the actual thickness of the body of the lining. The maximum permissible threshold for using the body is 1.5 mm. Above the specified limit, the operation of the technical device is not safe. The degree of wear can be determined by removing each wheel and measuring the thickness with a caliper.
Alternative option: turn the steering wheel to the extreme left/right position, visually assess the thickness without resorting to dismantling work. The above recommendation only applies to the front circuit. For rear wheels, unconditional removal of discs.
When to change pads
The brake pads of the VAZ 2110, if you don’t delve into their design, consist of a friction lining and a special frame. Friction linings perform braking and, precisely by the material from which they are made, these linings are distinguished. This material (for the friction lining) is based on a special reinforcing component, which determines such design parameters as strength, stability, heat resistance and reliability of the braking qualities of the system.
New brake pads for VAZ 2110
Like any part, VAZ 2110 brake pads have their own service life, which is usually 30,000–50,000 km of vehicle mileage or the friction lining reaches a thickness of 1.5 mm. (that is, they practically grind down to zero, but most often when braking, piercing unpleasant sounds arise from under the wheels). When the thickness of the brake linings is less than 1.5 mm. Excessive stroke of the brake cylinder pistons occurs, which leads to its leakage.
Typical causes of wear on brake system components
- Long-term operation without intermediate prevention;
- Mechanical damage to the caliper or steering knuckle, resulting in deformation of the lining;
- Deformation, and as a result, creaking of brake pads on Grant;
- Purchase and subsequent installation of low quality parts;
- Violation of installation technology;
- Aggressive driving style of a vehicle;
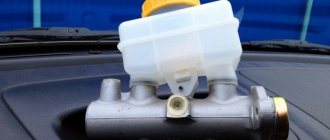
- Insufficient amount of fluid in the expansion tank of the master cylinder;
- Damage to the supply line DOT – 4;
- Working cylinder jammed.
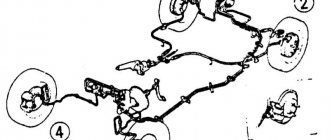
How to change front pads
- To install new brake pads, perform the above steps in reverse order. However, you must remember to clean the seats from dirt, install the internal block, and move the bracket to the working position. Then we move the bracket with a screwdriver, resting it on the brake disc and retracting the piston with a screwdriver, which is inserted through the hole for the caliper.
Using a gas wrench, press the piston into the brake cylinder
We cut the wire responsible for the wear of the pad
Disconnecting the brake pad connector
We take out the rest of the wire
We connect a new block with a new connector
It happens that the brake disc piston does not return to its original position. In this case, you should unscrew the brake bleeder, which will make it easier to return the piston. If this does not help, then we remove the entire brake mechanism of this wheel to squeeze out the piston in a yew and replace the seals. It is very important that when performing this work you do not hit the piston, as this can lead to its distortion and scratches on the cylinder surface.
Fines for crossing the stop line and speeding will no longer bother you!
Video instruction
Sequence of actions when replacing pads on Granta yourself
Front
- We place the car within the perimeter of the repair zone, squeeze the parking brake, and engage first gear. We fix the rear row of wheels with wheel chocks;
- Jack up the side and remove the wheel;
- We unscrew the upper and lower guides, move the caliper to the side, do not unscrew the line;
- Carefully pry up the anti-squeak plates with a screwdriver and remove the pads;
- We troubleshoot the caliper, clean it, and blow it out if necessary;
- We install new linings.
After replacing the front pads, check the level in the tank. It is located in the engine compartment. We carry out a similar procedure with the second wheel. Service center technicians recommend replacing the circuits at the same time. For example: front / rear, all four calipers. Subsequent replacement after 30,000 km.
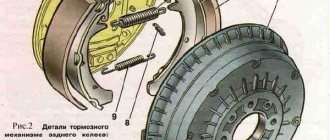
Rear So, to change the rear brake pads on a Grant, do the following:
- fix the front wheels, do not release the parking brake;
- jack up the rear side, remove the wheel;
- tapping the rim evenly with a hammer to knock it off its seat;
- remove the pressure plate, spacer bar;
- unpin the base of the fixation, the ear of the handbrake cable;
- remove the old ones and install new friction linings;
- The mechanism is pinned in the reverse order.
Be sure to check the fluid level in the expansion tank and replenish the missing amount.
Pad replacement process
Turn the steering wheel in the direction you want to replace it. It will be more convenient to work this way.
Clean any dirt from where the caliper attaches to the disc.
Take a chisel or a flat screwdriver with a small slot in your hands (I don’t know if this word can be conjugated). Bend back the locking plates that hold the bolt. I recommend bending the bottom plate, then it will be convenient to lift the brake mechanism up and replace the pad.
Unscrew the mechanism bolt. On one side there is a key for 13. On the other side there is a key for 17. The easiest way is to loosen the inner part a little with a key for 17
Just be careful not to damage the protective rubber of the return mechanism. You can try to break it off with a key at 13, but there the locking plate that is not completely bent may interfere with you.
Raise the brake mechanism.
Remove the brake pads.
Now you need to press the brake cylinder back in, as it will not allow the brake mechanism to engage
It just sounds complicated, but in fact, it's simple. The easiest way is to use a clamp or clamping bolt. If you do not have this tool, then take an old block, insert a chisel into the slot (you can use a wheel wrench) and move the brake cylinder to the very beginning.
Install new pads.
Put on the brake gear.
Reassemble in reverse order.
Attention! After you have replaced both brake pads, you need to bleed the brakes. Place a block or something similar under the rear wheels to block the wheels from moving.
Start the car and operate the brake pedal.
Owner reviews of Grant brake pads
| from 900 | ||
| 2. | 21100-3501089 | from 1200 |
| 3. | Disc TRW LADA Granta Article: GDB1384 | from 1450 |
| 4. | rear TRW Granta, Kalina, Datsun art. GS8210 | from 1300 |
| 5. | Allied Nippon ADB2794 (set) | from 3200 |
| 6. | Allied Nippon ADB2795 with calipers from Lada Priora 2110 | from 1100 |
| 7. | Allied Nippon ADB0173 | from 1100 |
| 8. | Rear brake pads Grant Sport / Kalina article number: 21905-3502080-87 | from 1100 – 1200 |
| 9. | Front brake pads LADA Granta Sport / LADA Kalina-2 Sport | from 1200 |
| № | Positive |
| 1. | Vitaly, 38 years old: since I am familiar with equipment, I fix numerous breakdowns myself. I rarely go to the service center. I didn’t expect that the factory brake linings on the Grant last so long (37,000 km). |
| 2. | Kirill, 39 years old: I work as a taxi driver, I drive many kilometers per shift. I often change brake pads, the reasons are obvious. I didn’t change traditions, I buy domestic ones. |
| 3. | Vyacheslav, 41 years old: the right cylinder jammed and had to be urgently repaired at a service station. The technician pointed out the need to replace the set of friction linings. The domestic manufacturer suits me quite well, my advice to car enthusiasts. |
| 4. | Alexander, 44 years old: frequent trips around the city greatly wear out the friction linings on the Grant. I carry out repairs myself. In the store I always buy “original” ones according to the catalog numbers from the instruction manual. |
| 5. | Mikhail, 35 years old: after the accident, the question of choosing a pad manufacturer arose. The standard ones are not the best, but they are enough for me, my positive review. |
| 6. | Vitaly, 42 years old: I recently carried out maintenance on the Grante and was pleasantly surprised by the service life of the pads. Mileage over 32,000 km. |
| Negative | |
| 1. | Nikolay, 35 years old: I didn’t like the efficiency of the brake circuit, so I replaced it with new ones from Renault Logan. The quality is immediately noticeable. |
| 2. | Vladlen, 33 years old: I practice tuning on Grant, improving everything little by little. The other day I installed a set of new Allied Nippon ADB2795 pads. Japanese quality is always at its best. |
Memo
- We replace the pads only as a set;
- When replacing, secure the vehicle with anti-rollbacks;
- For replacement, we select only suitable analogues;
- After completing the work, monitor the brake fluid level. If necessary, top up.
Read more: How to install a clutch disc on a gazelle
Did you like the article or have something to add? Write!
In general, this is the case, I drove on factory TIIR pads, you all know them very well, and I think I’m sick of this creaking sound when I press the brake! A friend recommended pads from the Markon company (I think that’s what they’re called), they didn’t creak on his Chevrolet Niva!
After driving about 1 thousand km they whistled like a cop's UAZ! After about another 300 km they began to whistle like a suu... gopher! I later realized that the factory ones were just whispering and not whistling compared to Markon. I thought about putting the factory ones back but then I remembered that I threw them away! =)
Just a song and not pads, but imagine in traffic jams for half an hour to an hour and a half! My mind just explodes! Yes, it's a shame =)
I was searching on the Internet and found out what kind of pads do not creak on the Grant. A lot of people wrote about Feradoo (green, they are soft and brake worse) and Ferado (red, they brake better but wear out the brake disc faster), everyone says that the green ones squeaked after a certain mileage, then everyone apparently started buying red ones. But the result is that they still creaked sooner or later.
When I saw a Lada Granta passing in a traffic jam on the street, I wanted to run out of the car and ask, “What brand of pads do you have!” =))) I then heard this creak from everyone, like a block maniac =))))
But after searching on the Internet, I found a video recording of one dude who was talking about TRW GDB 1446 pads.
Then I found a blog post for Daseros (Lada Kalina) and asked him about the creaking, he answered me “I drove 15 thousand, there wasn’t a single creaking... these are pads for Europe. Excellent))) I’m shocked)”
The next day I started looking like crazy for TRW GDB 1446 pads, we didn’t have them in the car markets and in stores either! But after searching the Internet I found it on the website www.exist.ru/price.aspx?p >
Now they cost 1,228.33 rubles due to the dollar jump. And then they came, I immediately checked the license via my mobile phone using the QR code, everything was fine and not a fake =)
Difficulty : easy. Running time : 1 hour