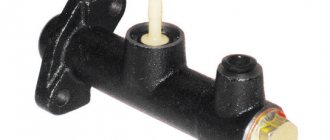
Brake master cylinder (MBC) is a device for converting the force from the brake pedal into hydraulic fluid pressure for further transmission of force through the hydraulic fluid (brake fluid) to the brake caliper piston. The GTZ is located in the upper part of the vacuum brake booster (VUT). Above the master cylinder there is a reservoir filled with brake fluid.
In general, the part is quite reliable and has a long service life. However, brake cylinders wear out during operation, as a result of which they require inspection, replacement or repair. Read more in our article.
The design of the brake cylinder and the principle of operation of the GTZ
On the vast majority of cars, the cylinders are two-section, each section is responsible for a separate circuit of the brake system.
This is necessary for safety, since in the event of damage, the effectiveness of the braking system will decrease, but performance will remain intact.
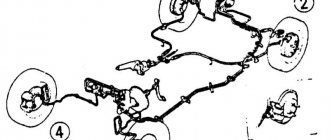
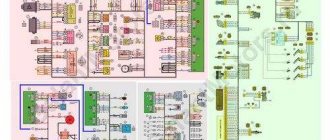
Brake master cylinder design:
- brake booster rod;
- retaining ring;
- primary circuit bypass hole;
- compensation hole of the primary circuit;
- first section of the tank;
- second section of the tank;
- bypass hole of the secondary circuit;
- compensation hole of the second circuit;
- return spring of the second piston;
- master cylinder body;
- cuff;
- second piston;
- cuff;
- return spring of the first piston;
- cuff;
- outer cuff;
- anther;
- first piston.
Removal and repair
To remove, repair and reinstall, you will need a minimum of tools:
- key to 13;
- special wrench for brake pipes;
- flat screwdriver;
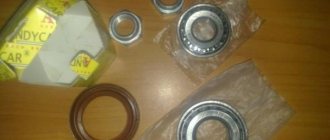
- brake master cylinder repair kit;
- brake fluid container;
- syringe;
- brake fluid.
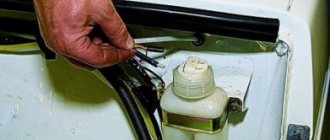
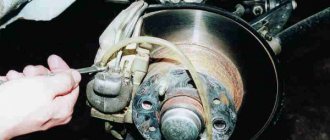
To avoid spilling brake fluid from the reservoir, it must be poured into a prepared container using a syringe. The procedure for removing the cylinder is as follows:
- loosen the rubber hose clamps on the brake cylinder fittings;
- remove the hoses coming from the brake fluid reservoir to the cylinder fittings;
- use a special wrench to unscrew the three brake pipes;
Note: the tightening torque of the brake pipes is very high; attempts to unscrew them using a conventional open-end wrench can lead to the edges breaking off.
- unscrew the nuts securing the main brake cylinder to the vacuum booster;
- remove the brake cylinder.
Now it is necessary to disassemble the master brake cylinder and inspect it for scratches or shells; if they are not found, if the mirror is clean, then repair is possible, otherwise, replace the master brake cylinder with a new one. At this stage there should not be any problems - you need to unscrew the locking screws one by one, starting from the plug. When you unscrew the second screw, hold the piston so that it does not fly out under the force of the spring. The first piston will come out on its own, the second will need to be knocked out, tap the body on a piece of wood.
How does the master cylinder work?
There are 2 pistons located one behind the other in the housing. When the driver presses the brake pedal, the force is transmitted through the rod to the first piston, which moves forward. Due to this, the brake fluid is compressed, thereby forming pressure in the first brake circuit.
Also, the first piston pushes the second piston forward. This piston creates pressure in the second circuit. The compartments that appear when the pistons move inside the housing receive liquid from the compensation tank.
After releasing the brake pedal, the return springs return the pistons to their original position, and the pressure inside the cylinder is again equalized by the brake fluid in the reservoir. This scheme of operation of the GTZ makes it possible to very quickly transfer force through practically incompressible brake fluid to each of the brake cylinders on the wheels.
By the way, the compensation tank also has two sections. If leaks occur, fluid will remain in at least one section. There is an additional brake fluid level sensor inside the reservoir. When the level drops significantly, the corresponding indicator lights up on the instrument panel. To increase reliability, some gas turbine engines use two tanks at once.
Repair kit for master brake cylinder VAZ 2110
Before repairing the GTZ on a VAZ 2110, you need to purchase a repair kit to replace its worn parts and a special key. The key is necessary in order not to tear off the edges of the brake pipe fittings when unscrewing them on the master cylinder body.
With this version, it is not possible to control the rear brake using the thumb master cylinder and pedal at the same time, only one of them can be used. But after his injury, Valentino wanted a solution with two separate circuits to control the master cylinder and pedal simultaneously.
After all, Brembo knows Valentino very well, having been by his side since his World Cup debut. Dutch doctors acted on his right leg, but there were complications overnight that put him at risk of amputation. The Australian urgently called Dr. Claudio Costa, who loaded him on a stretcher and brought him to Italy. The founder of the mobile clinic was able to save Dohan's leg, but it never regained the strength it once had. Doohan could no longer control the rear brake with the right pedal.
They are divided into complete and incomplete. In full repair kit
includes all cuffs, boot, springs, washers, as well as plastic cones for installing new cuffs on the piston body.
An incomplete set
usually includes only the master cylinder cuffs themselves.
The hydraulic brake system of any passenger car consists of many components and elements. In this article we will look at the design and principle of operation of the most important component of the brake system - the master cylinder.
. This unit is designed to convert the mechanical force on the brake pedal into fluid pressure in the system and ensure effective deceleration of the vehicle. Effective operation is ensured only if a special brake fluid is used, which does not compress and has a high boiling point.
He needed a steering wheel control that could perform the same function. And that's how the rear brake master cylinder appeared. The severity of Valentino Rossi's injury does not compare to Dohan's injury, but still Dr. No Rossi's desire to ride the bike improved both of them again. He also has less than 100% strength in his right leg. Therefore, to control the rear brake, he had to use a lever located under the left half of the handlebar more than he was used to.
Brake system diagnostics
Practically speaking, the thumb master cylinder works as a kind of traction control: it's activated mid-corner to stay close to the tire's traction point, straightening the bike as quickly as possible. And on the right side, riders with larger feet find it easier to use the peak of a lean angle because there is no risk of the right boot making contact with the asphalt.
To ensure maximum system reliability and increase the level of safety, almost all modern cars are equipped with two-section master cylinders, which divide the system into two practically independent circuits. A two-section brake cylinder ensures full or partial preservation of the functionality of the brake system in the event of loss of tightness of any circuit.
Brake master cylinder: signs of malfunction
The GTZ is a reliable device, but over time, individual elements in its design fail. The list of main signs of problems with the brake master cylinder includes the following:
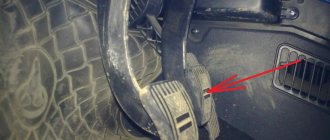
- the brake pedal fails;
- the brakes are applied at the end of the pedal stroke;
- brake pedal travel reduced;
- braking requires a lot of force;
- the brake pads are constantly pressed against the brake discs;
At the slightest sign that the brake system's response to pressing the brake pedal has changed, it is necessary to diagnose and repair the problem. Please note that such problems do not always indicate that the brake master cylinder is faulty.
In some cases, it may be necessary to completely replace the turbocharger or repair the master brake cylinder, while in others a completely different element turns out to be faulty.
For this reason, it is necessary to pay attention to how the car behaves when braking:
- a clear deviation from a given trajectory when you smoothly press the brake when driving on a flat road. This symptom usually indicates problems in one brake circuit or on one wheel.
- A creaking or grinding sound is heard when braking, a beating is noticeable. The problem is in the pads or brake discs.
- Significant overheating of the brake discs is noticeable. In this case, you need to pay attention to the brake calipers themselves.
If no such signs are found, then there is a high probability of problems with the master brake cylinder.
Causes of GTZ failure
As a rule, among the main causes of failure of the main brake cylinder, experts identify:
- Using low-quality/inappropriate brake fluid, resulting in damage to rubber seals and seals. The result is that the gas turbine engine is leaking.
- Brake fluid is replaced irregularly; the fluid “accumulates” moisture and loses its properties. As a result, metal parts oxidize, rust appears, valves become clogged, etc.;
- After poor-quality repair of the GTZ, the functionality of the device is not restored or partially restored. In this case, the brake master cylinder may leak, valves may not function properly, bypass may occur, etc.
For example, if brake fluid flows inside the main brake cylinder, and the required pressure is not created, then the main brake cylinder is bypassed.
We also recommend reading the article about why the engine stalls when you press the brake. From this article you will learn about the reasons for the unstable operation of the motor when you press the brake pedal, as well as how to fix this problem.
In this case, the level of brake fluid in the reservoir does not decrease, but the brake pedal sinks (as if there was a leak). If checking the VUT (with the car turned off, press the brake pedal 3-5 times) gives a positive result and the amplifier is in order, then the GTZ is bypassed.
This occurs because the cuffs are worn or damaged. In this case, pressing the brake pedal does not create the necessary pressure and the brakes do not work.
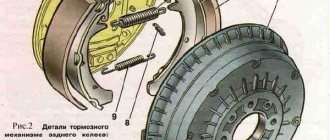
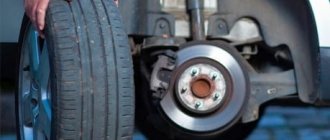
Carrying out work on rear mechanisms on VAZ classic models
First, let's look at how to properly bleed the brakes on a Classic. To perform the operation correctly, it is necessary to take into account that on the VAZ-2106 or any other model, the brakes are dual-circuit. That is, the entire system is divided into two independent parts. This was done so that if one of the circuits depressurizes, the second remains operational and the car can stop. But it is important to understand that the separation into circuits occurs on the master cylinder, and if air enters the system due to lack of fluid, it will be in both components.
For all classic models, including the VAZ-2107 brakes, the circuits separate the front and rear wheel drives. This must be taken into account when it is necessary to bleed the brakes of a 2101 or another model.
By the way, if only one circuit is aired, then it is not necessary to bleed the second one, although it would not be superfluous to treat all mechanisms, both front and rear.
So, everything is prepared, and you can get started.
The sequence of actions is as follows:
- It is better to drive the car into a pit to make it easier to get to the fittings. At the same time, he is immobilized using a handbrake or wheel chocks;
- Remove the cap from the brake fluid reservoir, check the level, and if necessary, bring it to the maximum level;
- First, we bleed the rear brakes of the VAZ, since the entire operation is done from the brake mechanism, which is as far as possible from the master cylinder, that is, from the right rear wheel;
- We put the assistant in the driver's seat. We climb under the car ourselves, put the key on the fitting, and then put the prepared tube on it, the second end of which should be lowered into a container with a small amount of liquid poured into it. It is advisable to immediately tear the fitting out of place and immediately screw it back, even before pumping. This is done so that there is no hitch in the process due to a non-unscrewing fitting;
- We ask the assistant to press the brake pedal 5-6 times. At the same time, with each press the failure will be less and less - the drive is pumped with liquid, while air moves to the mechanisms. After downloading the system, the assistant should hold down the pedal - press and hold it;
- Unscrew the fitting half a turn, working fluid will begin to flow out of it. If a transparent tube is used, air bubbles will be clearly visible in it, and the pedal being held will begin to move down until it hits the floor. In this position, the assistant must hold it, at this time the fitting must be screwed back;
- This sequence of actions should be carried out for one mechanism 4-5 times to completely remove air;
- On the “classic”, the left rear wheel is pumped next (since they are combined into one circuit). But before that, you need to check the level of the tank and bring it to the maximum level. The sequence of actions is the same: pump the brakes and hold the pedal - release the fitting to drain the fluid with air (the pedal goes down) - tighten the fitting - pump again. And so 4-5 times;
Note that this sequence of actions is identical for all cars. The difference lies only in some design features of the system itself.