Cars admin26.02.2020
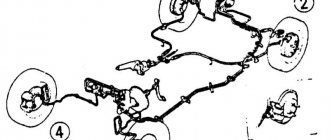
On Gazelle trucks, the bearing for the front hub, as well as the entire chassis, experiences increased loads. And if we add to this bad roads, quite frequent driving with overload, as well as not always high-quality parts, it becomes clear that the bearing for the Gazelle front hub has to be replaced quite often.
However, it is extremely important to perform this procedure correctly to avoid additional risk or monetary costs. Below is information on how to recognize a malfunction in time and how to replace the front wheel bearings with a Gazelle Next, 3302 or Business.
The article is also suitable for owners of GAZ 2705, 3221, 32212, 32213, 32217, 3302, 33021, 33023, 33027 GAZelle and 2217, 22171, 2752 Sobol (and modifications).
When to change brake discs
There is no specific operating time or set mileage of the car in case of replacing the TD. And yet, many car enthusiasts face this problem.
Signs of a faulty brake system are determined quite simply:
- squeaking around the wheels when you press the brakes;
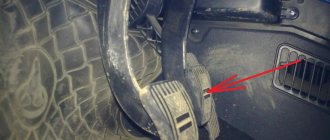
- increased brake pedal travel, so-called sagging;
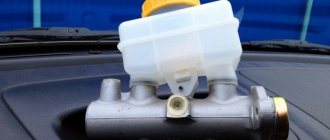
- a significant decrease in the fluid level in the main brake reservoir;
- When you press the brakes, the car pulls to the side or a vibration is felt.
What caused the appearance of such signs of malfunction in the vehicle is determined by a visual inspection of the condition of the mechanisms, in particular, the degree of wear of the brake discs and pads on all wheels is determined. Based on its results, a decision is made whether the brake pads need to be changed or whether the brake discs need to be replaced.
The need to replace disks
The regulated period established by manufacturers for replacing a disc is not always available to car owners. In most cases, this parameter is controlled based on operating hours for each vehicle. Replacement is carried out when negative indirect signs are identified. The main problematic symptoms are:
- strong squeaking sound when pressing the brake pedal;
- prolonged pedal stroke while pressing, the appearance of dips;
- a noticeable decrease in brake fluid, which can be seen from the level in the expansion tank;
- When pressing the brake pedal, the driver feels the car pull to the side or a beating occurs.
Preparing to replace the AP
Having determined that the TD is faulty, you need to prepare to change them yourself. To do this, you first need to buy a new spare part from a car store.
When choosing brake discs for his car, the car owner must take into account his driving style. Does he like to accelerate sharply and actively maneuver? How often does he use the brakes? He drives a lot around the city or mostly intercity trips on the highway.
The spare part from which manufacturer you need to buy depends on these factors. Discs can be standard or sports.
- Standard TD - made of cast iron, the casting is processed on a milling machine. They are ventilated and non-ventilated. Without ventilation, it is a single disc that is pressed on both sides by brake pads. A disk with ventilation is easy to distinguish - it is two disks connected by bulkheads. Ventilation occurs during movement due to air entering between these pancakes. Some of the respected manufacturers of these products are Bosh, Zimmerman, ATE.
- Sports TD - made of durable and ultra-strong gray cast iron, as well as austenitic stainless steel. These are considered to be more durable products that can last much longer and with more aggressive driving. Such discs are produced by EBC, DBA, Brembo.
The driver must remember that when the front brake discs are replaced, they must be changed in pairs, even if one of them is suitable for further use in all respects. The same rule applies to rear brakes.
This rule is explained by the fact that unequal weight of the same type of spare part on the wheels of the same axle will lead to loss of directional stability.
Thus, for repairs, two or four TDs are purchased, but in no case one or three.
In the garage or at a special technical site, the tools and materials needed for repairs are prepared in advance.
- Jack and wheel wrench.
- Keys to "13" and "17".
- Ratchet wrench.
- Large flathead screwdriver.
- Thin flathead screwdriver.
- Clamp.
- A piece of wire to fix the stupor.
- Hammer.
- WD fluid to unscrew stuck fasteners.
- Brake fluid, in case of bleeding the brakes.
- Rags.
Place the machine in a hole or on a prepared level area. Decide in advance whether the rear brake discs need to be replaced or only the front ones need to be replaced. This determines how to jack up the car. Raise the entire side or just the front wheels.
Preparatory operations
You can dismantle the old disk and install a new one yourself, even in a garage. You will first need to buy wheels suitable for your specific car model. This must be done carefully, since sometimes even the year of manufacture of the same car affects the parts being installed.
It is worth choosing a specific manufacturer of these spare parts based on your driving style. The required characteristics for a driver who uses an active style with frequent use of the brake pedal or for a driver who spends most of his time on a country road will be different.
It is customary to divide TDs into classic (standard) and sports (reinforced):
- The classic design uses malleable cast iron, machined to the desired dimensions. Non-ventilated and ventilated specimens are available. In the first case, the basis is a single disc, next to which a caliper with brake pads is installed. In the second case, a dual system of disks separated by ribs is used. Due to the entry of air between them, the unit is ventilated. Popular brands that manufacture these parts are ATE, Zimmerman, Bosh.
- In the production of reinforced discs, more durable grades of cast iron or high-alloy stainless steel are used. These elements provide longer service life under increased loads while driving. Well-known brands in this area offer more expensive products. Most often in auto stores you can find brands such as Brembo, DBA, EBC.
Brake discs must be replaced in pairs on both sides of the axle.
This will ensure proper operation of the entire braking system. Even if one of the sides is in satisfactory condition after visual inspection, and the other is significantly worn, it is recommended to replace both disks. If dismantling work is carried out on one side, then the discrepancy will lead to loss of directional stability. The rule applies to both the front and rear axles.
To carry out installation and dismantling work you will need the following tools:
- car jack (mechanical, hydraulic, pneumatic);
- clamp;
- a hammer with a wooden handle (a rubber or wooden mallet is allowed), in some cases a reverse hammer is used;
- a set of wrenches and screwdrivers;
- rust treatment fluids (WD-40 or analogues);
- brake fluid, if bleeding of the brakes is required;
- clean rags and personal protective equipment (work gloves, safety glasses, etc.);
- metal brush or power tool with a special attachment;
- torque wrench.
How to remove a brake disc
In order to replace a failed TD, you need to perform a series of actions sequentially.
- Press out the piston of the brake working cylinder.
- Disconnect the caliper. To do this, two mounting bolts are unscrewed from the inside of the hub.
- Without disconnecting the brake hoses, move the caliper, thereby freeing the disc. Release the brake pads and secure them with a clamp.
- Secure the caliper using the prepared wire.
- On some car models, the caliper frame interferes with disc removal. In these cases, you need to unscrew the frame fastening and remove it.
- Before removing the TD from the hub, you need to unscrew the stuck fastening bolt, having previously lubricated the mounting location with WD fluid or brake fluid, if it is not available. There may be one or two such bolts securing the disc to the hub. It depends on the car model.
- Once the mounting bolts have been removed, you can begin to remove the TD. Often, it is stuck to the surface of the hub. To facilitate its dismantling, you need to lightly tap it with a hammer to separate it from the wall of the adjacent part.
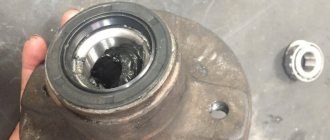
- After removing the old brake disc, be sure to remove rust, scale and dirt from the surface of the hub. If this is not done, then after installing a new spare part, the hub will run out more than the permissible value.
- Install a new disk in the free space. During its installation, a torque wrench is used to tighten the mounting bolts. Torque force - 100-120 Nm. If you overtighten the fasteners, this can lead to radial runout of the hub.
- Assembling the brake mechanism on a new disc is carried out in the reverse order.
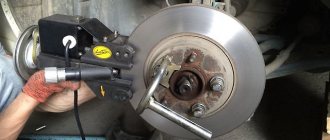
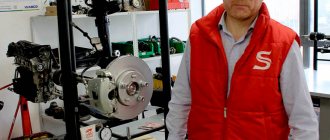
- After the brake mechanism with the new disc is assembled, the runout of the hub and disc is checked. To do this, a special meter is installed with a needle at a distance of 5 mm from the surface of the new disk, which must be rotated. The runout should not exceed the value permitted for a specific vehicle model.
- In the same way, the brake disc on the opposite wheel is changed, and the rear brake discs are also replaced.
Experience shows that replacing brake discs, although a labor-intensive process, is relatively simple. However, if the driver does not have enough skills in handling the tool, it is better to seek help from professionals.
Replacement process
The machine for repair work is installed on a straight, level surface. Use a jack to lift the required side and remove the wheel. In the opened space we free the disk for dismantling. Press the piston of the working cylinder to remove the caliper. First loosen the mounting bolts on it.
There is no need to disconnect the hydraulic pipes of the brake system; just move the unit to the side and pull it with a wire to any beam or rod. We unclench the brake pads and block them with a clamp.
In some assembly designs, dismantling is hindered by the caliper frame. It is enough to unscrew its fasteners and get rid of the obstacle. In most cases, the mounting bolt sticks and prevents removal from the hub. To weaken it, use WD-40 or brake fluid. Some machines have a pair of these bolts.
Having freed yourself from problematic hardware, you need to remove the stuck brake disc. Here you can also pre-use special fluids for corrosive areas. Then you need to apply one of the proven methods:
- Tapping with a wooden tip on the back side. This should be done with short sharp blows so as not to create problems.
- Using a wooden or rubber mallet, tap the reverse plane. This method is more gentle on the parts than using a heavier metal hammer.
- Apply a reverse hammer . To do this, you will need to buy or borrow this relatively rare but effective instrument.
- You can use a puller. However, you should feel the effort so as not to break the tool or disk, because in some cases stronger pullers can damage a heavily stuck part. Then you can forget about restoring the latter.
After getting rid of the old disk, we clean the surface from contaminants in the form of scale or dust. To do this, we use a metal brush or an attachment for power tools. Later we clean the surface with special liquids. If cleaning is not carried out, the new part may sit on the surface with large runout, which will lead to undesirable consequences.
Using a reverse hammer
We install the restored or new brake disc in the free space. The bolts for fastening it will need to be tightened with a force of 20 Nm , which a torque wrench will help with. The caliper will require increased force, which should be in the range of 100...120 Nm . Do not over-tighten the fasteners to avoid radial runout of the hub. The remaining elements of the unit are assembled in the reverse order of disassembly. Be sure to check the position of the hoses so that they are in their proper places.
Brake discs stuck
- Posts: 871
- Thanks received: 403
The subject itself. I wanted to change it, but that was not the case. He spilled water and knocked, but the damned ones don’t give in. In the dismantling holes, the bolts were curled together. Should I cut them with a grinder?
Trouble on Vitara - forgot to write
Please Login or Register to join the conversation.
- Makar
- –>
- Offline
- Posts: 2982
- Thanks received: 1615
Please Login or Register to join the conversation.
- Rufflet
- –>
- Offline
- Posts: 6743
- Thanks received: 3634
Please Login or Register to join the conversation.
- Buba
- Topic author –>
- Offline
- Posts: 871
- Thanks received: 403
Please Login or Register to join the conversation.
- Makar
- –>
- Offline
- Posts: 2982
- Thanks received: 1615