How to clean and change VAZ 2110 injectors?
In what situations is it necessary to change injectors?
Replacing injectors on VAZ 2110 vehicles is required when they fail. The following typical symptoms may indicate this:
- Unstable operation of the power unit;
- Sudden loss of power;
- Increased fuel consumption;
- Jerks and dips when moving.
Injectors on VAZ cars
These symptoms may also indicate a malfunction of other parts of the car. In addition, it is possible that the injectors are simply clogged due to low-quality fuel. In this case, it is not at all necessary to replace them. It will be enough to clean the injectors using methods specially designed for this purpose. How is cleaning and replacement done? This is discussed further below.
Replacement technology
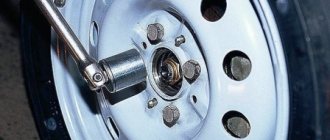
On VAZ 2110 cars, replacing injectors is carried out as follows. The first step is to disconnect the battery. Then you will need to remove the air filter. After this, disconnect the vacuum hose from the fuel pressure regulator. Next, press the plastic latch of the throttle position sensor connector and disconnect this connector. The same is done with the connector going to the idle air control regulator.
Now you need to unscrew the two bolts that secure the fuel rail, as well as the screw securing the fuel pipe holders. Then remove the holder itself. The fuel rail will need to be carefully moved along the axis of the injectors. The ramp should be removed from under the receiver with extreme care, as there is a risk of damaging the injectors.
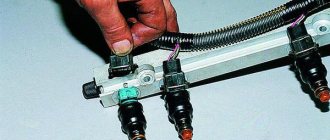
The next stage of work is to check the condition of the injectors. It is best to place them in transparent containers, first connecting them to the battery via wires. Next, you will need to turn on the starter and check the atomization of the fuel injectors. Each of them should spray the same amount. If one of the nozzles sprays less than the others, then most likely it needs replacement. In addition, it will be necessary to conduct a thorough inspection of the remaining devices for leaks.
A fuel injector that does not spray fuel needs further inspection. Perhaps it simply does not receive electrical power. It is necessary to disconnect the connector with wires from it. After this, you should directly connect the battery to the injector contacts and turn on the ignition. If in this situation the device begins to spray fuel, this will mean that the malfunction is hidden in the electrical circuit.
Experts advise measuring the resistance of the device windings. It should be in the range of eleven to fifteen ohms. Otherwise, such a fuel injector for VAZ 2110 vehicles is faulty. She needs replacement.
The process begins by reducing the pressure in the power system. Disconnect the wire connector from the fuel pump, and then turn on the starter and crank the engine with it. The starter is turned off when the fuel stops spraying. After this, the battery is disconnected on VAZ cars. Next, disconnect the connector with wires from the injector that needs replacement. Then move its lock to the side and remove the injector from the fuel rail.
Install the device in the reverse order, first lubricating the O-rings with gasoline. If the clamps do not hold the injectors securely, then they also need to be replaced. To do this, you just need to move them to the edge of the ramp. If on a VAZ car the ramp itself needs to be replaced, then the connector with wires, as well as the hoses, are disconnected from it.
Cleaning technology
Cleaning the injectors of VAZ cars is necessary if they are contaminated with deposits coming along with the fuel. Today, the market offers a huge number of different chemical additives, which experts recommend adding to the fuel tank to prevent and prevent clogging of injectors.
However, if cleaning is still necessary, then it can be done with your own hands. Most car enthusiasts can do this.
Cleaning injectors on VAZ cars of the tenth family is performed as follows. First you need to remove the injectors in the same way as when replacing them. Tubes from a can containing a special cleaning liquid are inserted into the removed devices. Such cans can be easily purchased at automobile stores. These tubes must be securely wrapped with insulating tape. We connect the can and inject the flushing liquid. This type of cleaning can be effective for different durations. It all depends on the degree of pollution. It must be remembered that getting the washing liquid on your hands or other parts of the body should be avoided. If it does get on the skin, it must be washed off as soon as possible.
autodont.ru
Procedure for cleaning and replacing rubber seals
It is best to remove the injectors from the fuel rail and blow and clean each of them, and at the same time inspect them for wear on the rings. This method has a huge advantage over using an additive, since you can visually check how well the restoration work was carried out.
What tool can you use to make repairs?
To dismantle and replace seals you will need:
- diamond key 8;
- carburetor cleaner;
- a can of compressed air;
- rubber hose (you can use a vacuum cleaner);
- syringe with outlet diameter 10 mm;
- wire approximately 2 meters long;
- standard set of rings for injectors (includes eight products);
- rubber seals for fuel lines.
The repair and cleaning process is as follows:
- Remove the rubber seal from the nozzle.
- Place the rubber hose on the tail part of the nozzle.
- Connect the wire to the battery (you can choose any terminal).
- On the reverse side of the hose, connect an aerosol tube through a syringe to flush the carburetor.
- Holding the entire structure with your hands, spray the cleaner several times until the jets emitted become uniform.
- After cleaning, it is recommended to use the same principle to blow out the injectors with air from a can.
- Next, it is recommended to immediately put new rings on the product, after moistening them with gasoline.
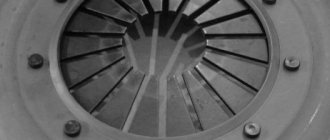
In the photo the nozzle is in critical condition
The injector repair procedure can be considered accessible to beginners and inexperienced drivers. The only difficulty is dismantling the fuel rail, since you will have to first relieve the pressure in the system. Cleaning and replacing the rings on the injectors with your own hands gives the driver the opportunity to carry out the highest quality repairs of these elements and be confident that repeating the procedure will not be necessary for a long time.
We install new injectors on a VAZ 2110
If the car injectors become dirty, the engine will gradually lose power. As the car accelerates, engine problems will begin to become more noticeable and fuel consumption will increase. The injectors will need cleaning.
Only a small number of problems arise due to contamination, which is why the VAZ 2110 injectors must be washed on time. This is done when you do not see any obvious deviations, but the car’s mileage has already exceeded 100 thousand km. The main signals that there are problems with the engine are the following factors:
- its launch is difficult;
- works unstably, it lacks the previous stability;
- it begins to stall after working for a certain time;
- the crankshaft begins to make more revolutions;
- the engine does not have enough power;
- when the car moves, it works jerkily;
- gasoline is consumed inappropriately over the distance, and the injector itself is significantly dirty;
- processed gas waste contains an increased amount of CO and CH compounds (this can be found out when inspecting the car at a car service center);
- the injectors become leaky, producing drip ignition.
Return to contents
Preparation for dismantling
Replacing injectors may not be necessary for much longer if you purchase special additives added to the fuel. Thanks to them, the injector stays clean longer. But you shouldn’t shift all the responsibility onto them, because with prolonged use, dirt and deposits formed create a kind of blockage for the passage of fuel, and this, in turn, causes irreparable damage to the engine.
Of course, you can contact a service center, where they will not only clean the injectors, but also check the machine. However, you can carry out the repairs yourself, because this way you can save a lot. Please keep in mind that the ramp on which the injectors are located is a kind of “center” in each machine. Any independent intervention, including cleaning the injectors, can result in significant damage.
To replace, you must purchase the goods that will be required for the job. First of all, this is a special product for cleaning the injector; it is sold in special aerosol cans. It is advisable to replace the rings on the injectors themselves. It would be useful to purchase any button, a light bulb whose power will not exceed 21 W, and a chip used to connect the wires to the injectors.
It is also necessary to pay attention to some features of dismantling. Before removing the injectors, be sure to ensure that the engine has cooled down. Then it is necessary to completely de-energize the fuel pump. To do this, all wires responsible for power will need to be disconnected. Next, you need to reduce the pressure in the motor as much as possible. They simply start the engine and wait for the engine to stall. Repeat several times until the engine stops starting.
Return to contents
Sequence of replacement work
To replace the injectors, follow these steps:
- Disconnect all wires from the battery.
- Next, separate all the mounting brackets holding the engine guard in place.
- Proceed to remove the air filter on which the hoses are attached. Disconnect the hose from the device responsible for reading the gasoline pressure, the block from the idle air regulator. Keep in mind that it is held in place by a clamp. Next, disconnect the block from the wires, folded in the form of bundles.
- Now you need to carefully unscrew the two bolts located in the ramp mount. There are flat washers under the bolt heads. Therefore, in order to avoid losses, the excavation must be done using tweezers. Now unscrew the mounting screw used to hold the tubes through which the fuel passes. Carefully remove the holder itself so that the spring washer does not get lost. Next, the fuel rail is carefully moved along the injectors until it completely exits the holes in the engine pipe. To avoid breaking them, carefully remove the ramp from under the receiver. The slightest carelessness when performing this work will lead to catastrophic consequences and costly repairs.
- Remove the injectors from the ramp using a slight rocking motion. To ensure that as little dirt as possible gets on the parts, the already removed injectors are covered with a cloth, and the place where they were in the car is hidden under any material. The main thing is that there are no large gaps.
Return to contents
Troubleshooting
After you remove the injectors, proceed to carefully inspect them. When the removal of the VAZ 2110 injectors is completed, you can see that one of them remains in the inner pipe of the engine. It will be necessary to replace its retainer and the rings responsible for the seal. In addition, injectors are also replaced when the rings lose the elasticity of their coating or when there are cracks.
Check how the injectors spray. Connect the harnesses and attach everything to the battery. Then place the nozzle in a glass container and turn on the starter to see if the gasoline is spraying correctly. Each nozzle must have at least 4 jets, in addition, the gasoline that is carried through them in containers must be at the same level. If the sprayer begins to leak, the nozzle needs to be replaced.
If it does not spray at all, you need to check whether the nozzle is receiving power. If it does not pass gasoline, disconnect the wires leading from the block and connect the battery directly with the ignition on. If it starts spraying gasoline, it means there is a problem in the electrical circuit. After the injectors have been replaced or cleaned, they will need to be reassembled, but before that, lubricate each ring with gasoline.
If the car has low-quality fasteners, they will also have to be replaced. To do this you will need to move them to the edge of the ramp. If you need to replace the fuel rail, unfasten all the wires and harnesses and install a new one, connecting all the parts in the reverse order. Good luck!
expertvaz.ru
Procedure for removing oil injectors
Before you begin removing injectors from any car of the tenth VAZ family, you will need to relieve the pressure in the fuel system. Removing any element that is under pressure in any way can result in personal injury.
How to get rid of excess fuel
To relieve the existing fuel pressure, you need to turn off the fuel pump and exhaust the remaining gasoline:
- Fold down the cushion from the back row of seats.
- Below it is the fuel tank hatch.
- Unscrew the screws securing the hatch.
- Disconnect the wiring harness from the pump housing (the wires supply power).
After this, start the engine and wait until it stalls. It is recommended to turn the ignition on several times to ensure that there is no gasoline left in the system.
Next, you can begin to remove the injectors. It is recommended to prepare the necessary tools in advance:
- open-end wrench 17;
- a flat screwdriver with a narrow blade;
- Phillips screwdriver;
- hex key 6;
- rags.
All elements of the repair kit are usually at hand for any driver
How to remove parts from the engine
- Remove the air filter box (it will interfere with free access to the engine).
- Remove the wiring harnesses from the injectors.
- Then you will need to disconnect the wires from the idle speed control and from the throttle sensor.
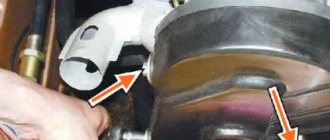
- Next, remove the vacuum seal from the pressure regulator (it has a white braid).
- Using a 17 key, unscrew the bolts that secure the fuel frame to the body. To make it more convenient, you can remove the gas cable.
- It is better to unscrew the fasteners of the plate with which the ramp is pressed using a hexagon.
- The fuel rail must be removed very carefully, with the nozzles facing up.
- On a 16-valve engine, dismantling will take longer, since the ramp has a more complex structure and several types of fasteners.
- Next, you can remove the injectors themselves - to do this, disconnect the fastening brackets of the electrical connector with your finger, and then the injector bracket. During removal, gasoline may leak; it is recommended to place a cloth under the ramp.
To install a new injector, the socket is first thoroughly cleaned of dirt and fuel, and only then can the product be screwed in. It is better to drop a few drops of gasoline onto the rubber ring before installation - this will make the nozzle fit into the mounting hole more easily. All work is then carried out in reverse order.
Read more: Changing the oil to another manufacturer
How to remove and clean injectors on a VAZ 2110
There are a huge number of gas stations in our country, but not all of them have fuel quality that meets the standards and needs of the cars themselves. Various contaminants and impurities in gasoline lead to disruption of the quality and efficiency of the engine and its elements. Such as injectors. You can replace them if necessary or clean them yourself.
Symptoms of a problem
With proper care, the injectors on the VAZ 2110 can last quite a long time. But when the first signs of malfunction appear, it is recommended to immediately clean the elements. What are the symptoms?
- The engine starts with certain difficulties;
- Fuel consumption increases;
- Power and thrust drop;
- In winter, the car sometimes jerks;
- The engine starts to stall, etc.
If you notice at least one of the symptoms, be sure to check the injectors and decide whether to clean or replace.
Cleaning methods
There are three main ways that will allow you to clean your injectors. Decide for yourself which one to use.
| Way | Peculiarities |
| Automotive chemistry | Quite effective, but financially expensive. Plus, working with chemicals is risky because it is very dangerous to your health. Cleaning is carried out only in full compliance with safety regulations |
| Service station services | Car services will now do everything for your money. But you'll have to pay a lot. Don’t forget that finding a really good, responsible and inexpensive service station is something out of the realm of fantasy. Therefore, either questionable quality of work, or impressive money for effective cleaning |
| Do-it-yourself cleaning | The most economically profitable way to save money and complete the task efficiently. You should choose this option only if you have an idea about the design of the motor, the location and functions of the injectors |
Do not carry out cleaning yourself if you have never climbed into the engine compartment yourself to replace or repair engine components. Trust trusted specialists, do not take risks.
Before and after cleaning
Dismantling
Before replacing or cleaning the injectors, they will need to be removed from the fuel rail. To achieve this, the following activities are carried out:
- Make sure the engine has cooled down properly. It is not safe to work on a hot engine;
- Disconnect the power wires from the fuel pump to de-energize the device;
- Try to reduce the pressure in the engine power system as much as possible. To do this, the engine starts, and then you need to wait until it stalls at idle speed;
- Repeat this procedure several times until the car simply stops responding to turns of the ignition key;
- That's it, now our goal is the fuel rail. To remove it, you must first remove the terminals from the battery, turn off the power to the ramp itself, disconnect the fuel supply hoses, and also disconnect all electrical appliances going to it. These are pressure, idle, throttle position sensors;
- If you have an 8-valve engine, then you do not need to remove the receiver. This step is relevant for engines with 16 valves;
- Experts do not recommend removing the intake manifold without dismantling the throttle valve and the hose going to it. It is better to unscrew and disconnect everything at once, which will allow you to continue working more conveniently;
- Cover the exhaust manifold openings with something to protect them from foreign objects;
- Using a hex wrench, you can unscrew a couple of bolts and remove the fuel rail along with the injectors;
- Make sure that there are no distortions when removing the ramp, otherwise problems may arise with the dismantling processes;
- We remove the injectors. To do this, remove the mounting brackets that hold the electrical connector. You also need to remove the bracket that holds the injector in its seat.
After dismantling the elements, be sure to close the seats to prevent debris and other objects from getting in, and place the nozzles themselves on a table or floor, after laying down a dry rag.
Here you can decide whether to change or clean the elements of the fuel system. If replacement is required, install new injectors in place of the old ones and follow the assembly procedure.
Cleaning
Here proceed as follows.
- Remove the rubber rings from the injectors, and when cleaning is finished, replace them with new seals.
- The cleaning process should begin with the nozzles, on which various deposits form as the car is used.
- Be sure to thoroughly clean the funnel-shaped surfaces where tar deposits accumulate.
- The next step is the fuel mixture supply channels.
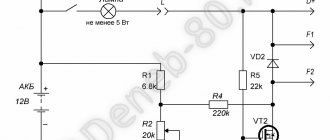
- To open the solenoid valve to supply fuel, you will have to trick the device with a 5-7 V power supply.
- Some use stabilized voltage sources, phone chargers, or even a car battery. If using a battery, the voltage should be supplied through the light bulb. It will play the role of a current damper. Otherwise you risk burning the winding.
- Electricity is supplied through two wires, in the gap of one of which a button is installed. It will close and open the network. This creates an imitation of the operation of an injector in an engine due to the influence of a pulsed electric charge.
- You can supply the cleaning liquid to clean the injectors through a can of carburetor cleaner. Inexpensive and effective, even better than specialized chemicals.
- Be sure to tightly connect the cylinder and nozzle with a rubber tube, clamps and any other means.
- All is ready? You can then apply electricity to open the injector. At the same time, press the button on the cleaning agent canister.
- Soon the torch of the liquid jet, which will exit through the fuel atomizer of the injector, will change its “clumsy” direction and will begin to uniformly exit the nozzle. This indicates that you have removed all carbon deposits.
Homemade cleaning device
Before replacing the cleaned injector, check its actual condition.
Examination
To check you need:
- Measure the injector resistance using a multimeter. If the readings are within 10-15 ohms, the injector is working;
- If you deviate from these limits, cleaning is pointless. You only need to change the injectors;
- Check devices for leaks;
- To do this, when cleaning, do not turn on the electrical pulse so that the nozzle does not open;
- Under pressure, a device with a broken seal will begin to show signs of leakage. Therefore, the element must be replaced.
Injectors cannot be repaired or disassembled into parts to restore functionality. If the resistance and tightness are broken, the devices must be replaced with new ones.
Cleaning the injectors is quite easy if you properly construct the device for this procedure. If you don’t have such skills, contact a good car service center.
No Comments Yet! You can be first to comment this post! Close Window
Loading, Please Wait!
This may take a second or two.
luxvaz.ru
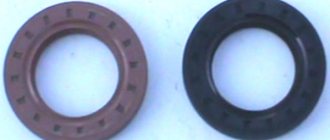
Types of injector sealing rings
Inlet or upper o-rings are found on both gasoline and diesel injectors. They serve to eliminate air leaks and fuel leakage at the point where the injector is connected to the fuel line. Most often they are made of rubber, because:
- no large mechanical loads;
- the temperature effect is small due to the distance to the hot engine;
- rubber is characterized by high elasticity;
- slow loss of properties under the influence of an aggressive environment.
The lower seal operates under more severe conditions, so the following options are possible:
- metal ring;
- alloy seal;
- rubber, made of a special composition, capable of withstanding temperature and mechanical stress.
To increase reliability, it is possible to simultaneously use a metal and elastic seal. In this case, the lower ring is made of a resistant material, for example, copper, and serves as a flame arrester. The upper ring is in this case protected from adverse influences. It is made of rubber, which ensures the tightness of the system at the proper level.