Let's see how to check the generator with a multimeter in the video
The car battery supplies it with electricity in splendid isolation only until the engine starts. After the engine starts, the generator helps it. The task of the generator is to ensure continuous recharging of the battery in all operating modes and under any load on it. But breakdowns happen. How to determine that the generator is to blame?
Signs of its malfunction are:
| Nature of the malfunction | Cause of malfunction |
| The battery is boiling over | Large charging current |
| Battery is running low | Charging current is low or absent |
| The “Lack of battery charge” light on the car’s instrument panel is on. | No charging current |
| The voltage in the on-board network is unstable | There is no stabilization of the charge current or there is no current. |
| Extraneous sounds in the generator | The bearings require replacement or the alternator belt is not tensioned. |
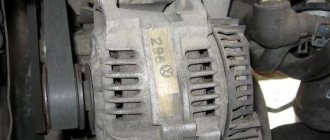
But first things first. The generator is not so easy to remove and to do this, you need good reasons.
Diagnosing a generator on a car with a multimeter / tester
Before inspections, the tension and technical condition of the generator belt
. The belt should not be overtightened, but it should not be loosened either. In the first case, the bearings will wear out prematurely, in the second, the rotor will slip when the electrical load increases. Slippage, in addition to reducing the voltage in the network, will also lead to premature wear of the belt. The belt itself should not be worn out and there should be no cracks on it.
If you smell burnt rubber from under the hood while the engine is running, the “no charge” lamp is on - the generator bearings are jammed
.
Increased noise, on the contrary, is caused by an increase in the gap in them
. This is checked by loosening the belt and shaking the rotor shaft in the radial direction. This only determines the play in the front bearing, but it is the one that suffers first.
If the mechanics are in order, check the electrical characteristics
. To do this, you will need a device capable of accurately measuring a direct voltage of 12 - 16 V. Moreover, the scale (or digital indicator) at this measurement limit must show values with tenths, otherwise the measurements are meaningless. Both a pointer tester and a multimeter are suitable.
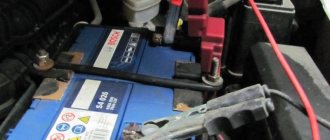
We connect the device directly to the battery, observing the polarity. For digital instruments, reversing the polarity will not harm, but for analog instruments the needle will sharply hit the left limiter. You shouldn’t be afraid of this, the device will withstand it, but it’s not advisable to stay in this position for a long time.
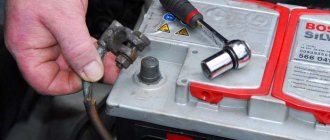
It is better to fix the measuring probes on the terminals
. You can use the services of an assistant, but using alligator clips is more convenient. The main requirement is that when the motor starts (it jerks) the clamps do not turn off spontaneously.
Before starting the engine
fix the battery voltage.
It should be in the range of 12.5 - 12.7 V
, depending on the degree of its charging, and the entire load is turned off. Don’t forget that when you open the doors, the light comes on in the cabin, and this is a small, but load. If the voltage is below 12 V, then it is better to charge the battery before the test. A working regulator will greatly reduce the voltage, trying to correct the situation and charge the battery as quickly as possible. And you will draw incorrect conclusions from this about its malfunction.
Now start the engine and warm it up
so that the rpm is equal to the idle speed for your model (usually within 800).
We control the voltage on the battery; you can start looking at the device scale while it is warming up.
should be between 13.5 and 14 V. And so on in all operating modes.
If the voltage at idle is below 13.0 V, then the problems may be as follows:
How to check the generator on a car without removing it?
Good afternoon. In today's article I will tell you how to check the generator on a car without removing it. Traditionally for our site, the article contains a lot of photos and video materials.
How does a generator work and why is it needed?
Modern cars have many consumers of electricity - from the car radio to the heated rear window. All these consumers require electrical energy to operate. Its main supplier is the generator. When it cannot cover all needs, for example in a traffic jam, the energy stored in the battery is consumed. Once conditions arise, the alternator replenishes the battery charge.
At the slightest malfunction of the generator, there may be problems with replenishing the battery charge and, as a result, problems with starting the engine.
You can clearly see the principle of operation of the generator in this video:
How to check the electrical part of the generator?
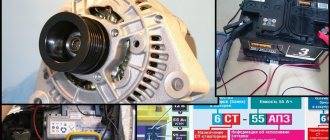
This is done with a special device - a multimeter. It is sold in any hardware store and costs 500-700 rubles, or you can order it directly in China, and it will cost, without trade markups, 300-350 rubles.
The verification scheme is as follows:
We turn on the multimeter in voltage measurement mode up to 20 volts DC.
We fix its probes on the wheels of the generator; with a fully charged battery, the device will show 12.5-12.9 volts.
We start the engine and let it run at high speed for 4-5 minutes.
If the generator is working properly, the voltage will rise to 14.5-14.7 Volts.
We gradually turn on the consumers (headlights, interior heater, heated glass, music, heated seats) and control the voltage. Even at idle it should not be below 13.5 volts.
If so, your generator is working.
Here is a video of checking the generator with a multimeter:
If you don’t have a multimeter, you can check the generator without it, but the accuracy of such a test is not high.
This is done as follows:
- Loosen the negative terminal on the battery.
- We start the engine and let it run so that the idle speed decreases.
- Remove the negative terminal from the battery.
If the engine does not stall, the generator can be considered serviceable. It is unacceptable to “accelerate” with the terminal removed!
Here is an example video of removing the battery from a car with the engine running:
Important Notes:
Many cars are equipped with a voltmeter, but its readings can be trusted very conditionally, since the accuracy of its readings is not great and often differs by 0.5-1 volts in any direction.
Checking the generator by removing the terminal is not always acceptable - not everywhere there is good access to the battery, and on complex cars, such a check is fraught with errors and the ignition of the check engine warning lamp.
We agreed that it is safer to check the electrical part of the generator with a multimeter, measuring the voltage on the battery. As a last resort, it is permissible to check the generator by disconnecting the negative terminal.
How to check the overrunning clutch without removing the alternator belt?
We have a separate article on our website about the purpose and check of serviceability of the overrunning clutch, so it will be brief.
When the engine is running, the overrunning clutch should not creak or make noise.
With the engine off, use a thin screwdriver to turn the generator armature.
Ideally, it should scroll in one direction and move away in the other. Here's a visual video:
If the overrunning clutch jams, the alternator belt, if extremely worn, may simply slip off.
How to check generator bearings?
In a good way, to check the bearings, you need to remove the generator belt. This is the only way to fully check the play and noise of the bearings.
There is an old-fashioned method of listening to bearings.
You will need a metal rod that is long enough.
With the engine running, we rest the bar against the generator, and bring the other end to the ear (ATTENTION, do not put the bar in your ear, you will already hear everything clearly).
This is done like this:
Malfunctions associated with broken contacts
You need to constantly monitor the cleanliness of the battery terminals, but you should not use sandpaper to clean oxides. It is better to scrape with a knife, and periodically loosen the contacts and grind the surfaces, turning the clamps on the terminal from side to side. And when checking the oil level, apply a couple of drops to the battery contacts.
Contact connections that should be checked in case of low charge voltage:
- Positive terminal: from battery to generator;
- Negative terminal: from the battery to the car body; from the car body to the engine housing.
Contact between the car bodies and the engine of VAZ models is ensured by a flexible connection under the bottom in the area of the gearbox
. The metal lead bends and additional resistance is added to the electrical circuit. And the minus of the generator is connected to the minus of the battery through it. Additional resistance is also introduced by rusty elements of the bodies of old cars.
The way out is to install an additional flexible connection from a 25mm2 conductor connected between any of the suitable bolted connections on the engine and the connection point of the negative terminal of the battery to the body.
Diagnostics of the voltage regulator operation
The task of the voltage regulator is to maintain the voltage on the battery in the range from 13.5 to 14 V
at all engine operating modes and at any load. Criteria for its performance:
- When you press the gas pedal and increase the engine speed, the voltage increases slightly, without leaving the permissible limits.
- When consumers are turned on: headlights, car radio, heater, air conditioner, the voltage drops below the permissible level only at idle. If you increase the speed (add gas), it returns to the operating range.
Check the serviceability of the regulator with the engine running by changing the speed by pressing the gas pedal. First, the experiment is carried out without load, then the headlights and heater are turned on, adding load. The voltage on the battery should not change significantly.
If this is not the case, the regulator is changed. On some models this is possible without removing the generator, but it is still recommended to remove it. Purpose: to further evaluate the condition of the brushes, remove dirt accumulated during their operation, and check the condition of the bearings.
How to check the voltage regulator
The regulator is checked in case of undercharging or overcharging of the battery. The voltage is measured at rpm; it should be in the range of 14.4 - 15V.
In addition, you can check the resistance of the regulator capacitor (at the moment the tester probes are connected, it should decrease until it approaches infinity).
With the generator voltage regulator removed, the condition of the brushes is inspected and serviceability is checked using a 12V light bulb and constant voltage. That is, you need to connect a light bulb to the brushes, and apply 12V to the positive terminal and ground of the regulator (the light bulb should be on, and go out when the voltage increases above 15V).
Read more: How to choose the right subwoofer for your car
Checking the generator brushes
To inspect the generator in detail, it is removed from the car. Then it is cleaned of contaminants. Remove the brush apparatus and, if necessary, the voltage regulator. The brushes must be worn evenly (their length is the same, and the wear from the rotor rings is symmetrical relative to the longitudinal axis). The remaining length of the brushes should be more than 4.5 mm (8-10 mm is considered the norm)
. If these parameters are not met, the brushes are replaced, even if the fault does not lie in them.
Along the way, you will need to remove the carbon dust formed when the brushes rub against the rotor rings.
To replace the voltage regulator or brushes, no further disassembly is required, but if the fault has not yet been found, open the back cover of the generator. Before this, you will need to unwind the positive output pin.
Checking the rectifier
The generator produces three-phase voltage, rectified by six diodes. The positive and negative terminals of the rectifier are made in the form of aluminum plates, which at the same time serve as radiators for cooling the diodes.
To check their serviceability, you will again need a multimeter or tester. We switch the device to resistance measurement mode. Then we measure the resistance of each diode in the forward and reverse directions one by one. To do this, change the polarity of connecting the probes of the device. In the forward direction, the resistance is low (but not zero). In reverse it is equal to infinity
. If this is not the case, the diode has failed.
If one diode is damaged, at least two more fail. It is impossible to accidentally leave a breakdown unattended. The diodes are replaced as a group, together with the radiator.
Checking the stator windings
Checking the stator begins with a visual inspection. We pay attention to external damage to the housing and insulation, and places where wires are burned during a short circuit.
The faulty unit should be rewound or replaced. If the external integrity of the wires is established, we begin to investigate using a tester.
Before starting work, you should make sure that the unit is disconnected from the network and that there is no contact between the leads of the stator windings.
When performing work to check the normal state of the node, we make sure:
Generator stator diagnostics
The stator winding is made of thick wire, so breaks in it are rare. Unless the contacts are unsoldered at the places where it is connected to the diodes, which needs to be checked.
Then inspect the winding for mechanical damage. They appear if the rotor shaft, due to increased bearing wear, has shifted to the side during operation. At the same time, its impeller touches the turns of the stator winding and damages them. Result: breaks, turn shorts or shorts to the housing.
The insulation of the stator conductors is restored. To do this, varnished fabric is laid between the turns. For fixation, the damaged area is coated with bakelite varnish and dried. The use of insulating tape is unacceptable; it will melt under the influence of the operating temperature inside the generator.
In the absence of visible damage, the winding turns may short-circuit to each other and to the housing. A turn fault can only be detected by a change in the color of a group of winding turns. It will not be possible to identify a defect by measurements, since the cross-section of the wire is large, and the number of turns, on the contrary, is small. The change in resistance across phases is so small that it is comparable to the transition resistance at the point where the probes of the device are connected. But the likelihood of a turn short circuit occurring, fortunately, is small.
But short circuits to the housing occur more often. To identify them, measure the resistance between any winding terminal and the housing. Use the highest limit of the multimeter to measure resistance. It is better to use a special device - a megohmmeter, but only on condition that the voltage it produces does not exceed 100 V. The operating voltage of the generator is 12-16 V; using megohmmeters for testing higher voltages will damage the insulation.
For any problems with the stator winding, the best solution is to replace it
. The stator is sold with a winding wound inside it. But rewinding it yourself, even with the involvement of specialist wrappers, will not justify itself.
Self-diagnosis
So we smoothly approached the issue of verification. If you don’t know how to check the functionality of a unit in your car, then first of all carry out a visual diagnosis of the device’s condition. If the check shows that there is no external damage, then a more thorough diagnosis is needed. Initially, you should check the winding for insulation damage; you will need a multimeter or a test lamp to check.
Before checking, one wire from the lamp must be connected to the armature shaft, and the other wires must be touched in turn to the collector plates. Please note that when checking, the wire tips must be reliably insulated. In the event that the armature winding shorts to ground, the light should blink.
To check the turn-to-turn short circuit you will need a special induction device. The core of the device in this case is made of metal, and the coil is powered using industrial alternating voltage. The armature is installed in the prism of the core, after which it must be rotated around its axis, and an iron plate must be connected to the metal. In the absence of short circuits, there will be no current in the winding (the author of the video is the Ramanych channel).
If there is a short circuit, then an electromotive force will be recorded in the closed turns. In this case, the alternating voltage will contribute to the formation of another magnetic field, so if there is one, then vibration will appear in the iron plates connected to the armature. The presence of vibration may indicate that there is a short circuit in the turns; if this is the case, then the only option to solve the problem is to rewind the armature.
Generator rotor diagnostics
When inspecting the rotor, pay attention to:
- wear on the slip rings: there should be no grooves formed under the brushes;
- winding color: uniform, other than black (black color – the winding is burnt out).
To level the surfaces of the slip rings, they can be ground by holding the rotor in a lathe, making sure to center it. For grinding, sandpaper is used, the grain of which is reduced as it approaches the desired shape of the rings.
To diagnose the rotor winding, its resistance is measured with a multimeter or tester. For different generator models, this value ranges from 2.3 to 5.1 Ohms
.
Typical faults
Among our compatriots there is an opinion that one of the main faults of the armature is the lack of resistance. It should be noted that the resistance is checked on the rotor winding, and the rotor, in turn, can be installed instead of an inductor, and a stator will stand instead of an armature. This is done in order to provide higher power, so the resistance can only be diagnosed at the rotor.
As for the anchor specifically, it is characterized by the following malfunctions:
- Most often, do-it-yourself repair of the generator armature is carried out as a result of wear of the slip rings;
- also, the need to repair the unit may arise as a result of failure of the shaft bearing;
- not so often, but the problem of winding short circuit still occurs.
It should also be noted that there are breakdowns that cannot be repaired:
- wear of the collector to a diameter of 8.6 cm;
- wear of keyways.
1. Anchor installed in a lathe 2. Grooving the armature on the lathe
Generator bearings
Pullers are used to remove bearings. The use of improvised means for this purpose is possible only if you have the appropriate experience.
If during diagnostics of the generator it turns out that more than two of its parts need to be replaced, it is better to purchase it entirely. And if you are not confident in your abilities, immediately use the services of specialists from the nearest service station. This way you will save your time, nerves, and possibly money.
The main source of electricity in a car is the generator. It starts simultaneously with the engine starting, after which it generates energy and charges the battery. If it fails, the battery charge will not be enough to operate the car for a long time, so the driver is obliged to monitor the condition of the generator.
There are a lot of problems that can cause a generator to fail during operation. These can be either mechanical or electrical problems. Generator malfunction is also manifested by various symptoms, the most common of which are:
- The appearance of extraneous sounds emanating from the generator;
- Problems with the battery: discharging, overcharging, boiling off of the electrolyte;
- Reduced brightness of headlights with increasing speed. This situation is considered normal if it occurs briefly when switching to first gear from idle on a cold engine;
- Warning lamp warning about low battery while the vehicle is moving;
- Electronic malfunctions, including dim headlights and a weak sound signal.
If the symptoms described above occur, the vehicle's alternator must be checked. Diagnosis is most often performed according to four parameters:
- Checking the recoil current strength;
- Diagnostics of diode bridge operation;
- Checking the generator voltage regulator;
- Checking the field windings.
Depending on the problem identified during diagnosis, the question of whether it is advisable to repair the generator is decided.
Safety rules when checking a generator
Before you start checking a car generator, you should familiarize yourself with the basic safety rules that will help maintain the health of the diagnostician and not damage the unit. The basic rules for safe inspection and repair of a generator are as follows:
Please note: If you are not only checking the generator, but also welding work on the car body, you must completely disconnect the generator and battery from the vehicle’s on-board power supply before starting.
Checking the output current strength of the generator
For this test of the generator, you will need a multimeter equipped with a special probe to measure the current flowing in the wire. This probe looks like a clamp that wraps around a wire, and is most often supplied with the diagnostic device. To check the output current strength of the generator you need to:
- Place the clamp on the wire that goes to contact “B+” (“30”) of the generator;
- Next, start the engine and set high speed;
- After this, one at a time, you need to turn on the electrical consumers on the car - radio, air conditioning, heated steering wheel and others. When turning on each consumer, the readings from the multimeter should be recorded;
- Next, you need to measure the strength of the output current when all consumers are turned on together (which were turned on in the previous test).
When all measurements are received, it is necessary to compare the total indicator of sequential switching on of consumers and the indicator of instant switching on of all consumers. It is considered unacceptable if the indicator for instantaneous switching on of all consumers is 5 or more Amperes less than the amount for sequential switching on.
Checking the generator diode bridge
To check the condition of the generator diode bridge, you need to switch the multimeter to AC measurement mode. Connect one test probe of the diagnostic tool to output “B+” (“30”), and the second to ground. The voltage when connecting the probes in this way should be no more than 0.5 Volts. If the voltage is higher, the diodes have probably shorted.
You can also check the diodes for breakdown. To do this, disconnect the battery from the generator and also disconnect the wire that goes to the “B+” (“30”) terminal. Next, the multimeter is connected between the disconnected generator wire and “B+” (“30”), after which readings are taken. If the discharge current of the multimeter shows more than 0.5 mA, there is a high probability of breakdown of the diodes.
How to check a diode bridge (rectifier)
Diodes are checked by measuring resistance and detecting conductivity. Since the diode bridge consists of two plates, we check one at once and then the other. The tester should show the conductivity of the diodes in only one direction. Now, in a little more detail: we hold one tester probe at the “ ” terminal, and with the other we check the diode terminals one by one, and then swap the probes (in one case there should be a high resistance, and in the other there should not be). Then we do the same with the other part of the bridge.
It should be noted that the resistance should not be zero, as this indicates that the diode is broken. Broken bridge diode even when there is no resistance on both sides.
Checking the diode bridge
Checking the slip rings
Even one bad diode leads to failure of the entire diode bridge and undercharges the battery.
Checking the generator voltage regulator
To diagnose the condition of the car generator regulator, you must use a voltmeter or multimeter in voltmeter mode. Before starting measurements, you need to start the engine, turn on the headlights and let the engine run for 15-20 minutes. The measurement itself is carried out using probes that are connected between ground and the “B+” (“30”) terminal of the car generator being diagnosed. The obtained values are recorded, after which they must be compared with normal figures for a specific car model. These numbers can be found in the technical documentation of the machine. For most machines, normal voltage ranges from 14 to 16 volts. If there are deviations from the standards specified by the car manufacturer, there is a high probability of failure of the voltage regulator, in which case it will need to be replaced.
Checking the field windings
To check the serviceability of the field windings of a car generator, you must first remove the regulator and brush holder to gain access to the slip rings. For diagnostics, you will need an ohmmeter, the probes of which should be applied to the slip rings of the generator. As a result of the test, the resistance should be at a level of 5-10 ohms. You also need to make sure visually that there are no breaks in the winding.
To diagnose a short circuit of the excitation winding to ground, you will need to connect one ohmmeter probe to any slip ring, and attach the second to the generator stator. As a result of the measurement, infinite resistance should be displayed on the screen.
When diagnosing a generator, it is also necessary to inspect it for mechanical damage. Based on the results of all checks, the feasibility of repairing the device or replacing it with a new one is determined.
If a generator is suspected of malfunctioning, the car owner first tries to identify the breakdown himself. There are several verification methods that involve measuring both a removed and an undismantled device. The verification in both cases will be reliable. In addition to knowing how to check the generator, you need to find out the reasons why it may fail. Although the generator is a fairly reliable device, incorrect or careless operation of the car can cause it to fail prematurely.
Self-test of the generator
The simplest option for checking a generator at home without a trip to the service center is a visual inspection and searching for extraneous sounds. However, these methods cannot identify all existing defects. For example, the glow of a lamp on the dashboard indicates that the battery is not being recharged. In this case, the battery itself may be faulty or the generator is supplying insufficient voltage to its terminals.
Therefore, it is better to arm yourself with a tester or its more modern version of small dimensions - a multimeter for high-precision diagnostics. Most breakdowns can be identified locally; to find and repair the rest, you need to check the removed generator by partially disassembling it.
Safety precautions
In order for diagnostics to be safe for the user and the electrical part of the car, the following conditions must be met:
- using a tester, multimeter or instruments to measure current, voltage and resistance separately
- additionally disconnecting the battery from the on-board network and from the generator
- when replacing wiring, maintain the length and cross-section of the cable as the original parts
- make sure the belt tension is normal
It is prohibited to perform the following actions:
- use sources with voltages greater than 12 V
- turn off consumers when the engine is running and the generator belt drive is connected
- close terminal B+ (aka 30) to ground or terminal D+ (67)
- check the spark to the body with a short circuit
Visual inspection
First of all, the owner is interested in how to check the generator on a car without removing this electrical device. Therefore, faults can be diagnosed in the following ways:
- charging lamp - if it lights up on the panel, either the charging voltage is insufficient, or the battery has exhausted its life
- third-party sounds - noise, whistling and rustling indicate weak belt tension, a worn bushing or bearing
- burning smell - can penetrate through the stove into the interior, the likely cause is high-temperature heating of the windings
- electrical interruptions - indicate insufficient current produced by a running generator
The belt can be tensioned without removing the entire assembly; other faults can be eliminated only after dismantling the generator.
Bearings (bushings)
The generator shaft rotates in two rolling bearings. The first is fixed on the shaft itself and is removed along with the anchor. The second is pressed into the stator in its central part. In this case, diagnosis is made aurally and visually:
- Whistle and hum with normal belt tension are signs of a worn-out bearing or a loose race.
- when turning the shaft manually after removing the belt, it should rotate freely, there is no lateral play
Otherwise, distortions, jamming, burnout of the windings, and spillage of the armature magnets are possible.
In any case, a reduced voltage will reach the battery, insufficient for recharging.
Windings
This unit is the only one in the generator whose visual diagnostics are more effective than using a tester for a number of reasons:
- With intense heating, the varnish coating of the copper conductor darkens
- there is a burning smell
- The winding resistance is too low to accurately diagnose a short circuit.
It should be noted that before checking the generator for operability, in this case you will have to disassemble it by removing it from its seat. If the electrical appliance is in good working order, the varnish coating will be light by default.
Commutator group and brushes
Before checking the generator for wear of these friction parts, you need to disassemble it:
- brushes are adjacent to cylindrical brass contacts - collectors
- Most often the brushes wear out, it is better to replace them as a set
- wear of the collector group is determined visually by the grooves that appear
- the collectors can be ground 3-4 times, then they will have to be replaced entirely
At this stage, the car owner does not have any problems.
Attention: The “old-fashioned” method of checking the functionality of the generator - removing the minus terminal after starting the internal combustion engine and not stalling the engine, is unacceptable for modern cars. Moreover, on fuel-injected cars it is better not to let them “light” with wires from the battery connected to the on-board system. The “check” error may light up.
Hardware diagnostics with a multimeter
The best option for checking a car generator with your own hands is to use instruments: ohmmeter + voltmeter + ammeter or tester (multimeter). The last option for checking the serviceability of the generator is preferable, since you can also ring the diode bridge with a universal device.
Diode bridge
Structurally, the bridge consists of 6 diodes - 3 of them are considered negative, the remaining positive. In fact, they are turned in opposite directions in the circuit, passing current in only one direction.
There are two options for checking a car alternator for the integrity of the diode rectifying bridge:
- without removing the unit - diagnostics are carried out after disconnecting the battery ground, the wires from the voltage regulator and the diode bridge, the tester is switched to ohmmeter mode, its plus (red wire) is connected to the 30th terminal of the generator, the minus (black wire) is shorted to the body of the electrical device, all diodes are intact if infinity appears on the multimeter scale, broken - if some value in Ohm is displayed
- after dismantling and partial disassembly - positive diodes are checked in the same way, negative ones - on the contrary, in both cases the specific resistance value on the tester indicator becomes a sign of breakdown
Attention: If you make a mistake with the polarity when connecting the battery, it is the diode bridge that fails.
Rotor and stator
If checking the mechanical part does not reveal any problems, the operation of the generator is checked further after disassembling it:
- stator - you need to check the generator winding for each turn, the resistance is about 0.2 Ohm, so you will need an accurate instrument, you can use the non-hardware methods discussed above
- rotor - if a modification with permanent magnets is used, you just need to reinstall them inside the cage, conventional rotors have only 2 windings, the resistance of each of which is 2 - 5 Ohms, if the tester shows infinity, then an insulation breakdown or wire breakage has occurred
For a more detailed diagnosis of whether the generator is working, the starter needs to be checked additionally, but already included. To do this, the resistance between the terminal of any winding and their common “zero” is measured; it should be 0.3 Ohm.
Battery charging voltage regulator relay
To avoid mistakes, before checking the charging of the car’s generator, you should consider the following nuances:
- Normal for a car battery is considered to be a voltage of 12.5 - 12.7 V at its terminals, that is, in the entire on-board network with the engine off
- at idle speed with the engine turned on, it reaches a value of 13.5 - 14.5 V; for some foreign cars the normal voltage is 14.8 V
- at higher speeds, the generator voltage drops to 13.7 V
- if the device shows 13 V when the internal combustion engine is running under load, the generator definitely needs repair
- Overcharging 15 V is dangerous because the electrolyte boils and the plates of the acid battery begin to crumble
- undercharging of 13 V will not allow the battery to accumulate the electricity expended when turning the flywheel at the moment of starting, the next train will be in doubt
Diagnostic operations must be performed sequentially:
- the engine is started with the starter key
- The headlights are turned on for 15 minutes, the speed is set to medium for this entire time.
- The voltage is measured between terminal B+ (30) of the generator and its ground; it should be in the range of 13.5 - 14.5 V
Many owners, after installing high-quality car audio, for whom voltage drops in the on-board network are critical, solve the problem radically:
If you have any questions, leave them in the comments below the article. We or our visitors will be happy to answer them
If a generator is suspected of malfunctioning, the car owner first tries to identify the breakdown himself. There are several verification methods that involve measuring both a removed and an undismantled device. The verification in both cases will be reliable. In addition to knowing how to check the generator, you need to find out the reasons why it may fail. Although the generator is a fairly reliable device, incorrect or careless operation of the car can cause it to fail prematurely.
For what reason can a generator fail?
Since the sign of a generator malfunction is almost always the same, it is impossible to immediately identify the reasons why it failed without special equipment. There are 4 main failures due to which the generator may become inoperable.
- Bearing jamming
. During operation of the machine, there is a constant movement of elements in the generator, which leads to the disappearance of lubricant and further jamming or complete jamming of spare parts. Since the bearings have a high density, the first thing that breaks is the belt, which is responsible for their rotation. If the belt breaks, then you should think about replacing or rebuilding the generator. - Winding burnout
. A burnt winding can occur for various reasons. The most common is the ingress of chemicals and salt that are sprinkled on roads in winter. After the wiring has burned out or simply lost its integrity, the generation of current stops. - Wear or jamming of brushes
. Problems in the brush assembly arise because the graphite rods are worn out. This is a fairly common problem, as many car enthusiasts forget to replace brushes in a timely manner. - Regulator relay failure
. This part prevents overcharging of the battery and brings the voltage to the specified parameters.
Since it is not always convenient to check the generator on a car in the field, it is worth carrying out scheduled maintenance in advance and not neglecting the symptoms of imminent failure.
How to check the relay regulator.
How to check the relay regulator on a car or motorcycle? This is a question asked by many drivers who have found problems with charging their battery. A relay regulator is a small but very important device on which the proper operation and durability of the battery depends. In this article we will take a closer look at how to make sure that the relay regulator has failed, and what you will need for this.
Any working relay regulator maintains the voltage generated by the generator, which is necessary to charge the battery, and the longevity of the battery depends on the proper operation of the regulator relay. After all, the relay regulator is a precise voltage stabilizer and does not allow it to rise or fall above the required level, and maintains the required voltage regardless of the engine speed (and, accordingly, the generator rotor) and the number of electricity consumers.
In addition, the relay regulator constantly monitors the voltage at the pole pins of the battery and, if necessary, turns on or off the voltage coming to the excitation winding of the alternator.
To begin with, it should be noted that modern integrated relay regulators, if they fail, cannot be repaired, since they have a non-separable housing (filled with compound). And it’s unlikely that anyone will bother with repairs, even if the relay is of an old type and is collapsible. It is much easier to buy a new relay regulator, since it is inexpensive. But before you go to the store, you should make sure that the old relay regulator is really faulty.
This article will look at testing several relay regulators of different types, and although these devices come with different markings (for example, on foreign cars), the diagnostic principle for most of these integrated relays is almost the same. You can check the charging of the battery and the relay regulator on the car, or after removing it from the car. Let's consider both options, and when checking, you can use a light bulb and a simple Chinese tester (multimeter).
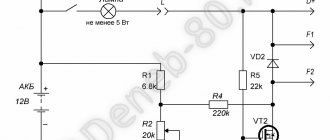
How to check the relay regulator on a car.
Malfunctions of the regulator relay are usually confirmed by systematic undercharging (or overcharging - a decrease in the electrolyte level due to boiling water) of the battery. And if your regulator relay burns out and the charger disappears somewhere along the way, and it’s still a long way to go home, then in order not to drain the battery, you can still use an ordinary light bulb that will replace the regulator relay on the way (read more about this in this article).
For the simplest test, we will need a tester set to voltmeter mode to measure direct current in the range from 0 to 20 volts.
We connect the tester probes to the pole pins of the battery and before starting the engine, remember what battery voltage the voltmeter showed (12 - 12.8 volts - depends on the condition of the battery). Next, we start the engine and look at the voltmeter readings - the voltage at the battery pole posts should increase after starting the engine (approximately 13 - 13.8 volts - depends on engine speed).
As the engine speed increases, the voltage should also increase, for example, at medium speeds it is approximately 13.5 - 14 volts, and at maximum speeds 14 - 14.5 volts. If after starting the engine, the voltage does not increase (it remains the same as before starting the engine, approximately 12 - 12.8 volts), then most likely the regulator relay is faulty.
Of course, the battery may not be charging for other reasons, for example, due to generator malfunctions, but to make sure that the relay is faulty, it should be removed from the car for a more accurate check, which will be described below. I also advise you to read the article - “Troubleshooting the generator and regulator relay of a foreign car” - the article is located here.
Checking the regulator relay removed from the car.
If any of the novice drivers do not yet know how to remove the regulator relay from the car (and replace it), then read and look at it in detail here. It also describes how to troubleshoot and replace generator brushes (after all, the brushes of modern generators are combined into one unit with an integrated relay regulator).
To begin with, I will describe checking an integrated regulator relay of a more modern type (for example, Ya212A, similar relays are installed not only on modern domestic cars, but also on many foreign cars), which is combined into one unit together with a brush holder (see photo on the left).
And since such a relay regulator is also a brush assembly, then of course it is mounted directly on the generator at the back, in the area of the slip rings of the generator armature. Having unscrewed the two screws holding the regulator relay and removed the terminals from it, we remove it from the generator cover window, blow off the coal dust and connect it to the simple circuit shown in the figure on the left.
To check, you will again need a tester set to voltmeter mode and a 12-volt light bulb with a socket (for example, from a turn signal), several wires with terminals. You will also need a power supply (from 0 to 20 volts) or a charger with current regulation.
And since some chargers are not power supplies (that is, they do not produce direct current without a load - without a connected battery), you will have to connect the load to the charger - that is, connect the battery (the same as for charging) and connect the wires from the battery, as in the simplest electrical diagram just below.
After connecting the wires and the light bulb, as shown in the diagram on the left (plus to the plus of the relay, and minus to the minus), and turning on the charger, the light bulb will light up and after that we begin to increase the voltage with the current regulator on the charger and observe the readings of the voltmeter and the light bulb ( who does not have a built-in voltmeter in the charger, then connect the probes of the tester, set to voltmeter mode, to the pole pins of the battery).
The lamp should stay lit until the voltmeter reads up to 14.5 volts, but as soon as the voltage exceeds 14.5 volts (as the voltage is increased by the charger regulator), the lamp should go out. If you try to reduce the voltage (less than 14.5 volts), the light should light up again.
If everything described above does not happen, then the relay is faulty. If the light goes out when the voltage reaches more than 14.5 volts (for example, at 14.6 - 15 volts and above), then such a relay should also be replaced, since it will constantly recharge the battery, which will lead to constant boiling of water from the electrolyte (you will have to constantly top up) and this will significantly reduce the battery life.
As a result, if you save a little money on a new relay, then you will have to spend tens of times more on a new battery.
Similarly, we check integrated relay regulators YA112V and similar so-called “chocolate bars” that are installed on older domestic machines.
We connect the relay for testing, as shown in the figure on the left, and also monitor the readings of the voltmeter and the light bulb, which should go out when the voltage at the battery pole pins reaches more than 14.5 volts.
Well, one more circuit that allows you to check the relay regulator of the oldest type (marking 591.3702-01), which is installed not on the generator, but separately on the body of a VAZ classic (many people install the same relay regulators on domestic heavy motorcycles).
By the way, such a remote relay regulator is convenient not only because it is easy to reach, but also because even if the relay burns out somewhere along the way, you can always get home without draining the battery. To do this, we connect a 12-volt light bulb to the wires that come to relay contacts 67 and 15, and you can drive on without fear that the battery will run out.
Well, if you connect a light bulb instead of such a regulator relay (to those wires that went to pins 15 and 67) and remove the terminal from the battery pole pin, and the motor does not stall, then the generator is working.
And the last thing I would like to write. Often the culprit of problems with battery charging are oxidized contacts (terminals) of the regulator relay (especially contacts marked BV, B3, V, 61, 15 - the marking depends on the type of relay) or wires and their terminals coming to the relay, ignition switch, generator. After all, oxides and dirt on the terminals cause transition resistance and voltage loss.
Sometimes on very neglected machines, instead of a voltage of 12.5 volts at the oxidized terminals, only a measly 10 - 11 volts can be noted with a voltmeter. But once you put the contacts in order (clean them to a shine), everything returns to normal. It should be noted that before checking the relay, as described above, check the relay contacts and not only the relay (and, if necessary, put them in order), but as mentioned above, especially those relay contacts whose markings are described above.
The voltage at the contacts should be exactly the same as at the pole pins of your battery (no loss). If the voltage on the contacts is less, then you should definitely clean them and perhaps the relay regulator is quite serviceable and the reason was only due to oxides. After cleaning the contacts, to prevent problems from recurring, they should be sprayed with a special contact spray (for example, like the one in this article), which will prevent oxidation for a long time.
Well, that seems to be all. I hope many beginners now know how to check the relay regulator on their own, without turning to the services of an auto electrician, good luck to everyone.
suvorov-custom.ru
Check Features
You need to know how to check the operation of the generator on a car correctly, otherwise you may encounter the fact that a working part will be completely damaged. By following just a few simple rules, you can avoid unexpected breakdowns.
- Checking should be done using a multimeter.
- When diagnosing the condition of the valves, the current should have a voltage of no higher than 12 V.
- If it is necessary to replace the wiring, you need to select wires with an identical cross-section to the original ones.
- Before you start checking the generator, you need to make sure that all fasteners are connected correctly and that the belt tension is correct (read more about). If necessary, the connections are brought to a working condition, and the belt is tightened or loosened.
The main condition under which it is possible to check a generator at home is to maintain its working condition. If the device is disassembled or has received damage that prevents it from functioning, then diagnostics will not allow us to determine the suitability of the device for further operation.
There is a list of actions that absolutely cannot be performed during verification:
- performance testing should not be performed using a short circuit or in other words “spark”;
- connect terminals of different configurations to each other, as well as connect terminal 30 or B+ to ground;
- diagnostics and operation of the generator should not begin without connecting consumers. It is especially important to observe this point when the battery is disconnected;
How to test a generator for performance at home
There are two main verification methods. One of them, although very old, allows us to reliably understand the performance of the device. The second works more subtly and is able to respond to minor system flaws. Using the second method, you can identify the slightest deviations in the operation of each element.
How to check a generator on a car without removing it and without having the necessary tools
There is an ancient way to identify a generator malfunction. It is very simple, but the result can only consist of two points:
- works properly;
- there are malfunctions.
Since anyone can check a car generator at home using this method, its popularity is fully justified. You need to start the engine and turn on the low beam. You need to remove the negative terminal from the working engine. If the headlights are on evenly and the engine is not out of sync, then the generator is working properly. If the internal combustion engine operates uncertainly or the brightness of the headlights changes, it is necessary to perform a more in-depth diagnosis, since the device is in a faulty state.
How to test a generator with a multimeter
Measuring with a special device will reveal even a small failure. There are a number of indicators that are considered optimal for all types of machines. The battery without load has a voltage in the range of 12.5 - 12.7 V. Since a load is placed on the battery when the engine starts, the normal readings are 13.8 - 14.8 V. After receiving the maximum load, the voltage reading should drop to 13 ,8. If this does not happen or the voltage drops even lower, then the generator will need to be checked.
Since not all car enthusiasts can ring the generator correctly, if a malfunction is identified, but if it is not possible to carry out diagnostics yourself, it is better to contact a service center. Experienced technicians will be able to suggest the reasons for the breakdown and explain why it was not possible to carry out the research on their own.
Checking the voltage regulator
The sequence of actions is as follows.
- To check the condition of the voltage regulator, you will need to use a voltmeter, the scale of which should range from 0 to 15 V. Diagnostics must be performed only on a well-warm-up motor. To do this, start the car for 15 minutes and turn on the headlights.
- The measurement is carried out between the ground terminal and terminal 30. For most cars, the norm is very easy to find, since for most it is in the range of 13.5 - 14.6 V. Figures below 13 V indicate that the parts need urgent replacement.
This method is one of the ways to test a generator without a car. For diagnostics, you will need access to the battery and the device itself. The voltmeter is used in measurement mode and is connected to ground and the B+ terminal on the battery. After turning on the special equipment, the indicator in its window should not exceed 0.5 mA. If the indicator is higher, this indicates that the diodes have failed or the integrity of the insulation on the windings has been damaged.
Checking the return current
This check is carried out only with the motor connected. This method is quite problematic and requires a lot of time and scrupulousness. The essence of diagnostics is to measure the current of devices that consume electricity. The engine must be started and the speed reached as high as possible. The probe is installed on the wire that goes to the 30 or V+ terminal.
One by one, you need to turn on all the electrical appliances of the car, and record the readings from the multimeter. After the results have been obtained, the numbers must be added. Next, you should turn on all electrical appliances and compare the readings on the measuring equipment with the sum of past studies. An indicator of 5 A less than the amount received is considered normal, but an increase indicates a malfunction of the spare part.
Checking the generator excitation current
The engine should operate at the highest possible speed. The multimeter is connected to terminal 67. The device will immediately display the result and the magnitude of the excitation current. For a normally operating generator, this indicator is in the range of 3 - 7 A.
Description of the generator armature
An assistant will be needed to perform this operation. Sequence of actions to check the functionality of the generator:
- Set the digital or indicator multimeter to DC voltage measurement mode. We check the parameters at the battery terminals. According to the instruction manual, the voltage should be in the range from 11.9 to 12.6 V, perhaps a little less, taking into account the fact that the network consumes a small amount of energy.
- The assistant starts the engine and leaves it running at idle speed, we check the voltage again. If it drops, this means that the generator either does not work completely, or the parameters are insufficient to charge the battery.
- Exceeding the voltage value of 14.5 V for a long time will lead to boiling of the electrolyte in the banks.
If a generator malfunction is detected, you will need to check the diode bridge, electronic voltage regulator, stator and rotor windings, as well as the condition of the brush assembly.
To perform this operation, it is necessary to remove the device from the vehicle and clean it of dirt. The verification procedure is as follows:
- We switch the multimeter to resistance measurement mode. We install the positive probe on terminal “30”, and the negative probe on ground. Readings close to zero indicate that the bridge or generator stator has failed.
- Positive diodes are checked by installing a positive probe on the terminal of one of the rectifier unit mounting bolts, and a negative probe on ground. Zero or close to zero instrument readings indicate that the diode bridge is faulty.
- To check the rotor, it is necessary to measure the resistance between the slip rings. In working condition it should be within a few ohms. If the resistance is near zero, then a short circuit has occurred in the winding.
The diode bridge and other faulty elements of the generator must be replaced with new ones from spare parts.
There are hardware and visual ways to check a car's generator. However, the owner must know the design and purpose of this electrical device in order to diagnose correctly. This guide will help you avoid a trip to the service station and save your operating budget.
Rice. 1 Checking the car generator
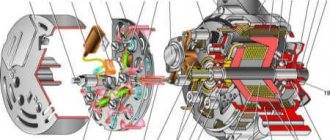
Before you test the generator with a multimeter on your own, you need at least minimal knowledge about the design of the electrical appliance:
- the belt transmits rotation from the engine crankshaft to the generator pulley
- mechanical energy is converted into electrical energy
- diode bridge changes alternating current to direct current
- The regulator relay is responsible for recharging the battery when it is discharged during engine startup
- the rest of the voltage is spent on electrical appliances of the machine
Rice. 2 Design of a car generator
Both undercharging and overcharging are harmful to the battery, so the voltage at the terminals must have stable characteristics at any speed. At the same time, the connecting unit, dimensions, layout and quality of manufacture of generators may differ significantly from different manufacturers and for specific car modifications.
Circuits and terminals
Before you check the generator on your car on your own, you need to know the electrical diagram of this unit and the purpose of the terminals on its body. The most popular are 6 schemes; for example, one of them is shown in the bottom photo.
Rice. 3 Example of electrical circuit
For ease of reference, the digital designations on all diagrams are the same:
- generator block
- exciting winding
- stator winding
- rectifier
- switch
- warning lamp relay
- voltage regulator
- indicator lamp
- noise suppression capacitor
- transformer/rectifier unit
- battery
- zener diode
- resistor
The terminals on the case are not designated the same, which may interfere with correct diagnostics with a multimeter (tester):
- positive terminal of the power rectifier - VAT; IN ; thirty; B or ""
- exciting winding – FLD; E; EXC; F; DF; 67 or Ш
- output for the control lamp from the backup rectifier – IND; W.L.; L; 61; D or D
- phase – STA; R; ͠ or W
- zero – MR or “0”
- output for "" battery - B; 15 or S
- terminal for connection to the on-board computer – F or FR
- output to ignition switch – IG
Rice. 4 Location of pins on the housing
In the Russian Federation, generators are most often used, the exciting winding of the voltage regulator of which is connected to the on-board network by the negative side. Although there are variants attached to it with “ ”.
In cars with diesel internal combustion engines, two-level 14/28 V power plants can be installed. Checking these generators is more difficult; it is better to carry it out at a service station.
The simplest option for checking a generator at home without a trip to the service center is a visual inspection and searching for extraneous sounds. However, these methods cannot identify all existing defects.
For example, the glow of a lamp on the dashboard indicates that the battery is not being recharged. In this case, the battery itself may be faulty or the generator is supplying insufficient voltage to its terminals.
Therefore, it is better to arm yourself with a tester or its more modern version of small dimensions - a multimeter for high-precision diagnostics. Most breakdowns can be identified locally; to find and repair the rest, you need to check the removed generator by partially disassembling it.
In order for diagnostics to be safe for the user and the electrical part of the car, the following conditions must be met:
- using a tester, multimeter or instruments to measure current, voltage and resistance separately
- additionally disconnecting the battery from the on-board network and from the generator
- when replacing wiring, maintain the length and cross-section of the cable as the original parts
- make sure the belt tension is normal
It is prohibited to perform the following actions:
- use sources with voltages greater than 12 V
- turn off consumers when the engine is running and the generator belt drive is connected
- connect to ground or terminal D (67) pin B (aka 30)
- check the spark to the body with a short circuit
It is recommended to let the engine run for ¼ hour at medium speeds with the headlights on low beam before starting hardware diagnostics.
Visual inspection
First of all, the owner is interested in how to check the generator on a car without removing this electrical device. Therefore, faults can be diagnosed in the following ways:
- charging lamp - if it lights up on the panel, either the charging voltage is insufficient, or the battery has exhausted its life
- third-party sounds - noise, whistling and rustling indicate weak belt tension, a worn bushing or bearing
- burning smell - can penetrate through the stove into the interior, the likely cause is high-temperature heating of the windings
- electrical interruptions - indicate insufficient current produced by a running generator
Rice. 5 Battery charging lamp
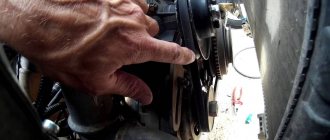
The belt can be tensioned without removing the entire assembly; other faults can be eliminated only after dismantling the generator.
Rice. 6 Checking the tension of the generator belt
Bearings (bushings)
The generator shaft rotates in two rolling bearings. The first is fixed on the shaft itself and is removed along with the anchor. The second is pressed into the stator in its central part. In this case, diagnosis is made aurally and visually:
- Whistle and hum with normal belt tension are signs of a worn-out bearing or a loose race.
- when turning the shaft manually after removing the belt, it should rotate freely, there is no lateral play
Rice. 7 Replacing the generator bearing
Otherwise, distortions, jamming, burnout of the windings, and spillage of the armature magnets are possible. In any case, a reduced voltage will reach the battery, insufficient for recharging.
Windings
This unit is the only one in the generator whose visual diagnostics are more effective than using a tester for a number of reasons:
- With intense heating, the varnish coating of the copper conductor darkens
- there is a burning smell
- The winding resistance is too low to accurately diagnose a short circuit.
Rice. 8 The burnt-out winding has dark-colored wires
It should be noted that before checking the generator for operability, in this case you will have to disassemble it by removing it from its seat. If the electrical appliance is in good working order, the varnish coating will be light by default.
Before checking the generator for wear of these friction parts, you need to disassemble it:
- brushes are adjacent to cylindrical brass contacts - collectors
- Most often the brushes wear out, it is better to replace them as a set
- wear of the collector group is determined visually by the grooves that appear
- the collectors can be ground 3-4 times, then they will have to be replaced entirely
Rice. 9 Production of collector rings
At this stage, the car owner does not have any problems.
Attention: The “old-fashioned” method of checking the functionality of the generator - removing the minus terminal after starting the internal combustion engine and not stalling the engine, is unacceptable for modern cars. Moreover, on fuel-injected cars it is better not to let them “light” with wires from the battery connected to the on-board system. The “check” error may light up.
Rice. 10 “Lighting” from a car is prohibited
The best option for checking a car generator with your own hands is to use instruments: an ohmmeter, a voltmeter, an ammeter, or a tester (multimeter). The last option for checking the serviceability of the generator is preferable, since you can also ring the diode bridge with a universal device.
Diode bridge
Structurally, the bridge consists of 6 diodes - 3 of them are considered negative, the remaining positive. In fact, they are turned in opposite directions in the circuit, passing current in only one direction.
There are two options for checking a car alternator for the integrity of the diode rectifying bridge:
- without removing the unit - diagnostics are carried out after disconnecting the battery ground, the wires from the voltage regulator and the diode bridge, the tester is switched to ohmmeter mode, its plus (red wire) is connected to the 30th terminal of the generator, the minus (black wire) is shorted to the body of the electrical device, all diodes are intact if infinity appears on the multimeter scale, broken - if some value in Ohm is displayed
- after dismantling and partial disassembly - positive diodes are checked in the same way, negative ones - on the contrary, in both cases the specific resistance value on the tester indicator becomes a sign of breakdown