What is needed for disassembly
To remove body kits from a car, you will need the following tools:
- socket wrench or socket wrench size 8 mm;
- the same, size 10 mm;
- Phillips screwdriver;
- WD-40 aerosol lubricant, which facilitates the rotation of rusted threaded connections.
Minimum set of tools
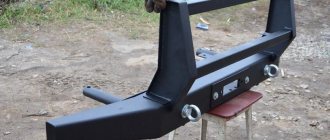
Additionally, you should prepare the usual set of plumbing tools. They are useful for unscrewing the lower fastening of the front bumper, consisting of nuts and studs. The problem stems from the unfortunate design of this unit, where it is stipulated that the studs stick out 2-3 cm under the front overhang of the car. As soon as the driver slightly catches a curb or drives into an ice snowdrift, the ends of the studs bend or even break off completely. You'll probably have to tinker with them when disassembling them.
For the same reasons, removing the front one will require an inspection ditch. It is extremely inconvenient to twist rusted lower and side fasteners while lying under the car.
Very useful lubricant for rusty bolts and nuts
To replace the stock body kits that were on your car from the factory with beautiful styling products, you also do not need any special tools or equipment. Elements of a different shape, but intended for installation on the “ten”, are mounted on existing mounts. It’s another matter when you want to install the body kit you like from another car, for example, from a Lada Priora. In this case, the fasteners will need to be modified.
This is interesting: How to drain gasoline from a Niva Chevrolet tank - methods
How to remove the bumper on a VAZ 2110, 2111, 2112
It will be useful for a novice car enthusiast to learn how to remove the bumper on a VAZ 2110, 2111, 2112. This information will be useful when replacing, repairing or tuning it.
Working with the front bumper of Lada
The most common reason for replacing bumpers and fenders is damage. Often the front structure suffers from potholes on the road, frontal and side collisions, the rear from unsuccessful parking maneuvers, as well as drivers who do not comply with the speed limit and driving distance. Bumpers are also removed for tuning installation of additional headlights, parking sensors or a video camera. Before starting work, prepare the necessary set of tools: a Phillips screwdriver, an 8x10 mm open-end wrench or a socket wrench with 8 mm and 10 mm heads (nozzles). To dismantle the radiator, use a key to release the upper fastening the grille Using an open-end or 10 mm socket wrench, unscrew the fastening screws on the upper side of the radiator grille. We remove the grille from the lower hooks and separate it
Lifting it up, release the grille from the sockets of the lower fastenings and completely separate it.
We attach the front bumper to the body from above with two 8 mm screws. From below it is attached to the engine protective casing with five 10 mm bolts. Additionally, we use two self-tapping screws to attach the structure to the fender liners on each side. The cavity also has two side projections with mounting holes together with 8 mm screws, which are used for fixing in the body brackets.
How to remove the bumper yourself
The structure is dismantled in the following way:
Photo gallery: step-by-step instructions for dismantling the structure
Detaching the engine apronDetaching the fender liners from the bottom.Releasing the fasteners in the upper part of the fender liners.Unscrewing the bracket fixing screw.Detaching from the front panel.Complete separation of the front bumper.
Video: how to change a radiator grille
Installing the bumper is also easy. It is enough to follow the reverse sequence of actions performed during dismantling.
Video: what is the difference between the process of installing a front tuned bumper
Removing the VAZ rear bumper
To carry out this operation, you will need a 10 mm wrench. Removal work is carried out in the following order:
Photo gallery: the main stages of work on detaching fasteners and replacing parts
Releasing the lower fastenings Releasing the upper fastenings Disconnecting the power connector for the license plate and ground illumination Complete disconnection of the rear bumper Unlike the 2110 model, the VAZ 2111 bumper is attached at the top with four screws and does not carry the license plate illumination . Its installation is carried out in reverse order. Purchasing a new replacement part will cost around 4.5 thousand rubles.
Video: how to replace a rear bumper without involving specialists
Information about the rules for replacing the front and rear bumpers of a VAZ 2110, 2111, 2112 car will expand the technical horizons of a novice car enthusiast. With minimal knowledge and skills in servicing your car, you can replace the bumper yourself if necessary. The ability to remove and install this part without involving car service specialists will save time, money and nerve cells of the owner.
Working with the front bumper of Lada
The most common reason for replacing bumpers and fenders is damage. Often the front structure suffers from potholes on the road, frontal and side collisions, the rear from unsuccessful parking maneuvers, as well as drivers who do not comply with the speed limit and driving distance. Bumpers are also removed for tuning installation of additional headlights, parking sensors or a video camera.
Before starting work, prepare the necessary set of tools: a Phillips screwdriver, an 8x10 mm open-end wrench or a socket wrench with 8 mm and 10 mm heads (bits).
To dismantle the radiator, use a wrench to release the upper fastenings of the grille. Using an open-end or 10 mm socket wrench, unscrew the fastening screws on the upper side of the radiator grille.
We remove the grille from the lower hooks and separate it. Lifting it up, release the grille from the sockets of the lower fasteners and separate it completely.
We attach the front bumper to the body from above with two 8 mm screws. From below it is attached to the engine protective casing with five 10 mm bolts. Additionally, we use two self-tapping screws to attach the structure to the fender liners on each side. The cavity also has two side projections with mounting holes together with 8 mm screws, which are used for fixing in the body brackets.
Removing the bumper
Before removing both the front and rear bumpers, disconnect the electrical wires from any possible carriers. So, in the front bumper these are usually fog lights, and in the rear lights there are license plate lights.
How to remove the front bumper
The front bumper is removed together with the beam and brackets. To do this, you need to unscrew the nuts securing the side and front brackets. After this, six screws are unscrewed and the side brackets are removed from the bumper. To release the front bumper from the license plate, you only need to unscrew two screws. Then two bolts are unscrewed and the beam with the front brackets is disconnected from the bumper. The front bumper is installed in the reverse order.
How to remove the rear bumper
The rear bumper is removed, just like the front one, together with the beam and brackets; to do this, you need to unscrew the nuts for the side fastening to the body and the nuts for fastening the brackets. After this, the beam itself is removed from the bumper. The rear bumper of the VAZ 2115 is installed in the same way as the front one, that is, in the reverse order.
After you have removed the bumper from the car, you can begin tuning it.
Removing the rear body kit
To disassemble the rear part of a VAZ 2110-2112 car, the same set of tools is enough. The presence of an inspection hole is not necessary; here you can cope without it. But the services of an assistant will definitely come in handy when removing an unscrewed element so that it does not fall and hit the floor.
Considering that a license plate light is installed inside the bumper, you also need to disconnect the battery before disassembling. Then follow this algorithm:
- From below, the element is attached to the bottom with two bolts located along the edges of the part. Treat these areas with WD-40.
- Open the trunk lid and use a 10 mm wrench to unscrew the 2 upper mounting bolts. They are located on the sides of the threshold of the loading opening.
- Using the same key, unscrew the 2 lower bolts that you previously treated with grease.
- Together with an assistant, remove the body kit. To do this, you need to disengage the plastic latches holding it on the sides. Pry the edge of the plastic with your hands and pull it to the side, and then back.
- Holding the bumper suspended, remove the rubber plug from the hole where the power cord for the lamp comes out. Pull it and pull out the connector you want to disconnect. This completes the dismantling of the body kit.
If you plan to replace the part with a new one, then you will have to remove the backlight and its wiring, which is attached from the inside with plastic clamps, from the old element. After which they need to be moved to a new bumper, installed in the reverse order. It also doesn’t hurt to check the condition of the metal at the joints before assembling the rear of the car.
Removing the rear bumper of a VAZ 2110 - video
As you can see, replacing bumpers on VAZ 2110–2112 cars is not difficult. Some difficulties arise only when unscrewing the lower nuts holding the front body kit on the studs. But if you approach the issue scrupulously and without haste, then these problems can be easily solved, and the rest of the work is not worth taking the car to a service station and paying money.
Removing the VAZ rear bumper
To carry out this operation, you will need a 10 mm wrench. Removal work is carried out in the following order:
- Using a 10mm wrench, unscrew the two nuts securing the bottom to the body.
- We do the same with the two upper screws located at the rear lights.
- Disconnect the license plate light power connector.
- We unscrew the terminal of the negative wire attached to the threaded point of the body inside the trunk.
- We derive the structure from technological hooks.
Photo gallery: the main stages of work on detaching fasteners and replacing parts
Releasing the lower fastenings
Releasing the upper fasteners
Disconnecting the power connector for license plate and ground illumination
Complete rear bumper detachment
Unlike the 2110 model, the VAZ 2111 bumper is attached at the top with four screws and does not have a license plate light . Its installation is carried out in reverse order. Purchasing a new replacement part will cost around 4.5 thousand rubles.
How to remove the bumper
To repair the front bumper, you need to remove it. Before carrying out the operation, you need to dismantle the fender liners.
Removing the fender liners step by step:
- Unscrew the nut at the rear of the fender liner with a 10 mm socket and two self-tapping screws with an 8 mm socket.
- Find two screws at the top of the fender liner and one in the front of the fender liner.
- Unscrew them.
- Using a Phillips screwdriver, unscrew the 3 screws attaching the fender liner to the bottom of the bumper.
- Remove the fender liner.
Many people are interested in how to remove the front and rear bumpers on VAZ 2110 and 2112. There may be several reasons for this work. Although, in general, this body kit element looks quite good. And he has enough strength. Which makes motorists very happy.
How to remove the front and rear bumpers on VAZ 2110 and 2112? This question usually comes to car enthusiasts when it is necessary to replace or repair this structure. The most common reasons are the following:
- The bumper is damaged. If scratches and chips appear, it makes sense to carry out restoration work or replace it with a new one;
- Tuning. Many car owners change their bumpers to more beautiful ones. Replacing the body kit, the most common modification;
- Installation of non-original optics.
Removing and installing the front bumperBefore work, you must prepare the car. To do this, simply disconnect the battery. Also, do not forget to put the car on the handbrake. Replacement is carried out in the following order:
- First, remove the decorative radiator grille. To do this, you need to unscrew the top mounting screws using a 10mm tube. Next, release the clamps of the lower grille fastening, and remove it;
- If there are installed fog lights, remove the connectors from them;
- Loosen the nuts securing the engine protection;
- Using a Phillips screwdriver, unscrew all the screws securing the fender liners to the bumper;
- Use a 8mm socket to unscrew the screws securing the bumper to the brackets;
- The body kit is also attached to the front of the car; here you will need to unscrew 2 10mm screws;
- After this, the bumper is moved forward and removed from the car.
When installing, assemble in the reverse order.
Removing and installing the rear bumper The work of dismantling the rear bumper is not too different from that described above. Their attachment points are the same, but there are some differences. Therefore, let's look at the process in more detail:
Open the trunk and disconnect the wires that power the license plate lighting. To do this, you will need to fold back the rear trunk trim. It is usually attached with clips. Next, remove the connector. And unscrew the negative wire from the stud; We unscrew the screws of the upper bumper fastening, they are located at the edges; The screws securing the lower part of the body kit are unscrewed; Move the bumper back and remove it
At the same time, it is important to pass the wires through the holes in the body panel; The next step is to remove the casing that mounts the room lights. To do this, unscrew the 3 fixing screws.
Bumper repairIn many cases, it makes sense to bother restoring the bumper to its original appearance. For this, there are a large number of different techniques. Let's look at the most common ways of doing this:
If there are scratches, first of all, clean the damaged area. Next, level the surface using putty.
When choosing it, pay attention to compatibility with plastic. After the leveling layer has dried, the bumper is primed and painted; Cracks are usually sealed using a soldering iron.
But there is one caveat here. To avoid further growth of the damage, you need to drill holes slightly away from the ends of the crack. Soldering is best done on the back side of the bumper. This will preserve the appearance of the body kit. After repairing the damage, the part is puttied and painted; In case of chips and holes, you will have to restore the damaged piece. This can be done using fiberglass and epoxy glue. If everything is done carefully, then there will be no problems with the appearance.
Conclusion. Unfortunately, our roads are not particularly smooth, so damage to body kits is not uncommon. In this case, the driver wonders how to remove the front and rear bumpers on the VAZ 2110 and 2112. After all, carrying out repair work directly on the car is not very comfortable. Fortunately, dismantling is not difficult and does not require any special tools.
AutoFlit.ru
How to remove the front and rear bumper on a VAZ 2110 and 2112 Simple methods
Removing and installing the fuel filter VAZ 2110-2111-2112
- The bumper is damaged. If scratches and chips appear, it makes sense to carry out restoration work or replace it with a new one;
- Tuning. Many car owners change their bumpers to more beautiful ones. Replacing the body kit, the most common modification;
- Installation of non-original optics.
- “How to remove scratches on a bumper”;
- “How to paint the bumper yourself.”
- First, remove the decorative radiator grille. To do this, you need to unscrew the top mounting screws using a 10mm tube. Next, release the clamps of the lower grille fastening, and remove it;
- If there are installed fog lights, remove the connectors from them;
- Loosen the nuts securing the engine protection;
- Using a Phillips screwdriver, unscrew all the screws securing the fender liners to the bumper;
- Use a 8mm socket to unscrew the screws securing the bumper to the brackets;
- The body kit is also attached to the front of the car; here you will need to unscrew 2 10mm screws;
- After this, the bumper is moved forward and removed from the car.
Open the trunk and disconnect the wires that power the license plate lighting. To do this, you will need to fold back the rear trunk trim. It is usually attached with clips. Next, remove the connector. And unscrew the negative wire from the stud; We unscrew the screws of the upper bumper fastening, they are located at the edges; The screws securing the lower part of the body kit are unscrewed;
Move the bumper back and remove it
At the same time, it is important to pass the wires through the holes in the body panel; The next step is to remove the casing that mounts the room lights. To do this, unscrew the 3 fixing screws.
If there are scratches, first of all, clean the damaged area. Next, level the surface using putty.
When choosing it, pay attention to compatibility with plastic. After the leveling layer has dried, the bumper is primed and painted; Cracks are usually sealed using a soldering iron.
But there is one caveat here. To avoid further growth of the damage, you need to drill holes slightly away from the ends of the crack. Soldering is best done on the back side of the bumper. This will preserve the appearance of the body kit. After repairing the damage, the part is puttied and painted; In case of chips and holes, you will have to restore the damaged piece. This can be done using fiberglass and epoxy glue. If everything is done carefully, then there will be no problems with the appearance.
AutoFlit.ru
Installing the front bumper
When reinstalling the bumper, you must first insert it into the guide brackets on the sides of the VAZ 2110. Then the trim is attached in the reverse order. All fasteners should be replaced with parts that have new threads. Before installation, it is advisable to lubricate the hardware, thus providing minimal protection against corrosion.
The fastening of the cladding should not be immediately tightened until it stops. It is necessary to align the part as evenly as possible, achieving gaps across the body of almost the same width. After this, you can finally secure the cladding by tightening all the fixing bolts and screws.
Installation of the VAZ 2110 bumper
A car bumper is a strip of car cladding designed to protect the car from minor impacts. Since most modern cars have bumpers made of plastic, they are more decorative. In case of an accident, they no longer protect the driver and passenger, but the pedestrian in case of a collision at low speed (it is believed that the presence of a bumper is less injurious to the pedestrian).
One way or another, if the bumper is damaged, it is dismantled for repair or replacement and the VAZ 2110 bumper is subsequently installed. The removal and subsequent installation of bumpers is carried out for the installation of additional vehicle equipment systems, such as a tow bar or parking sensors.
The cost of installing a bumper in St. Petersburg:
| Installation options | Price |
| Installation of the front bumper VAZ 2110 | from 1000 rub. |
| Installation of rear bumper VAZ 2110 | from 1000 rub. |
| VAZ 2110 bumper repair | from 3500 rub. |
If the bumper is slightly damaged, service stations offer the service of applying a special repair seam on plastic. To do this, they remove the bumper, apply patches made of plastic identical to the plastic of the bumper being repaired, and then install the VAZ 2110 bumper in its original place. If the damage is large, the old bumper is removed and thrown away, and a new VAZ 2110 bumper is installed in its place. The metal bumper is often not repaired due to the high cost of the procedure, but replaced.
The procedure for removing the front bumper is as follows. First, the front fender liners, fog lights and license plate are removed. Then unscrew the 2 bolts securing the amplifier. Then - 2 nuts securing the body to the mudguard, right and left cladding brackets. Then the studs securing the cladding in the area of the mudguards are removed, 2 nuts securing the brackets are removed and the bumper beam is removed. Install a new or repaired bumper in the reverse order.
The rear bumper is removed and installed in the same way. Different car models have their own characteristics for installing the bumper; the procedure described is approximate as an example.
We invite you to remove, repair, replace and install the VAZ 2110 bumper in our certified services in St. Petersburg. All work is guaranteed.
In our spare parts department you will find both new and used original bumpers of good quality for replacement.
Selection of new bumpers
Plastic body parts for the “ten” are sold in two versions:
- bare plastic without paint coating;
- painted in a specific color and completely ready for installation.
This body kit is cheaper, but it still needs to be painted
The first type is worth purchasing when you need to repaint the entire car or its color is so unique that it is difficult to find a painted bumper. A coated part will cost more, but it can be immediately installed on the car without unnecessary worries about painting. Prices for standard and some styling products for VAZ 2110-2112 are presented in the table.
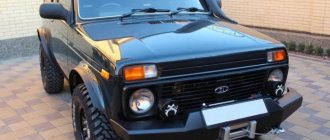
VAZ 2110 with front styling bumper AVR
If you analyze the prices given in the table, it becomes clear that buying an unpainted product rarely justifies itself, since you still have to pay extra for painting and waste time
When choosing new parts, you should pay attention to the following points:
- the quality of the paintwork, the absence of manufacturing defects and small chips along the edges that may occur during transportation;
- front elements can be sold with or without a plastic amplifier, choose the appropriate option for yourself;
- it is better to choose products where the manufacturer has provided additional internal ribs that strengthen the structure;
- The plastic should be flexible, not hard and brittle.
Styling bumper Sniper gives an aggressive appearance
We remove the front bumper on a VAZ-2110 with our own hands
The bumpers on the VAZ-2110 are not particularly durable. It is enough to make slight contact with the obstacle, as cracks appear on the surface of the bumper, which, of course, does not decorate the car. Removing the front bumper on a VAZ-2110 is sometimes necessary for painting or repair, but more often than not, for replacement. Today we will figure out how to remove the front bumper, find the attachment points and find out the features of the choice.
Bumper painting after repair
To use this repair technology, it is necessary to collect fragments when the bumper is damaged. Repairing chips on the bumper requires a soldering machine. Collected fragments or purchased plastic strips are soldered to the area where the bumper is damaged. Adhesion depth - 80%.
The soldering material is copper wire. Solder from the inside of the bumper. Soldering from the outside is allowed if there is no access from the rear.
A decorative radiator grille will be required. Connect the bumper at the damage site using the soldering method. The technology differs from previous ones in its high reliability of fastening.
The methods are suitable for repairing the rear bumper and front
Pay attention to the material the bumper is made of. It is indicated on the inside of the bumper
- After fixing the cracks and chips of the bumper, sand the area for further painting with sandpaper.
- Use putty to smooth the seam. Apply with a spatula. Application angle: 15–30 degrees.
- Sand the entire painted area with sandpaper.
- If necessary, apply a final level of putty.
- Prime the painting area. Use primer in a can.
- Spraying paint from a can at a distance of 15 centimeters from the bumper will eliminate the appearance of smudges and unsmooth transitions. Apply paint in a 180 degree arc - swing your hand left and right.
Repair and tuning of the front bumper on a VAZ 2110
The front bumper on a VAZ 2110 car provides the car with a bright and unusual appearance, and also creates sporty and slightly aggressive features. And thanks to various air intakes, good aerodynamic characteristics of the vehicle are ensured, and they also provide all the necessary conditions for the braking system and radiator cooling.
This article contains answers to the following fairly common questions:
- How to properly replace the front bumper on a VAZ 2110?
- What is tuning the front bumper?
- Tuning the body kit on a VAZ 2110;
- Covers for the front bumper of a VAZ 2110;
- Do I need to install front bumper covers or not?
- How to install front bumper covers?
basic information
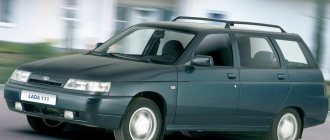
Cars from the Lada 110 family belong to passenger vehicles produced by VAZ, which are quite popular among car enthusiasts due to their good combination of comfort, cost, quality and beauty. The tenth family includes four models, such as VAZ 2110, 2111, 2112 and 21123. The VAZ 2110 brand car belongs to a new generation, which began production in 1995. The presented model has many differences from its predecessors, for example, the body has changed its shape and has become more modern. The VAZ car has several body modifications, such as a station wagon (2111), sedan (2110) and hatchback (2112). The presented models belong to budget vehicles. After the VAZ 2108 entered the automobile market, tuning VAZ cars became commonplace for all owners of cars of this brand. In addition, today there are high-quality parts for car tuning and various accessories on sale.
That is, now absolutely every driver can install a foreign audio system, sound insulation or air conditioning in his car. In principle, you can eliminate any external shortcomings of the presented car brand or add a more aggressive look to it by updating the linings, rear and front bumpers, spoilers, sills and many other tuning elements.
Tuning a VAZ 2110 car is an ideal way to transform your vehicle.
How to properly replace the front bumper on a VAZ 2110?
Front bumper VAZ 2110 The front bumper on VAZ 2110 cars is quite fragile, and the paint also peels off quite quickly. In addition, after even minor impacts or minor accidents, the VAZ 2110 bumper cracks, since the main material from which it is made is plastic. Naturally, after such damage, the front bumper will need to be urgently replaced. So, to replace the front bumper you will need to have:
- Crosshead screwdriver;
- Keys for 10;
- Socket head 8;
- Socket head for 10.
Before you begin replacing the front bumper, you need to disconnect the negative terminal from the battery, as well as the drive from the fog lights. First, remove the radiator grille:
Algorithm for removing the front bumper:
Front bumper tuning process
So, what is front bumper tuning? Tuning the appearance of a vehicle includes reupholstering the interior, updating dashboards, door trim, updating car seats, installing steering wheel lighting, updating the dashboard and many other improvements. Installing a small refrigerator or TV is also called tuning. What is body kit tuning on a VAZ 2110? The best identification of the presented vehicle model is its headlights. Tuning car headlights comes with a corrector or with standard optics. In the manufacturing process, tuned taillights use not only standard incandescent lamps, but also LEDs.
Although the low level of ground clearance makes it possible to confidently move cars on Russian roads. An excellent solution may be to install automatically folding and unfolding thresholds and bumpers.
Tuning the body kit of this car consists of the need to automatically reduce and increase the vehicle's ground clearance by raising the sills and the front bumper skirt. In this case, the standard front bumper will become the basis for building up individual elements. First you need to lay out the mold from sculptural plastic, and the flat elements from plywood or MBF. After this, cover it with fiberglass material and remove the matrix. Next, glue the part into it, making the underskirt and bumper separately. The mechanical body kit operates with the help of 2 motors thanks to the electric window lifter. The first motor is installed for the front bumper, and the other for the sills. That is, when you press a key, the body kit lowers or rises. Another tuning option is front bumper covers, which make the car even more sporty and harmoniously combine all the tuning elements.
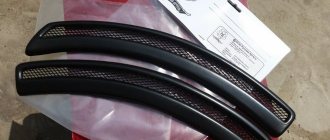
They are most often made of plastic, which is then painted to match the car. The covers are usually installed on a standard bumper, and they are secured using self-tapping screws.
Front bumper linings give the car greater aggressiveness and individuality. The main function of the linings is to change the appearance of the vehicle and visually reduce the side of the car. But the disadvantage of the linings is the accumulation of dirt under the sills, and this can sooner or later lead to rust.
Today, linings are made that fit even better to the edges, and this makes it possible to even better protect the thresholds from dirt.
In order to install the front bumper covers you will need:
- Priora Thresholds;
- Key to 7;
- Key for 10;
- Phillips screwdriver;
- Plastic clips;
- Latches;
- Movil.
Algorithm for installing overlays:
How to replace the front bumper on a VAZ 2110-VAZ 2112?
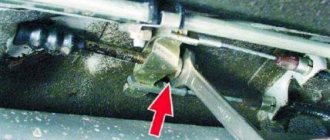
Removal: 1) At the very beginning of the operation, you will need to take a wrench with you, or a socket, and together with these tools, look under the lower part, namely strictly under the bumper of your car, there you will see that the so-called engine mudguard is attached to the lower part of the bumper (Some people also call it crankcase protection, although this is a completely different part, but still you will most likely understand what we are talking about), so this mudguard is attached to the body with five nuts in its front part, so just unscrew all these nuts (The remaining nuts, and even more so, you don’t need to completely remove the mudguard), because if you neglect this, this mudguard will greatly interfere with replacing the front bumper on your car.
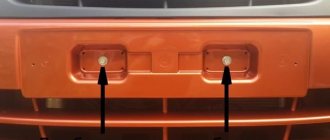
2) Then move into the car interior and, already inside the cabin, pull the handle that opens the hood of your car, after the hood is slightly opened, approach it and thereby lift it and place it on a support in order to gain access to the engine compartment, after To do this, you will need to remove the so-called radiator grille from the car, for this you will need to unscrew two bolts, one of which is already unscrewed in the photo, and the other is just unscrewed and their location is also indicated by arrows, so when the bolts are unscrewed, lift and thereby completely remove the radiator grille from the car in order to gain access to the remaining bolts that already secure the bumper itself.
3) After the radiator grille is removed, you will see in front of you two bolts that secure the bumper on top (Unfortunately, one bolt is not visible in the photo, but it is very close and therefore when you remove the grille you will immediately see it), so You will need to completely unscrew these two bolts and put them in some kind of box or somewhere else so as not to lose them, otherwise people usually put the nuts and bolts out on the grass and then they look for them for a very long time, so all the nuts and bolts , washers and so on, it is best to put them in a separate box, or in a small bucket.
4) And finally, lay down some kind of carpet, or if you are in dirty clothes and on the grass, then you can do without it, in general, you only have to unscrew all those screws and only all those bolts that secure the bumper on the sides, for example we will show on the left side of the car, firstly, from the very beginning, unscrew the most difficult to reach and inconvenient nut, you can see it only when you climb under the side part of the bumper of your car, so there will be a bolt there (Meaning inside the bumper) , this bolt will secure the inside of the bumper to the bracket, you will need to unscrew it and put it in the box, or somewhere else, and then unscrew all the remaining side screws and, as a result, completely remove the bumper from the car.
Note! When this bolt is unscrewed, then get out from under the car and, having already picked up a screwdriver, use it to unscrew all the screws that secure the bumper in its side part, so that you understand where these screws are located, then look at the photo below, it will show the places of the side bumper mounts!
Installation: The new bumper is installed on the car in the reverse order of removal.
Additional video: So that you can clearly understand where all the bumper mounting bolts are located, then watch a detailed video below that explains how to remove the bumper from the car.
How to remove the front bumper on a VAZ 2110 and models of this family
If your car has fog lights, they will be removed along with the body kit. Therefore, work must begin by disconnecting the negative terminal of the battery and turning off the headlights. For this purpose, special connectors must be provided in the engine compartment.
Advice. If for some reason the terminal blocks were not provided when installing the wiring to the headlights, install them during the process of replacing the body element.
Then proceed according to this scheme:
Place the machine over the inspection ditch, go down and treat all lower threaded connections with WD-40. If this is not done, there is a risk of breaking the bolts when unscrewing. While it eats away the rust, begin dismantling the upper fasteners. Remove the decorative radiator grille installed above the bumper. To do this, open the hood and unscrew the two bolts located on the horizontal panel with a 10 mm wrench. The grate is released from the plastic clips if you carefully push it up. Using the same key, unscrew the 2 bolts fastening to the top panel, found under the grille. Using a Phillips screwdriver, unscrew the 2 screws located on the front side inside the wheel arch. They attach the body kit to the fender liner. Repeat the operation on the second wheel. 2 more screws are located on the sides of the element on the bottom side, unscrew them. Go down into the inspection hole and, using an 8 mm spanner, unscrew the 5 nuts holding the element in place at the front. They are located along the front overhang of the car. If necessary, align them as described above. All that remains is to loosen and unscrew the 2 bolts located at the edges of the bumper and pressing it to the metal brackets. The operation is also performed from the viewing ditch.
Advice. When unscrewing the screws securing the part to the fender liner, turn the wheels in different directions to make it more convenient to use the screwdriver.
When all connections are loosened, the bumper can be removed without any problems alone. Stand in front of the car, grab it in the center with both hands and pull it towards you with a sharp, confident movement. When the element disengages, remove it and, if necessary, remove the fog lights and plastic amplifier.
The new body kit is mounted in the reverse order: first the headlights are screwed on, then the part is inserted into place and secured with self-tapping screws and nuts. It is recommended to coat the threaded connections with a thick lubricant such as “Solidol” to prevent rusting.
Advice. Before installing a new element, inspect the joints of the metal body parts hidden behind it. If you find traces of corrosion, clean them, degrease them and apply 2 coats of paint, one coat of primer at a time.
What's next?
Next, you act based on your own desires and goals. If you choose bumpers that are suitable specifically for the VAZ 2110 model, their installation will simply involve following the reverse sequence of dismantling.
Tuning body kits
There should be no problems with the “native” body structures. If we are talking about tuning and self-production, modifying bumpers and then installing them, you will probably have to drill additional holes, change fasteners, purchase additional headlights, etc. There is no universal advice on this matter.
Price issue
An important question that interests VAZ 2110 owners is exactly how much it will cost them to buy a new bumper front and back, what is the current cost of the radiator grille.
The answer is presented in the table:
| Body element | Price |
| Front bumper | Average price - 1700 rubles |
| Rear bumper | Average price - 1500-2000 rubles |
| Radiator screen | The average price is about 300 rubles. |
Loading …
Replacing the bumper of Lada 2110 (VAZ 2110)
Further, the set of tools and materials depends entirely on the front and rear body kit element you choose. Some bumper models require certain tools or attachments. It is best to find out about this from the seller. Now we can proceed directly to the task at hand.
Removing the wing fenders
Removing the front end
Removing the rear bumper
If you additionally plan to replace the rear bumper, you will also have to remove it first. The work is not difficult, it will take you about an hour. Rear bumper
Removing the rear
What's next?
Next, you act based on your own desires and goals. If you choose bumpers that are suitable specifically for the VAZ 2110 model, their installation will simply involve following the reverse sequence of dismantling. Tuning body kits There should be no problems with “original” body structures. If we are talking about tuning and self-production, modifying bumpers and then installing them, you will probably have to drill additional holes, change fasteners, purchase additional headlights, etc. There is no universal advice on this matter.
Price issue
An important question that interests VAZ 2110 owners is exactly how much it will cost them to buy a new bumper front and back, what is the current cost of the radiator grille. The answer is presented in the table: Welcome! The front bumper - it basically constantly suffers on the road, then I wanted to park but it didn’t work out well, then the brakes didn’t work very well and thereby caught up with the car in front, etc. Therefore, you have to change the front bumper many times while you are using the car, but not everyone knows how to do this, so we wrote this article especially for such people, in which we tried to detail the process of replacing the front bumper on cars of the tenth family. Note! To replace the bumper, you will need to stock up on: Various types of wrenches, you may also need sockets with an extension, or a wrench, and you will also need to take a screwdriver with you! Summary:
- Replacing the front bumper
- Additional video clip
How to replace the front bumper on a VAZ 2110-VAZ 2112?
Removal: 1) At the very beginning of the operation, you will need to take a wrench with you, or a socket, and together with these tools, look under the lower part, namely strictly under the bumper of your car, there you will see that the so-called engine mudguard is attached to the lower part of the bumper (Some it is also called crankcase protection, although this is a completely different part, but still you will most likely understand what we are talking about), so this mudguard is attached to the body with five nuts in its front part, so just unscrew all these nuts (the rest nuts, and even more so there is no need to remove the mudguard completely), because if you neglect this, then this mudguard will greatly interfere with replacing the front bumper on your car. 2) Then move into the car interior and, already inside the cabin, pull the handle that opens the hood of your car, after the hood is opened slightly, go to it and thereby lift it and place it on a support in order to gain access to the engine compartment, after which you will need to remove the so-called radiator grille from the car, for this you will need to unscrew two bolts, one of which has already been unscrewed in the photo, and the other is just being unscrewed and their location is also indicated by arrows, so when the bolts are unscrewed, lift and thereby completely remove the radiator grille from the car in order to gain access to the remaining bolts which already secure the bumper itself.3) After the radiator grille is removed, you will see in front of you two bolts that secure the bumper on top (Unfortunately, one bolt is not visible in the photo, but it is very close and therefore when you remove the grille you you will see it right away), so you will need to completely unscrew these two bolts and put them in some kind of box, or somewhere else so as not to lose them, otherwise people usually put the nuts and bolts out on the grass and then look for them for a very long time , therefore, it is best to put all the nuts, bolts, washers, etc. in some kind of separate box, or in a small bucket. 4) And finally, lay down some kind of carpet, or if you are in dirty clothes and on the grass then you can do without it, in general, you only have to unscrew all those screws and only all those bolts that secure the bumper on the sides, for example we will show on the left side of the car, firstly, from the very beginning, unscrew the most difficult to reach and inconvenient nut, you can see it only when you climb under the side of the bumper of your car, so there will be a bolt there (Meaning inside the bumper), this bolt will secure the inside of the bumper to the bracket, you will need to unscrew it and put it in the box, or anywhere else and then unscrew all the remaining side screws and, as a result, completely remove the bumper from the car.Note! When this bolt is unscrewed, then get out from under the car and, having already picked up a screwdriver, use it to unscrew all the screws that secure the bumper in its side part, so that you understand where these screws are located, then look at the photo below, it will show the places of the side bumper mounts!Installation: The new bumper is installed on the car in the reverse order of removal.Additional video: So that you can clearly understand where all the bumper mounting bolts are located, then watch a detailed video below that explains how to remove the bumper from the car.
In the last article we looked at the process of replacing the front bumper, now let's look at how to change the rear bumper on VAZ 2110 and 2112 sedan and hatchback cars. The entire process will take approximately an hour. For the work we will need: a 10mm socket wrench or socket, a Phillips screwdriver.
Work progress
The rear bumper must be installed in the reverse order of removal. In this case, you should pay attention to the fact that the 2 tabs on the bumper on both sides fit into the brackets on the body. To do this, you need to direct the tongues into the brackets, press the edge of the buffer to the body and push it in until it stops.
Replacing the rear bumper on a VAZ 2111 station wagon
For the work you will need: 10 and 13 socket wrenches, a Phillips screwdriver. Work progress
Install in the reverse order, making sure that the tabs on the bumper on both sides fit into the brackets on the body. I hope this article was useful to you, stay tuned :)
Working with the front bumper of Lada
The most common reason for replacing bumpers and fenders is damage. Often the front structure suffers from potholes on the road, frontal and side collisions, the rear from unsuccessful parking maneuvers, as well as drivers who do not comply with the speed limit and driving distance. Bumpers are also removed for tuning installation of additional headlights, parking sensors or a video camera.
Before starting work, prepare the necessary set of tools: a Phillips screwdriver, an 8x10 mm open-end wrench or a socket wrench with 8 mm and 10 mm heads (bits).
To dismantle the radiator, use a key to release the upper grille fastenings
Using a 10 mm open-end or socket wrench, unscrew the fastening screws on the top side of the radiator grille.
We remove the grid from the lower hooks and separate it
Lifting it up, release the grille from the sockets of the lower fastenings and completely separate it.
We attach the front bumper to the body from above with two 8 mm screws. From below it is attached to the engine protective casing with five 10 mm bolts. Additionally, we use two self-tapping screws to attach the structure to the fender liners on each side. The cavity also has two side projections with mounting holes together with 8 mm screws, which are used for fixing in the body brackets.
How to remove the bumper yourself
The structure is dismantled in the following way:
- Using a 10 mm socket wrench, loosen the tightness of the bottom side to the engine protective casing at five points.
- Using a Phillips screwdriver on each side, unscrew the screws securing the bumper to the fender liners from the bottom.
- In the same way, we free the upper part from the attachment to the fender liners.
- Using an 8 mm socket wrench, unscrew one screw on each side.
- Using the same key, we disconnect the fastenings on the front panel of the hood.
- We move the bumper forward, disengaging the technological protrusions.
Front bumper
Replacing the front bumper of a VAZ 2114 with your own hands takes a little time. If it is necessary to replace the radiator or grille, the procedure takes longer. Removing the body kit for all VAZ 2113-2115 models is carried out in the same way.
Tool
To replace the body kit you will need the following tools:
- Screwdriver Set;
- open-end wrenches 8 and 10 mm;
- 13 mm ratchet head with crank.
Step-by-step removal
To remove the front bumper of a VAZ 2114, place the car on a viewing hole or a lift. The algorithm for dismantling the body kit is as follows:
- The electrical connections to the license plate and fog lights must be turned off before any work can be done.
- The fastening bolts and nuts are treated against rust, as well as for better loosening, with VD-40 aerosol.
- Unfasten the front wheel fenders.
- Unscrew the fender liner mounting plate with a 10 mm wrench.
- Remove the 3 screws that are attached to the body kit.
- Using a 8 key, remove the 6 screws securing the fender liner to the front fender.
- Pull back the fender liner.
- Remove the radiator and headlight trims.
- Using a 10 mm wrench, unscrew the 2 nuts securing the left side of the bumper.
- Pull it a little to the side so that the studs come out of the body bracket.
- In a similar way, you need to unscrew the right side of the bumper.
- Using a Phillips screwdriver, remove the mounting screws under the license plate and unscrew the 2 screws located below. Disconnect the license plate.
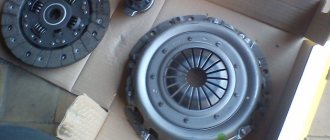
If the amplifier is damaged, replace it. Using a 13 mm socket, unscrew 2 nuts on each side. The amplifier is adjusted during installation using shims.
Before installing a damaged body kit, it is necessary to repair it and paint it. Installation of the front bumper on a VAZ 2114 is carried out in the reverse order of dismantling. Remember this rule: when we install the bumper in place, it is necessary to check all the gaps between the amplifier, fender, body, headlights, grilles and only then attach it.