Analogues of a standard starter
| Brand | A country | vendor code | Rated power | Starting power | Voltage | Price |
| ZIT (Samara) | Russia | 5722.3708 | 1.58 kW | 0.98 kW | 12V | 4000 rub. |
| BATE | Belarus | 5172.37080 | 1.4 kW | 1 kW | 12V | 5540 rub. |
| LKD ATE-1 | Russia | 2101.3708 PLGR | 1.55 kW | 0.95 kW | 12V | RUB 3,750 |
| SOATE (Stary Oskol) | Russia | 5722-3708000 | 1.55 kW | 0.95 kW | 12V | 3400 rub. |
Option without air conditioning
In some cases (if the car does not have air conditioning), you can do without dismantling the exhaust pipe.
To do this, you need to unscrew the engine mount and jack it up, resting one end of a wooden block on the exhaust manifold closer to the cylinder block, and the other on the jack. So you can try to bring the heat shield back, besides this there is another way - dismantling the exhaust manifold. Without a collector, the shield can be easily removed.
Good luck to everyone and enjoy your travels!
How to make repairs yourself
When the starter is removed, you can try to repair it yourself or take it to a specialized service center. If you have experience and an idea of how everything works and you, for example, are sure that the cause of the breakdown, for example, lies in a malfunction of the solenoid relay, then you can start repairing it yourself. But in any case, to be sure that this is the problem, it should be checked on a special stand where there is a load, since at idle it can work as it should, but not under load.
Another reason for poor ignition may be a malfunction of the planetary mechanism, which has plastic parts. You can understand what condition they are in by unscrewing the unit and disassembling it in half; to do this, simply unscrew a couple of nuts in its rear part.
As the experts say, the Chevrolet Niva starter is unsuitable for repair, since spare parts for it are not sold, but time does not stand still and you can do everything yourself. After the repair is completed, everything is assembled and put back in place in the reverse order.
Also interesting: Features of the front suspension of the VAZ-21213, VAZ-21214
Replacing the starter on a Chevrolet Niva
Before I started replacing the starter, I disconnected the battery. First, I removed the entire lower engine protection.
The starter is secured with three bolts; after they are unscrewed, it can be pulled out from below the engine, but a rod will interfere with this. So I immediately unscrewed it.
First the nut from the bottom.
Then the bolt on top.
Now you can unscrew the starter. The bottom bolt is fairly easily accessible from below. I unscrewed it with a small ratchet.
I unscrewed the remaining two bolts from above. This is what the starter looks like from above.
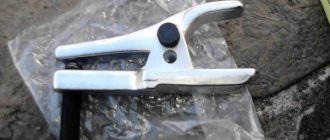
Here I have already used a spanner wrench. The key part of the key is slightly bent, otherwise it would be impossible to get to these bolts. The middle bolt is also more or less accessible.
The top bolt is the most difficult to reach of the three. But in principle, the key was easy to throw onto it, only the key stroke was very small and it took a long time to turn.
When all three bolts were unscrewed, the starter easily came out of its place.
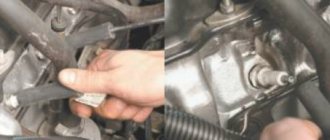
But in order to get it out of there, the protection of the starter from heat interfered. These are sheets of metal around it. On the side of the box, the starter rested against the protection with its protrusions into which bolts were screwed. At this point I simply bent the protection with my hands. On the other side, the protection at the bottom is secured with a nut. I tried to unscrew it with a large ratchet. She didn't give in. Then I pressed a little harder and it seemed to turn. And when I looked, I saw that the nut did not even think of turning away, but I simply twisted the eye to which it was attached. True, the protection bent back and allowed the starter to be removed, and the mount itself did not break off at all and seemed to be holding tightly and not rattling. I then left it all like that.
(It turns out I was wrong here. The nut shouldn’t have been unscrewed; it is welded to the mount. But you need to unscrew the bolt that goes into this nut on the other side.)
Now the starter easily pulled out of its place. The wires that go to the starter allow you to remove it without disconnecting them.
There are only 2 wires going to the starter. One small red one, which is simply plugged into the connector. We easily disconnect it by pulling the connector. The second one is healthy, screwed on with a nut covered with a rubber nozzle, and by unscrewing it I completely removed the starter.
Having unscrewed two nuts from the back of the starter, I disconnected its two halves and saw this picture.
It turned out that inside it there is a plastic part in the form of a glass with teeth, along which three gears run. So it broke into pieces and these gears therefore did not run in a circle and therefore did not rotate the gear that meshes with the flywheel.
And the gear that turns them also lost one tooth, but most likely this is due to flying plastic fragments.
This photo report shows in detail how to replace the starter on a Chevrolet Niva with your own hands. It is worth noting that replacing the starter is quite a rare need. In 80% of cases the starter can be repaired. In our case, there was a mechanical failure of one of the starter drive gears. This spare part is not sold separately, so I had to replace it with a new starter.
There is nothing complicated in the starter replacement procedure. He can handle it quite well on his own. Tools you will need:
- Ratchet wrench and sockets for 10, 12;
- Phillips and flathead screwdrivers;
- A penetrating lubricant like WD-40 may be needed;
We also recommend that you familiarize yourself with our video about starter malfunctions and the main possible causes.
The starter does not transmit torque to the crankshaft
| Diagnostics | Possible reasons | Remedy |
| When trying to start, a constant noise is heard, the starter clicks, the voltage at the battery terminals is less than 12V | The battery is low | Charging the battery |
| The voltage readings at the battery terminals are normal; when starting the starter, a crackling sound is heard with the voltage dropping twice | Decrease in battery capacity | Slow charging of the battery with a current of no more than 1A |
| During startup, a crackling sound is heard; when measuring the wiring from the battery to the starter with a voltmeter, a voltage drop of more than 1V was detected | Oxidation of battery terminals or starter terminals | Cleaning terminals, treating with anti-corrosion compound |
| Inspection of flywheel gears, drive shaft, bendix on a dismantled starter | Worn or broken teeth on the flywheel or shaft drive gears | Replacing the flywheel or a new starter |
| Failure to operate the solenoid relay when the 12V wiring is running at its contacts | Breakdown of the solenoid relay, damage to the wiring on the contacts, oxidation of the relay terminals | Replacing the relay with a new one, or cleaning the contacts and eliminating broken wiring |
| When 12V is supplied to the relay, no click is heard, the starter turns off | The relay is faulty, breaks in the armature winding, contamination or moisture ingress into the commutator, short circuit | Replacing the relay, cleaning the internal components of the starter |
| The starter drive rotates slowly when the relay is operating, the starter is turned off | Wear of the brush assembly, burnout of the commutator winding or armature | Replacing brushes, cleaning the commutator, or replacing the starter |
| When the starter starts, the drive armature rotates, but the flywheel remains stationary | Drive coupling wear | Replacing the clutch or starter with a new one |
| When the ignition is turned on, a grinding noise is heard, the drive shaft rotates, but the flywheel and crankshaft remain in place | Worn gear on flywheel | Flywheel replacement |
| The starter armature does not rotate when the relay is running | Breakage or burnout of the armature winding | Replacing the starter with a new one |
Step-by-step removal and installation of the Chevrolet Niva starter
Before starting dismantling work, you must disconnect the battery by removing the negative terminal.
And also interesting: “Niva” received air conditioning - KOLESA.ru - automobile magazine
A new or repaired starter is installed in its original place in the reverse order. When connecting wiring to the relay contacts, it is recommended to first clean the terminals and treat them with an anti-corrosion compound.
Chevrolet Niva LC › Logbook › Replacing the starter (car with air conditioning)
When unscrewing, the 82-piece tool set helped a lot:
The contents of all of these are the same, the difference is in the layout of the suitcase. We used both ratchets and all their extensions and universal joints so that we could reach the bottom bolts and a “13-socket” for the top bolt.
Read more: Mercedes ml 320 1998
I removed the “-” from the battery. I unscrewed the bolts and lowered them a little to make it easier to unscrew the wires:
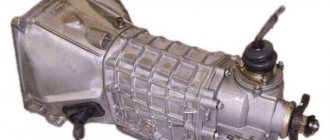
I pulled this miracle down: it really squeezes between the suspension parts)) And now let’s compare...
Not a very good angle: the original starter is closer to the phone, because of this its size is slightly exaggerated. In reality, it is noticeably smaller - both shorter in length and smaller in diameter.
Here he is - dear (closer):
For reference, power characteristics: Pramo - 1.4 kW, KZATE - 1.55 kW.
We install a new miracle in the same sequence and... nothing happens. Because the new KZATE is bigger - it doesn’t interfere from any side. I had to lower (unscrew) my pants =)
As a result, the new starter is in place, it seems to turn more powerfully than the old one, but for a longer time. The squeal is gone)) Don't break! All blessings!
Preliminary diagnosis
First you need to check all electrical connections connecting the battery and starter. There are often cases when insufficient contact of the wires - ground or positive - leads to partial operation of the device - clicks of the solenoid relay. In this case, the starter does not turn the engine crankshaft. This can be eliminated by cleaning the contacts of the battery, starter, ground wire and sometimes the contacts of the ignition switch group.
If you eliminate poor contact in the wire connections and there is no positive effect, you need to check the battery. This can be done using a load fork or simply replacing it with a proven working one. If there is no result, the unit will need to be removed and possibly replaced.
Removal on a Chevrolet Niva with air conditioning
The above is the sequence for removing the starter from a car without air conditioning. On a Chevrolet Niva with air conditioning, the sequence is the same, with the exception of two points.
- The starter heat shield on a Niva with air conditioning has a slightly different shape and is 3 cm shorter.
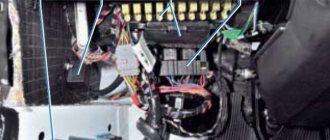
- In order to gain access to the upper mounting bolts of the starter, you will first have to remove the warm air intake hose. The clamp that secures it to the engine is loosened using a flathead screwdriver and the hose is removed, revealing access to the starter mount.
Also interesting: Do-it-yourself replacement of Niva Chevrolet silent blocks: upper hinges of the front arms, rubber or polyurethane?
As you can see, the main problem is not to remove the starter from the Chevrolet Niva, but to get to it. It should be noted here that the above method for removing the starter is not the only one. Some car enthusiasts prefer to remove the starter from the top, without using an inspection hole. However, it takes more time and requires considerable experience to carry out this procedure. It is for this reason that the article presents the traditional version of the “bottom” removal of the starter.
How to remove the Niva Chevrolet starter
To remove the starter, you need to do the following:
- Disconnect the wires from the battery and starter (you can use a wrench of the required size).
- We unscrew the starter, which is attached with three bolts to the box body. It can be removed through the top or bottom, however, motorists believe that it is more convenient to remove it through the bottom. It's difficult to do this without a pit. Air conditioning can be another obstacle. If it is present, you will also need to remove the warm air intake hose. The clamp that secures it to the engine can be loosened using a flathead screwdriver.
Now you need to determine the cause of the failure. There may be several of them:
- Faulty brushes. If they are worn out and do not reach the anchor, they should be replaced.
- Faulty retractor. In this case, replacement is necessary.
- Knocked out guide bushings also require replacement.
- The cause of the breakdown may be a burnt-out winding or a burnt-out armature. It is difficult to repair such a malfunction at home; it is better to contact a specialist.
Activation of torque on the starter without starting the engine
| Diagnostics | Possible reasons | Remedy |
| Visual inspection of the starter at the mounting points | The starter mounting bolts on the engine are loose | Tighten the threaded connections, replacing the bolts with new ones if necessary. |
| The starter is inspected in disassembled form | Loose terminal contacts on the armature | Tighten the nuts on the terminal contacts, having previously cleaned them |
| The starter is inspected in disassembled form | Worn bushings, damaged drive bearings | Starter replacement |
| When starting, the bendix rotates, the flywheel rotates slowly, the engine does not start, a loud noise is heard | Breakage of teeth, wear of flywheel gears | Flywheel replacement |
| The starter continues to operate after turning the key back in the ignition switch | Malfunction of the ignition switch, weakening of the reverse buffer spring, malfunction of the traction relay | Replacing the contact ignition unit, replacing the relay or spring on the reverse clutch |
| Slow rotation of the starter without starting the engine with extraneous noise and good wiring | Malfunction of the crankshaft, oil thickening at low temperatures, failure of the piston group system, generator failure | Diagnostics and maintenance of cylinder-piston mechanisms |
| The starter operates at increased loads without starting the engine | Insulation in high-voltage wires is broken, voltage surges in the circuit, short circuits | Diagnostics and repair of electrical wiring |
Recommendations for using the starter
To make your starter last
l longer, you need to follow a few simple recommendations:
- If you turn on the engine, then this should be done no longer than 15-20 seconds, and repeated no earlier than after 25-30 seconds. If after three times the engine does not start, you need to check the ignition and power system. If such faults are detected, they must be corrected.
- Do not use the starter to move the vehicle. This puts a lot of stress on the trigger mechanism.
- If you have successfully started the engine, turn off the starter, as the overrunning clutch may jam due to frequent rotation of the starter drive gear by the flywheel.
Anyone who has already removed and installed the starter at least once is unlikely to want to do it a second time. Although this work is not difficult, it requires a lot of effort and sometimes money. Follow these simple rules to avoid such breakdowns.