Necessary parts and tools for repair
Troubleshooting the cylinder head begins with the purchase of original parts and various consumables, the list of which is as follows:
- Fuel intake system valve 8 pcs. (art. 21120-1007010).
- Exhaust gas valve 8 pcs. (art. 21120-1007012).
- Set of hydraulic compensators 16 pcs. (art. 21120-1007300).
- Gaskets for valve cover, cylinder head, intake manifold, exhaust manifold (all come as a set art. 21120-1002064-86).
- Bolts securing the cylinder head to the engine crankcase (art. 21120-1003271-018).
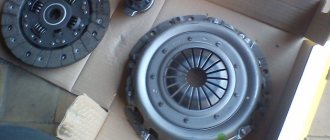
- Timing belt (art. 2112-1006040-02RU), timing tension roller (art. KT100507/100513), drive belt for mounted units (art. BP638).
- Engine oil and oil filter.
- Cooling system fluid.
Installation of valves on a VAZ 2112 is carried out using a standard set of tools, as well as several specialized types of keys:
- standard set of spanners from 8 to 24 mm;
- socket sockets in a set from 8 to 27 mm;
- end internal hexagons;
- mechanical valve retaining ring remover (depressurizer);
- torque wrench for tightening the cylinder head and camshaft bolts;
- paste for grinding valves (set for rough and fine grinding);
- metalworking cloth gloves to protect hands while working.
The work of replacing 16 valves on a VAZ 2112, the price of which as of this fall is about 50 thousand rubles at AvtoVAZ dealerships (or approximately 35-40 thousand rubles at ordinary car repair shops), is not a very complicated process. You can carry out the work yourself, for which it is enough to purchase the above-described spare parts and the necessary tools.
What can cause a malfunction in a 16-valve engine?
The main reason for the failure of the VAZ-2112 valves with 16 such elements is strong heating, which leads to burnout of the pump components. Car enthusiasts do not encounter this problem too often, but it arises due to:
- Filling the car with low-quality gasoline.
- If the vehicle is fueled with propane and the controller firmware has not been properly modified.
- The VAZ-2112 with 16 valves does not have the required number of spark plugs.
- The engine constantly detonates the injectors.
- The vehicle is operated at speeds higher than permitted, as a result of which the clutch readings begin to deteriorate and the parts are subject to increased load.
Self-repair of cylinder head
Every domestic car enthusiast has standard auto mechanic skills and is able to carry out cylinder head repairs with his own hands; to do this, you need to carefully study the stages of work described below, which are conventionally divided into: preparatory, dismantling, repair and installation.
Preparatory stage
They start by driving the car into a room with an inspection hole, turning off the power to the on-board electrical network (removing the terminals from the battery), unscrewing the engine crankcase protection and draining the oil and coolant from it, which is done into previously prepared containers through special technical plugs in the crankcase. These works should be carried out exclusively on a cooled engine, this will prevent your hands from getting burned from heated (usually up to 60-80ºС) liquids.
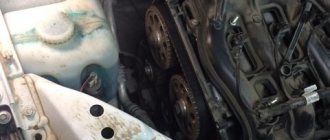
Dismantling
It begins with the removal of all cylinder head attachments (intake and exhaust manifolds, radiator pipes, air filter duct, high-voltage wires and spark plugs), timing belt protective cover, resulting in access to the valve cover fasteners. We unscrew the tension roller of the generator and timing belts, remove them, then proceed to dismantle the valve cover fastenings, unscrew them, gaining free access to the cylinder head bolts. We unscrew them, after which the cylinder head can be removed from the engine crankcase.
Repair
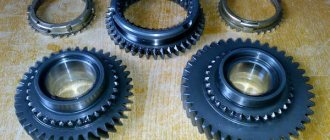
The cylinder head removed from the engine and placed on a workbench is disassembled. The fasteners of the camshafts are unscrewed and they are carefully removed, then the hydraulic compensators are removed from their seats and, using a screw depressurizer, the valve retaining rings (crackers) are dismantled, after which they are pulled out from their workplaces. After disassembling the cylinder head, we thoroughly clean it of technical contaminants. Each new valve must be ground into its working surfaces; this is done using a drill and a special grinding paste.
Having finished sanding, the working surface is thoroughly wiped with a cloth. All new parts are installed on the cylinder head. The timing mechanism (valve lifters, hydraulic compensators, camshafts and their front seals) is reassembled and the cylinder head is ready for installation on the engine.
Installation
They start by cleaning the surface of the engine crankcase from gasket remnants and traces of leaks of technical fluids, then a new cylinder head gasket is installed in the seat and the assembled head is carefully put on special guides, after which, according to a special scheme, its mounting bolts are tightened with a torque wrench to the required forces.
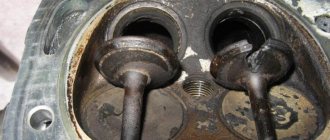
Sectional view of the valve mechanism
Replacing valves on a VAZ-2112 includes all the actions carried out when replacing hydraulic compensators. Having removed the compensator, you can see the valve stem and the upper plane of the disc. Plate 3 is held by two crackers 2 (see diagram).
Valve mechanism design
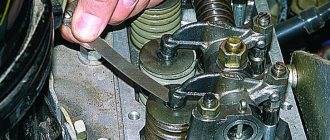
Dismantling includes the following steps:
- A “soft stop” (braided rope, etc.) is placed under the valve from below;
- Press down on the plate from above;
- The crackers are removed with tweezers or a magnetized screwdriver;
- Carefully move the plate upward, preventing the spring from rebounding.
Sometimes in “step 2” you have to hit the plate with a hammer, and here you need to be extremely careful. In general, there is special equipment, such as shown in the photo.
Spring compression equipment
The puller works on the principle of a vice. But the force when screwing should be small, otherwise they conclude that the crackers “stick” to the plate. And in this case, take a hammer.
Articles
- 21120-1007010 – inlet valve;
- 21120-1007012 – exhaust valve;
- 21120-1007028 – cracker;
- 21120-1007025 – upper plate;
- 21120-1007300 – hydraulic compensator (about checking them here).
Other cases in which dismantling of the cylinder head is required
Of course, it is not necessary to remove the cylinder head for every breakdown. This is only necessary if major repairs are needed. Such “major” cases include:
- Gasket wear.
- Formation of carbon deposits on parts.
- Valve deformation.
- Need to replace guide bushings.
- Failure of the camshaft, etc.
Of course, repairing it yourself or through a service in any case involves certain financial costs. To ensure smooth operation of the engine, regular diagnostics of the cylinder head are necessary. It is recommended to use high-quality fuel. In addition, try to prevent the car from overheating - because of this, the cylinder head may lead.
If some points remain unclear to you, then you can visually familiarize yourself with the process of replacing valves by watching the video:
Preparing to remove valves
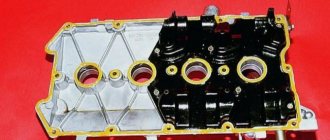
We will make a replacement on this engine (21120)
However, on a VAZ-2112 engine it is easier to replace valves by dismantling the cylinder head: to press in new guides, the cylinder head plate would have to be heated. It's best to leave the valve guides in place. But then you will have to remove different equipment:
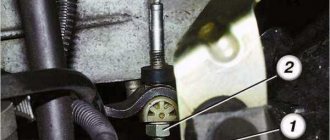
- There is a connector under the fuel pump hatch (photos 1 and 2). Turn it off so that the fuel pump stops pumping;
- Start the engine and let it stall;
- Remove the air filter: loosen clamps 1 and 2 and disconnect connector 3 (photo 3). Then use a 10mm wrench to unscrew the screw (photo 4).
All actions are illustrated by one photo.
Lowered the pressure, almost removed the filter
Remove the plastic filter housing along with the supply hose.
Disassembling the timing mechanism
Our goal is to remove both camshafts. On the VAZ-2112 engine, valve replacement can be performed even without removing the cylinder head. But the shafts will interfere in any case. Procedure:
- The negative terminal is disconnected from the battery;
- Remove the wires from the spark plugs, then disconnect them from the coils;
- The ignition module must also be removed (photo 2), and the crankcase ventilation hose must also be removed (photo 3);
- The bracket fixing the injector wiring is screwed to the cylinder head cover (photo 3). Remove it! The same is done with the bracket of the second harness (DPZ and IAC);
- It will be necessary to remove the receiver (photo 4). And the intake manifold holes are covered with fabric.
Study what the list says.
Preparing to dismantle the cylinder head cover
The cover itself is held in place by 14 bolts. A socket wrench is needed here. But first, let’s remove the plastic protection by unscrewing the six bolts with a 10mm wrench (photo 1).
We remove everything unnecessary in the timing drive
The timing mechanism has been removed!
Disconnect and remove the phase sensor under the right timing pulley. It is also necessary to disconnect the pressure sensor - it is located near the bracket that was removed. Using a 17mm wrench, without turning the pulleys, loosen the two mounting screws. A screwdriver is installed in the round holes - it is used as a stop. It remains to loosen the belt tension by partially unscrewing one nut (photo 3).
At the final step, after removing the belt, unscrew the screws on the pulleys. Each pulley is removed from the shaft. Then tighten three screws located flush with the pulleys (screws on plastic).
To remove the shaft, follow these steps:
- Remove the cylinder head cover;
- Unscrew 20 bolts (photo 1);
- Using two 15mm wrenches, unscrew the nut on the upper rod (photo 2). Do the same with the three nuts on the rod bracket (key “13”). The bracket is removed from the studs;
- Dismantle the bearing housing (photo 4);
- Now both camshafts can be removed (photo 5).
Do-it-yourself replacement of VAZ 2112 16 valves
Guide valves VAZ 2110
As a rule, replacing valve guides on a VAZ 2110 is necessary when the timing belt breaks and on some VAZ engines the valves come into contact with the piston. Replacing valves and guides on a VAZ 2110 is a responsible procedure that requires special knowledge and skills, but in this article we will look at how to carry out this operation with your own hands, especially since you do not have to use any special equipment.
As mentioned above, the reason for replacing the valves may be a broken timing belt, but this is not always the only reason. Often the valves need to be replaced due to the motor chain jumping.
When this happens, the valves simply turn out and it is clear that their further operation becomes impossible.
After this, the valves look like this:
Replacing valve guides for VAZ 2110
In addition, the valves themselves may wear out. More precisely, it is the valve stem, which has a certain size, that is subject to wear.
The leg is specially measured with a micrometer to check compliance with the standards. So, if the valve stem has a size that is less than 7.97 mm, then this is wear and tear and such a valve should be sent to the trash bin.
Finally, a burnout or crack in the plate itself may cause the valves to be replaced.
Replacing valve guides on a VAZ 2110
VAZ 2110 replacement of valve guides
So, let's begin. First you will need to remove the cylinder head from the car.
- de-energize or completely remove the battery;
- drain the coolant and engine oil;
- We remove all attachments, including vacuum hoses and cooling systems, from the vehicle.
Note. Don’t forget also to remove all fuel lines, accelerator cable and, in general, everything that could interfere with the removal of the cylinder head.
- Now you will need to remove the cylinder head cover;
- Next, remove the timing case and pulley belt;
- Now you will need to remove the bolts securing the cylinder head.
Note. During the process, you will need to monitor the condition of the bolts using a torque wrench.
In addition, you should not forget about the sequence of turning out the bolts. To do this, you should always have a cylinder head bolt tightening diagram with you.
Replacing valves
The cylinder head has been removed. The time has come to replace the valves, but for this you need to arm yourself with a special puller.
Of course, if there is no such tool, then you can always use the “old-fashioned” method, picking up a hammer and chisel. But it’s better to use a tool like the one in the photo below:
Special valve puller
- Remove the gas camshaft from the cylinder head;
- We also remove the camshaft;
- dismantle the pushers;
- now you need to take a removable device and secure it to the camshaft studs;
- Now we place a small stand under the valve plate and remove the fastening crackers.
Note. In this case, you should be very careful, since the springs are quite powerful and if the device comes off the plate, the crackers can fly far away, and you will need to look for new ones.
- after removing the cracker, you need to remove the plate with springs;
Replacing valve guides for VAZ 2110
- We also remove the thrust plates that sit under the springs.
Note. On a VAZ 2110, before removing the thrust plates, you need to remove the valve seal with a specially designed grip.
Removing the valve seal
The process of removing the oil seal is carried out as follows:
- The gripper clamps and presses the oil seal, but not too much;
- then you need to turn the oil seal a little in different directions.
When turning the oil seal to the right and left, you need to pull it up. In addition, it is not recommended to tilt the oil seal to the right and left, as this can damage the seating shoulder of the oil seal.
Replacing bushings
Now you will need to replace the valve guides. Doing this again with a hammer and chisel is, to put it mildly, unethical.
And the head itself can be easily damaged by acting in this way. To achieve an effective result, we will arm ourselves with a special tool.
Note. On a VAZ 2110 engine, replacing guide bushings is carried out in the same way as on all other VAZ models.
As you know, the guides need to be knocked out. That is why amateurs try to do this with a hammer.
Knowing that this can easily damage not only the head, but also the seating plane in the cylinder head, we arm ourselves, as was said, with a special puller. Here's what it looks like:
Special puller for removing guides
You should know that there are different types of pullers. In particular, it is customary to separate the impact puller, which needs to be hit with a hammer, but again, this method is not always effective.
Another type of puller, already a more common fixture, is the screw version. Thanks to this tool, it is possible to carry out smooth pressing and quickly replace the bushing.
It is sold at any specialized auto store, although you can make it yourself.
We continue the process of removing the bushings. Since the puller is universal, a bushing of a certain size should be placed under it.
It is selected in such a way that during subsequent installation its threaded part extends 2-3 centimeters from the guide.
- install the puller, securing it with two turned nuts;
- Holding the central part of the puller with a key, press in the guide sleeve.
Note. In this case, you need to be extremely careful, since too much force applied to the puller gives a characteristic click.
When this sound is heard, it means that the bushing has moved out of place and is already coming out of place. Next, you will need to continue unscrewing the screw until it comes out.
- take a new bushing (you will definitely need to treat it with engine oil so that it fits easily into place);
Replacing valve guides on a VAZ 2110
Note. To press in the bushing, you must use a special bushing with a conical chamfer, which must rest against the valve seat.
You definitely need two large diameter bushings for the intake valve seat. One of the bushings should be smaller. This needs to be remembered.
Note. It will be necessary to select the spacer bushings of the puller in such a way that when installing the guide bushing, their threaded part protrudes two or three centimeters.
Due to the fact that the upper part of the guide bushing is made with a special collar, you will need to use a special nut designed to rest against the guide. Why is this collar so important?
The fact is that a rubber cap-oil seal is fixed to this very collar, damage to which significantly reduces the tightness.
Note. After the special nuts are installed, a little thread remains on the stud and in order to reduce the load on the thread, a threaded bushing is also screwed on.
It should be remembered that a retaining ring is installed on the bushing. It will warn you with a kind of click when the bushing sits in place.
If, during the landing process, the scrolling becomes tighter, then you need to take your time and stop. This is done so as not to break the guide sleeve.
The guide is pressed in, but the work doesn't end there. It needs to be adjusted to the desired fit size.
This is done due to the fact that after pressing it is slightly compressed and the size decreases by eight millimeters. Therefore, you need to use a reamer with a diameter of 8.00.
This same reamer will need to be installed in the guide. After this, without pressing in any way, rotate the reamer freely.
- after unrolling the hole, blow it with compressed air (this is done to remove all sawdust);
- Now you need to start taking measurements.
Note. Measurements are taken to determine the diameter of the hole in the guide. To do this, you need to use a special intrameter indicator.
Usually, if the hole size is 8 mm, then at the end the size according to the indicator will show two hundred parts. After this, you will need to measure the thickness of the valve stem using a micrometer.
If the size of the leg is 7.99 mm, then three hundred square meters will be the normal gap between the guide sleeve and the valve leg.
Note. If it is noticeable that the valve is not completely adjacent to the seat, you need to tighten the seat with cutters or, in other words, carry out grinding.
Lapping
To begin with, newly installed valves require a runout check. There are special machines that grind the working surfaces of the valve disc.
So, if runout is observed and its value exceeds 0.02, then lapping is required. The runout is checked using, again, an indicator.
When the valve is turned by hand, the indicator shows a certain value.
Note. If the valve is completely new, then it should show a value of half a hundred.
The valve grinding itself must be carried out on special machines. You can see how to do this in this video.
Let's start the grinding process:
- we clamp the valve in the machine;
- start the machine;
- We carefully bring the valve to the grinding stone, which rotates at high speeds.
Note. It is not recommended to heavily grind the valve. To know if sanding is enough, you should pay attention to the intermittency of the process.
When the sanding becomes uniform, it is time to stop.
- After this, you will need to remove the valve and treat it with gasoline (rinse, in a word).
After this, the valves should look like in the photo:
- The seats are also subjected to grinding if they are not damaged.
Note. To grind seats, you need to use special balls.
Inside the saddle, the ball should leave a gray stripe, which is noticeable after the ball is removed from it. This same gray belt should go around the entire circle of the saddle.
After this, you will need to change the angle of the ball, which should now be 60 degrees. We do everything in the same way as described above.
The last stage of grinding in the seats with a rolling cutter should be carried out at an angle of 30 degrees.
Note. The ideal lapping of seats is considered to be such a condition in which a working strip of one millimeter is visible.
After this, it will be necessary to finally grind in the valves. How to do this can be found in subsequent articles.
As you can see, you can even change the inside of the engine with your own hands and nothing. It is only important to remember one thing: do everything as required by the instructions, otherwise problems cannot be avoided.
The beauty of working with your own hands is that you can always start all over again, and there’s no need to talk about saving money on the family budget. It’s no secret that the price for services of this type is growing every year in mathematical progression.
Materials: https://masteravaza.ru/dvigatel/klapany/zamena-napravlyayushhih-klapanov-na-vaz-2110-435
Installation Tips
Before installing the shafts, the piston of the first cylinder must be at the “top dead center”. To achieve this, rotate the crankshaft, grabbing it by the screw securing the generator pulley. Here you need a key “17”.
Alternator pulley and two timing shaft pulleys
The camshafts have spikes and the pulleys have grooves. Each pulley is equipped with a mark that should face up. The diagram shown in the photo corresponds to the upper position of piston 1. This is how the shafts are installed during installation.
You can set the crankshaft according to the mark located on the gearbox assembly (photo 1). This is done before installing the belt.
Various auxiliary elements
To set the tension correctly, use basic tips. Or you can do it simpler: when dismantling, note at what angle the tension roller was fixed. The key plate (photo 2) is set at the desired angle and the fixing nut is tightened (force 40 N*m).
How to screw the cylinder head
The threaded part of the screws is lubricated with engine oil. Then, maintaining a force of 20 N*m, the screws are tightened in the required order (see photo).
Recommended sequence (montage)
Second pass - each screw is turned at an angle of 90 degrees. On the third pass, the screws are turned another 90 degrees.
Chemistry
The bearing housing will be connected to the cylinder head cover. The connection itself must be airtight. A sealant is applied to the edge of the body around the perimeter: KLT-75M, Loctite-574, etc. During installation, the cylinder head gasket is not lubricated in principle - graphite or grease will only cause harm. Someone smears valve stems with graphite lubricant, which is also not correct. You need to use motor oil.
Before installation, the new valve is cleaned of factory grease. It is necessary!
How to remove the cylinder head on a VAZ-2112 (21120)
First you need to remove the fuel frame. To do this, you need keys 17, which remove pipes 2-3. You also need to remove clamp 1.
The screws of the fuel line strip are removed with a screwdriver, after which you need to remove the rubber rings from the pipes. It is also worth removing the oil dipstick pipe (10 wrench). Finally, you need to unscrew the bolts holding the ramp.
It is important to at least partially remove the coolant. After this, you can remove the thermostat mounts and move it to the side
You need to remove the thermostat gasket and the “0” wire nut. If necessary, you can turn off the sensor's DTOZh connector.
Now the engine is ready to change the valves. To do this, you need to take a 10mm wrench, unscrew the cylinder head bolts with it and remove the plate with the valves
It is important to follow the unscrewing sequence
Video instructions: all steps except installation
During the operation of the car, periodic adjustment of the valve on the VAZ-2110 is required; every owner of this brand needs to know where they are located. If necessary, you can contact the nearest car service center, but you will have to pay for this. Meanwhile, adjusting the VAZ valves of the “tenth” family is not so complicated that it cannot be done with your own hands, thus saving money.
How to make a valve desiccant with your own hands? 2 options to choose from
Motorists faced with engine repairs are often interested in how to make a valve depressurizer with their own hands.
After all, the presence of this device will not only speed up the work process, but also greatly facilitate it. Of course, some craftsmen use a spark plug wrench and a hammer to remove crackers from valves. This method is not ideal. Often the crackers fly away, and it is not possible to find the lost one. Also, with a strong impact, there is a risk of bending the valve plate, which will make it necessary to buy the entire set. This will result in additional costs. It is much easier to make the device and not have problems with repairs in the future.
Preparing and disassembling the mechanism
To carry out the work, you will have to purchase a special device for pressing the pushers and a set of adjusting washers of various thicknesses - you will not be able to do without them. If you constantly plan to make adjustments yourself, then this purchase will help you save money on car service costs. With a one-time promotion, purchasing devices is impractical; it is better to immediately contact the specialists.
To disassemble and adjust the clearances under the cams, you will need the following tools:
- a pair of flat probes with a thickness of 0.2 and 0.35 mm;
- a regular plumbing kit with screwdrivers and pliers;
- tweezers;
- sets of ring and open-end wrenches;
- spark plug wrench.
Since during the adjustment process you will have to repeatedly turn the crankshaft, to facilitate rotation it is recommended to unscrew all the spark plugs, having first removed and put the high-voltage wires aside. Further disassembly includes:
After wiping off any oil stains on the cylinder head flange where the gasket was located with a rag, you can begin tuning.
Remember that adjustment is carried out only on a cold engine.
Manufacturing of a lever desiccant
Making a universal valve desiccant with your own hands is also not difficult.
- Making a lever. To do this, the rod or pipe must be bent so that it takes the form of lightning. In this case, the bend should be shifted to one side. It turns out that the length of one end is about 15 cm.
- Two through transverse holes are drilled at the short end. The first is at a distance of 1 cm from the edge, the second is at a distance of 12 cm. The diameters correspond to the existing bolts.
- A U-shaped bracket is made from short strips. Holes for the bolt are drilled at the free ends. The partition is made of a washer with a diameter of 25 mm with a hole in the middle. The bracket is screwed to the outer hole in the lever.
- A similar bracket is made from long strips and is also attached to the lever using a free hole.
Finally, we would like to add that in a number of cases, a high-quality and competently manufactured homemade valve desiccant is in no way inferior to its factory counterpart, and sometimes even surpasses it in a number of indicators. And, of course, the cost of the tool will be noticeably lower compared to similar finished products.
Grinding in valves: how to do it yourself. Why and when do you need to grind valves? How to grind valves, what grinding paste to choose. Recommendations.
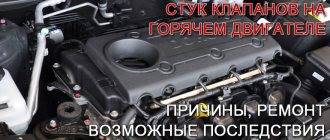
How to determine a burnt engine valve yourself. The main symptoms of a burnt valve, exact clarification of the causes of engine tripping. Diagnostics, useful tips.
Valves knock on a cold engine or after warming up the engine: possible causes of valve mechanism knocking. Fault diagnosis, useful tips.
Why and when do you need to adjust the valves? Self-adjustment of valve clearances using a feeler gauge and shims. Recommendations.
Purpose of the exhaust valve of the engine timing mechanism. Manufacturing materials and design features, protection of exhaust valves from burnout.
Purpose of the timing valve. Inlet and exhaust valves, design and features of the part. Layout diagrams and valve drive of an internal combustion engine.
Setting procedure
The first step is to put the adjusting device in place, then by turning the crankshaft, align the mark on its pulley with the protrusion on the cylinder block. In this case, the mark on the camshaft gear should also align with its protrusion. In this position, the piston of the first cylinder is at the very top (TDC), which can be easily checked with a screwdriver through the spark plug hole.
Then proceed in the following sequence:
- Check the tension of the timing belt by turning it around its axis as far as possible. A well-tensioned belt will not turn more than 90°. If you find any slack, tighten the belt using a pulley, otherwise further adjustment will be difficult.
- Using a wrench, turn the camshaft slightly clockwise so that the gear moves 2.5 teeth relative to the protrusion. Scratch your own mark on the gear with a sharp metal object - it will be useful to you in the future.
- Use feeler gauges to check the clearances in valves No. 1 and 3; they should be 0.35 and 0.2 mm, respectively. When the gap is set correctly, the feeler gauge moves in it with some effort.
- The size of the gap is adjusted with washers. If it is too small or large, remove the installed washer with tweezers and look at the markings where the thickness is electrographically applied. To be sure, it can be measured with a micrometer.
- Select the total thickness of the washers to maintain the specified gaps, check them with feeler gauges.
- Counting 11 teeth from the first mark, place the second, after 10.5 teeth - the third, and after another 11 - the fourth.
- Turning the camshaft clockwise and aligning your marks with the protrusion, repeat the valve adjustment in accordance with the table:
| Number of teeth between new marks | 11 | 10,5 | 11 | ||
| Intake valve number | Gap 0.2mm | 3 | 2 | 6 | 7 |
| Exhaust valve number | Gap 0.35mm | 1 | 5 | 8 | 4 |
Upon completion of the adjustment, remove the device, replace the plastic timing belt shield and reassemble it. Next, start the engine and check its operation by ear and while driving.