Nowadays, the question of which running lights is best for Kalina is quite relevant. Since November 2010, all vehicles are required to drive with low beams or fog lights on during the daytime. In accordance with the changes made to the traffic regulations, daytime running lights (DRLs) can be used. After the adoption of this resolution, car owners encountered certain difficulties. In the first place was the problem of forgetfulness: people did not turn on the lights due to lack of habit. Sometimes they forgot to turn them off.
And if in the first case, traffic police officers initially tactfully reminded about the rules, then in the second, discharged batteries caused extremely negative emotions among vehicle owners. When changes were made to the rules and daytime running lights were allowed for use, some car owners of Lada Kalina and other brands attempted to resolve the issue using homemade devices, various lamps and components from commercially available LEDs.
A variety of homemade devices of various types and qualities have appeared. But the changes made to GOST strictly regulated the requirements for DRLs. Manufacturers of lighting devices for motor vehicles did not miss their chance, and a variety of daytime running lights from various companies appeared on sale.
Return to contents
Basic criteria for choosing headlights
The popularity and demand for running lights is increasing over time. The various types of such lamps offered by manufacturers can not only ensure traffic safety, but also diversify the appearance of the vehicle. When choosing, you should carefully read the markings on the lamps.
Automotive lighting devices must be marked to permit their use on the territory of the Russian Federation. You should not choose devices based on the lowest cost. In addition to their low operational reliability, such lighting devices may be rejected during the next technical inspection. Then the car will be unusable until the causes are eliminated.
Markings must be clear, not exposed to external influences and located in a visible place. They must contain the country of origin code in accordance with EU requirements. The presence of a reflective element is also necessary. The selling organization is required to have a certificate for the product offered.
Parts manufactured by Hella, Philips, and Osram meet these requirements. Many of them can be installed on Lada Kalina. The cost of the kit ranges from 2,000 to 15,000 rubles. and depends on the manufacturer, design, performance characteristics and completeness.
To study the variety of shapes and lighting options when selecting daytime running lights for Kalina and preliminary evaluate design solutions, you can view photos presented in sufficient quantities in specialized magazines and on the Internet. Kits designed for self-installation are available for sale. These sets include:
- mounting brackets;
- connecting cable;
- connector;
- set of fasteners, bolts, nuts, latches;
- set of lighting fixtures.
The kit may contain a special device that, according to the rules, turns on and off the running lights when starting and stopping the engine. When purchasing such a kit, a connection diagram must be available. When installed on Kalina, running lights designed for foreign cars must be adapted to specific operating conditions.
- Installing DRLs (daytime running lights) on a Lada Largus with your own hands: video and connection diagram
Return to contents
Selection rules
When you choose running lights for your Kalina, follow a few rules:
- Please note that they must have markings regulating the use of lights on the territory of Russia;
- the optics must be marked with the code of the country that manufactured it, in accordance with EU standards;
- choose only products with reflectors and certification;
- all signs must be clearly visible and not located in visible areas where they are exposed to the external environment;
- Don't be fooled by the low price. Most likely, such daytime running lights on the Lada will not serve you for long, and they will be rejected at the next technical inspection.
Products from Osram, Hella or Philips satisfy the above criteria. Running lights for Kalina cost from 2 to 15 thousand rubles. The price depends on a number of their characteristics, configuration and company. To study the shape and brightness of the DRLs before purchasing, look at the photo of the optics on the car.
Despite the opportunity to use the services of specialists when installing optics, there are also kits on sale, thanks to which you can install running lights on your car yourself. This includes:
When choosing, you should carefully read the markings on the lamps
- brackets for fastening;
- cable;
- connector connector;
- fasteners: nuts, bolts;
- set of light bulbs for lighting.
Additional equipment includes a device that enables activation and deactivation of the running lights on the Kalina during engine startup and shutdown.
Each kit is supplied with connection instructions, but optics originally intended for foreign-made cars may require adaptation to a domestic car.
Method of installation of lighting devices
The installation of DRLs on Lada Kalina cars, like on all other cars, can be done at a car service center or independently. There are no restrictions in this regard either in the rules or in GOSTs. The main requirements for the location of daytime running lamps are:
- The distance between the closest inner sides of the lamps must be at least 60 cm. If the overall width of the car is less than 130 cm, a distance of up to 40 cm is allowed.
DRL installation diagram for Lada Kalina - The distance from the outer side of the lamp from the overall edge of the car should be no more than 40 cm. The lamps can be located at a maximum height of 150 cm, at least 25 cm from the surface of the roadway.
- In terms of length, the lamps are installed on the front side of the engine compartment, observing the height clause.
- The correct installation is considered to be the position when the light reflected in the rear and side mirrors of the car driving in front does not interfere with its driver. Angles of deviation from the axis of movement of the vehicle are allowed up to 20° in both directions horizontally and 10° vertically (down or up).
- In addition to observing the installation dimensions of fluorescent lamps, GOST regulates the brightness and size of the area illuminated by the devices. Basically, homemade devices do not pass testing based on these parameters.
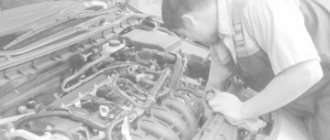
The process of installing DRLs on the Lada Kalina must begin by removing the upper and lower grilles. If you decide to install lamps in the bumper, you need to remove it too. But the optimal place is the bottom grill, since it can use existing holes.
In the selected places, it is necessary to make markings according to the shape and size of the lamps, and carefully check for compliance with GOST requirements. Then use a regular knife or any other suitable tool to cut or widen the holes for the devices. It is advisable to be careful when working and not to exert much force to avoid damaging plastic parts.
After adjusting the holes for the devices, you need to secure them with standard fasteners from the purchased kit, lay and secure the wires along the grille. After this, the parts can be installed in place. It is not advisable to secure the lower grille or other part with fixed lamps thoroughly until the devices are fully checked after connection.
Return to contents
Installation of running lights on Lada Kalina
In this article we will look at such a modification as running lights on a VAZ.
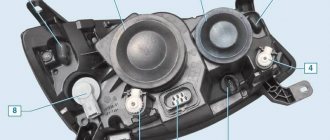
We will do this using the Lada Kalina car as an example. To install running lights on Kalina, Fig. 1, you need to find the right place.
According to the rules, additional lighting devices, if regular places are not provided for them, must be installed no closer than 30 cm from the edge of the bumper. The ideal place to install running lights (Fig. 2) on Kalina is at the edges of the lower grille (Fig. 5).
So, in order to prepare the place for installation, you need to remove the upper grill (Fig. 3) and the lower grill (Fig. 4).
The illustrations show the fastening bolts with arrows. After removing the lower grille, we proceed to install the running lights (Fig. 5) and lay the wiring along the grille (Fig. 7).
The wiring consists of two two-core cables that connect to the dimensions in Fig. 6, the LEDs consume very little power and do not require the use of additional relays.
After installing the running lights on the viburnum and conducting the wiring, install the lower grille in its place (Fig. 8) and connect the red wire to the plus dimensions, and the black wire to body ground.
It is advisable to install the lower grille in its place, but do not fix it with bolts and check the correct connection (Fig. 9).
If you accidentally reverse the polarity, then nothing will happen to the running lights, they simply won’t work. After checking, we put everything in place and fasten it. Upon completion of assembly, we check again and use it as in the first picture.
So, daytime running lights are installed on the VAZ. Good luck!
Requirements for DRL according to GOST
By placement:
Functional electrical diagram:
- DRLs should turn on automatically when the engine start/stop control is turned to the “on” position.
- It must be possible to activate and deactivate the automatic DRL operation without the aid of a tool.
- DRLs must turn off automatically when the headlights are turned on, except when the headlights are turned on for a short period of time to signal road users.
DRL emitters must occupy an area of at least 40 cm and emit light with an intensity of 400 to 800 cd. Moreover, the light should be white, the number of emitters should be 2 pcs.
Self-installation of DRLs is considered as making a change to the design of the car. If the vehicle is not equipped with DRLs, either low beam headlights or fog lights should be used instead during the daytime.
Features of installation of lighting devices
Daytime running lights "Lada Kalina" are installed in accordance with GOST according to the following rules:
- at a distance between the internal parts of the devices of at least 0.6 m. For machine sizes less than 1.3 m in width, a distance of 0.4 cm is permissible;
- at a distance of up to 40 cm from the outer part of the lighting fixtures from the overall edges;
- at a height of up to 1.5 m. In this case, the minimum distance from the road surface should be 25 cm;
- in the front of the engine compartment.
The installation of Philips Led Daylight 9 DRLs or other suitable optics is considered correct when the light reflected in the mirrors of the car driving ahead does not interfere with the driver’s visibility.
Horizontal deviation is allowed - 20 degrees and vertical - up to 10 degrees.
In addition to the rules for installing the control unit for daytime running lights, state requirements regulate their brightness and the area of illumination of the road surface. It is precisely for these parameters that, as a rule, home-made devices or optics are not suitable for other car models.
DRL connection
How to connect daytime running lights so that they meet GOST requirements? There are many such connection methods. We decided to publish the simplest of them, which uses only one 5-pin relay. The general connection diagram for DRLs is as follows:
It is worth noting that using the connection points from the diagram, all connections are made in the engine compartment; it is not necessary to lay wires into the car interior. Electrical diagrams may also be useful (Lada Priora, Lada Kalina, Lada Granta, Lada Largus)
As a result, the DRL operating mode will be as follows:
- Once the ignition is turned on, the DRLs light up. They continue to light even after the engine is started.
- After turning on the headlights, the DRLs are turned off.
- After switching to low beam, the DRLs are also disabled.
- If you turn off the low beam and side lights, the DRLs light up automatically.
- We turn off the car and take the key out of the ignition - the DRLs go out.
Let us remind you that the easiest way to tune headlights is to install eyelashes.
Keywords: headlights Lada Granta | headlights Lada Kalina | headlights Lada Largus | headlights of Lada Priora | 4x4 headlights | headlights of Lada Vesta | headlights lada xray | external lighting for Lada Granta | external lighting for Lada Kalina | external lighting for Lada Largus | external lighting for Lada Priora | external lighting 4x4 | external lighting for Lada Vesta | external lighting Lada XRAY | universal article
Found an error? Select it and press Ctrl+Enter..
Similar materials
The first photos of the Lada 4×4 Elbrus Edition have appeared. Adjusting the headlights of the Lada Kalina 2. The Lada 4×4 may have a prefix SE (Elbrus Edition)
Table of contents:
Connection to Kalina's on-board network
There are no restrictions or rules regarding the connection diagram in GOST. But turning on and off daytime running lights must obey certain rules. The running lights should turn on automatically when the engine starts and turn off when the engine stops. When you turn on the high or low beams, the DRLs should turn off. Sometimes Kalina car owners want to additionally turn off the daytime lights when the engine warms up.
This option is possible with certain knowledge and skills in working with automotive wiring. When installing daytime running lights on Kalina in the factory version with a diagram and instructions for connecting to the control device, usually no problems arise. The mentioned device is a relay with five terminals numbered 85-87, 87a and 30. To connect it to Kalina, you need to find any power wire from the low beam headlights and the positive wire from the ignition switch.
All these wires need to be installed with a female terminal with a small piece of wire, carefully insulating the connection points. Wires of the required length are also connected to the relay terminals, but with male terminals. Next, the wire from terminal 86 of the relay must be connected to the car body under any mounting bolt. It is advisable to immediately connect the wire marked “minus” from the DRL here.
The wire from the relay terminal with number 87a must be connected to the “plus” from the ignition switch. Wire 85 must be connected to the wire from the low beam headlights. You need to connect the positive wire from the running lights to terminal number 30. Relay terminal 87 is not used.
After installation is completed, you can check the operation of the lamps on the Lada Kalina car. To do this, you need to turn on the ignition. When the engine is running, the daytime running lights should light up. Next, you should turn on the low-beam headlights, the DRLs should go out, and the low-beam headlights should light up.
Read also: Amiwa spare parts reviews
When switching to high beam, the situation should remain the same. Next, you need to turn off the high and low beams, and the running lights will light up. Then turn off the engine and the daytime running lights should go out.
I’ve long wanted to install daytime running gear on my Viburnum, but the ones I found on sale were either long, bulging, or completely out of place... and after much agony of waiting and choosing, I took it for myself:
Begin. I decided to run the power wire into the cabin through the hole under the wiper drive. To do this, first remove the battery, the levers along with the brushes from the shaft, then the plastic lining, and lastly the gear motor:
At the same time I cleaned the hole for draining the water, everything was clogged with earth for some reason...:
Remove the rubber plug:
We pass the DRL power wire through it:
We bring the wire into the interior, fasten it:
We prepare the necessary tools for fastening the DRLs themselves:
We unscrew the two screws that hold the lower plastic grille and take it out:
We outline and drill small holes for further screwing of self-tapping screws into them:
We put the lower plastic grille and two “lamps” in their places:
As a result, everything was installed according to GOST standards :) (I hope):
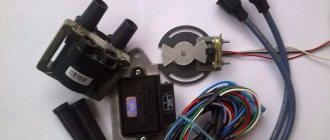
The first stage is now complete. Let's move on to the second one. These DRLs have a third wire (yellow), which is thrown to the dimensions, and in theory, when the dimensions are turned on, the daytime lights should work in the floor of the channel. But I need it so that when I turn on the headlights/low beams, they are completely turned off, and in the end I cut off this yellow wire at the root so that it doesn’t get in the way. In order for the DRLs to turn off the way I want, I need to use a 5-pin relay (avtogsm.ru/rele-5-kontakt-p211.html), I didn’t look for long, but took the whole set with wires and a fuse (I remember the rules DRLs should be able to be manually switched off without problems) from an unused PTF connection kit for the VAZ 2108... altered the pinout to suit your needs (30 - power supply for running lights, 85 - ground, 86 - dimensions, 88 - wiring, where 12V appears after switching on ignition), cut off the excess:
Pinout of the standard MUS, this is where we will hang the relay:
We pull out the larger wires needed from the bundle with the wire under the panel, and install a relay on them:
We tighten and paste over everything that can make a sound with a model:
continued in the next post, my limit of uploaded photos to the page is over))
Daytime running lights on Kalina do not lose popularity due to the requirements for cars, which stipulate that even during the day, cars on Russian roads must be driven with fog lights, daylight running lights or DRLs on. The manufacturers of this optics did not miss this innovation. Today, a wide variety of lighting devices have appeared on the market, which comply with state standards and at the same time give the vehicle a presentable appearance.
Read also: Anti-creak for car plastic
running lights for Lada Kalina
The nuances of turning on running lights
The basic requirements regarding installation, technical parameters and connection of navigation lights are listed in paragraph 6.19 of GOST R 41.48-2004. In particular, the electrical functional circuit of the DRL must be assembled in such a way that the running lights turn on automatically when the ignition key is turned (the engine starts). In this case, they should automatically turn off if the headlights are turned on.
Clause 5.12 of this standard states that headlights (FGS) should be turned on only after the lights are turned on, with the exception of short-term warning signals. When connecting DRLs yourself, this feature must be taken into account.
Correct connection of DRLs is not limited to a well-thought-out functional diagram. It's time to think about the stabilization unit for LEDs. In the running lights themselves, resistors act as a current limiter; however, due to voltage drops, resistors cannot limit the current to the same level. That is why a voltage stabilizer in the running lights connection circuit is extremely necessary. Otherwise, the service life of LED DRL modules is significantly reduced due to constant changes in on-board voltage. Some car enthusiasts claim that it is possible to connect running lights without a stabilizer.
Connecting and installing an LED driver is a waste of time, because the DRLs on LEDs shine regularly for months without any stabilization...
However, this statement is easy to dispute. The fact is that with each voltage surge, more than 12 V appears on the LED module, the forward current through the LEDs exceeds the nominal value, which leads to overheating of the emitting crystal. The brightness of the LEDs decreases, such DRLs will no longer be able to fulfill their immediate task - to warn oncoming drivers from afar, and over time they will begin to flicker and fail.
Using LED DRLs without a voltage stabilizer means spending at least several hundred rubles every year on new modules and wasting time replacing them.
For ease of understanding, the circuits below are shown without using a stabilizer.
Switching on through dimensions or low beam
The second version of the DRL connection diagram involves using the power circuit of the side light bulb. To do this, the positive wire from the running lights is directly connected to the “+” from the battery. In turn, the negative wire is connected to the “+” of the side light, which is currently electrically neutral. As a result, the following current flow path is formed: from the “+” of the battery through the LEDs to the size, and then through the light bulb to the body, which serves as the minus of the entire circuit. Due to the low current consumption (tens of mA), the LEDs begin to glow, and the lamp spiral remains extinguished. If the driver turns on the side lights, then +12 V appears on the positive side of the side lights, the potentials on the DRL wires are equalized and the LEDs go out. The circuit goes into normal mode, that is, current flows through the side light bulbs.
This circuit solution has several disadvantages:
- running lights remain on when the engine is turned off, which is contrary to current regulations;
- the circuit will not work if LEDs are also installed in the dimensions;
- the circuit will not work correctly if the DRLs contain powerful SMD LEDs, the rated current of which is comparable to the current of a light bulb;
- For safety reasons, an additional fuse must be installed.
This connection method can be improved by connecting the positive wire of the LED module not to the “+” of the battery, but to the “+” of the ignition switch, thereby eliminating the first drawback. Some motorists use schemes for turning on running lights through a low beam lamp. That is, when the low beam is turned on, the DRLs automatically go out, but in other cases they work. In addition to the above disadvantages, this method does not comply with GOST R 41.48-2004 and traffic rules.
When parking a car at night, side lights are used to indicate it; the use of DRLs is prohibited.
Connection via a 4-pin relay from a generator or oil sensor
The following two methods have a common basis and imply the operation of daytime running lights only after the engine is started. The circuit for switching on DRL from the generator is based on switching a four-contact relay and a reed switch.
The DRL relay contacts are connected as follows:
- 30 – to the positive terminals of LED modules;
- 85 – to the positive wire to the dimensions;
- 86 – to any reed switch output;
- 87 and the second terminal of the reed switch - to the “+” of the battery.
After checking the reliability of all contacts, proceed to setup. To do this, start the engine and, by moving the reed switch near the generator, achieve its activation and a stable glow of the DRL. Then the reed switch is hidden in a thermal tube and fixed in the found place using nylon ties.
At the moment of starting the engine, and then the generator, the contacts of the reed switch and relay close, supplying power to the LED running lights. In this case, the side lamps remain turned off, since the current through the relay coil is small to light them.
In the absence of a reed switch, you can power the DRL from the oil pressure sensor. In this case, pin 86 is connected to the oil pressure lamp. The rest of the circuitry is duplicated.
Both schemes have a common drawback. They cannot be used if LEDs are installed in the dimensions.
Connection via 5-pin relay
Now it's time to learn how to connect running lights via a five-pin relay. The scheme is the most universal, and was assembled to eliminate the disadvantages of previous options.
First, about connecting the relay for DRLs:
- 30 – to the positive terminals of LED modules;
- 85 – to the positive wire of the side lamp;
- 86 – on the car body;
- 87a – to “+” from the ignition switch;
- 87 – do not connect (isolate).
The circuit with a five-contact relay works as follows. When you turn the key, +12 V is supplied to the DRLs, thereby turning them on. If you turn on the side lights or headlights, the relay will open contact 87a and close inactive contact 87. As a result, the DRLs will go out and the side lights will turn on. The circuit fully complies with the requirements of GOST and traffic regulations and can work with side lights even based on LEDs.
However, the circuit still has one negative point - the DRLs will turn on immediately after turning the ignition switch. That is, if you turn the key in the ignition but do not start the car, the DRLs will light up.
Despite the existing drawback, the circuit is quite successful, but in order to correctly connect the DRL via a five-pin relay, you will need to supplement the circuit with a voltage stabilizer.
This switching option is interesting because the path of current flow through the running lights is independent. This allows you to install light sources of any type and power in headlights and DRLs.