I solved the problem with the belts. Pulling out and rewinding is now very comfortable. I installed a completely new belt on the passenger seat, bought it at a farita from a guy for only 300 rubles. It’s a little different in appearance from mine, there’s no decorative bolt plug and the old one doesn’t fit, but these are all minor things, the guy said that this is a belt specifically for classics. Works great. I just wound up the spring on the driver's belt and removed the ball, it comes out perfectly. Later I’ll try to make a hole in the ball holder, as people advise, maybe I’ll be able to get it to work tolerably. For those who also have a spring pop out, here is a small winding diagram. When the spring popped out, I wanted to try to carefully wind it up without removing it from the shaft and outer side, but some kind of Mobius strip came out, which I could not unwind to its normal state. When I wound the tape and put it on the shaft, it constantly intended to fly off, so I had to hold the tape and immediately put on the cover, it didn’t work the first time, but it worked)
It is necessary to wind up against the twisting of the spring
.
I also installed a new battery, it turns out I had the original one from the factory, it’s been 7 years already, but I have to give it its due, it held up quite tolerably. The new one with the delivery of the old one rose at 2500.
Any vehicle component does not last forever and tends to break. Sometimes this is not so noticeable and may appear after some time. In other cases, such as with a seat belt, the problem will be noticed immediately. What to do if the seat belt does not extend? For what reasons could this happen? Find out more details below.
What does a jammed belt mean?
If the seat belt does not pull out of the installation socket, it is most likely jammed. To understand what this means, you first need to understand how it works. When the belt does not extend, this indicates a failure of the locking mechanism or that the belts were jammed as a result of an accident. But first, let's look at the principle of operation.
Vehicle seat belt
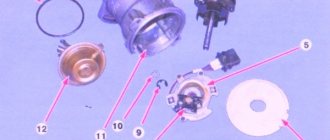
Inside the blocking device there is a sensitive element responsible directly for blocking, which is made in the form of a ball. This ball, moving through a system of levers, clings to the body of the coil gear. If the belt is retracted too quickly, the spool disc puts more force on the screw surface, thus blocking the ball.
If the lock is jammed and cannot be turned off, this means that over time the security mechanism has begun to function incorrectly.
In such cases, the strap does not retract and cannot be turned off in any way. In such cases, even an attempt to slowly latch the element may not help - it simply jams and no longer retracts, does not work.
Causes
If your vehicle's security system won't retract, or the lock is stuck and cannot be disengaged, there could be several reasons for this. Before we move on to how to disassemble and disconnect a belt that does not work and does not retract, let's talk about the reasons. There are not many of them, so we will not dwell on this point for long. After all, in order to repair the latch of an unfastened strap, you need to know what is not working and why. So, the reasons:
- First of all, the belt usually does not retract due to wear. Or rather, not specifically the wear of the belt, but in principle the locking system. Also, this may not be related to the entire system, but to one of its components. If the buckle of an unfastened strap is jammed, does not retract, and you cannot disengage it, then, without a doubt, the problem is in the mechanism. But if the element was not fastened, that’s half the trouble. It will be much worse if it jams during operation.
- The second reason is the breakdown of one or another component. As a rule, it concerns not an unfastened belt, but a fastened one. If a breakdown occurs or a defect appears in the operation of one of the components, this is usually associated directly with the fastened structural elements of the system. In this case, only repairs will help you and nothing more. Or, of course, you can always replace failed parts.
- Another reason is blocking after an accident. Typically, the design of the strap is made in such a way that in the event of a traffic accident, the squibs of the mechanism are activated. In this case, the lock of the device jams and it is no longer possible to disable it.
Depending on the car model, the driver may receive a signal that the straps are stuck. This signal can be either audible or appear on the instrument panel. The signal may also appear on the on-board computer screen, if available. In any case, if the car is equipped with “brains”, the driver will receive a corresponding signal.
Repair process
Now that we have dealt with the signals and reasons for blocking a fastened and unfastened seat belt, let’s move on to the repair process. Cleaning seat belts is one of the main tasks in this process, so we will consider this procedure separately. So, what should you do if you receive a signal that the lock is jammed? How can I clean it or turn it off? You will learn more about this below.
Tools
To disable the lock if a corresponding signal appears, the entire mechanism will need to be cleaned. To do this, you need to thoroughly prepare in advance and collect all the necessary tools. so what to prepare:
- a Phillips screwdriver, preferably a short one;
- flat head screwdriver;
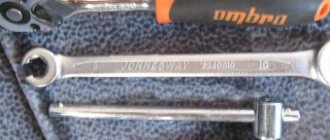
- a wrench set to “17”, it will be more convenient to use a socket wrench;
- stationery pin;
- syringe with tube;
- some gasoline (lighter fuel is ideal).
Step by step instructions
When the entire list of tools is ready, you can begin repairing and cleaning.
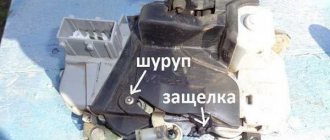
- Using a Phillips screwdriver, unscrew the screws that secure the strap protection.
- If the lock is not working, pull the strap out to its full length and secure it with a clothespin.
- Take a wrench and remove the screw that secures the element coil. The screw must be removed from its installation location. To prevent the element from starting to unwind, you can attach it directly to the same spool using the same clothespin. In any case, in order to disable and clean the lock, it must be locked to make further actions easier.
- Put the reel aside and sit in the next seat. To disable and clean the lock, you will need to find the lid behind which the inertial device is hidden. As a rule, it is slightly thicker in design. Shake the coil - under which cover you hear the noise - under that one it is located.
- Now to dismantle the protective cover you will need to remove four plastic pistons. This can be done using a slotted screwdriver or a thin knitting needle. The pistons should be supported by hand so that they do not fly out and you do not have to look for them and collect them throughout the cabin. Then pry up the cover with a screwdriver and remove it. Set the lid aside.
- Your view will now be presented with the first mechanism of the component. It is a kind of box with a cylinder and thus a locking ball and a so-called rocker inside, which jams the lock. This mechanism can be dismantled freely from the installation site.
- Check the functionality of this rocker - ideally it should move freely along the axis of rotation. This device should be positioned vertically with the top angled toward the locking ball. One way or another, the rocker arm must be positioned vertically so that it does not jam. If you feel that the so-called rocker arm does not move freely, then you need to clean its rotation axis. Pour some gasoline and rinse the device until it rotates freely on the axis, without the slightest jamming.
- Now let's move on to the second, inertial device. It is located under the gear, which is made of plastic and in most cases is made of steel. The gear comes off freely, so remove it.
- Note the center of the serrated hole. It contains an eccentric with teeth. It is these teeth that jam the strap when it is suddenly pulled out. The space under this very eccentric needs to be cleaned. Pour a little prepared gasoline around the entire perimeter of the hole, add a little fuel to the center. At the same time, hold the strap, preventing it from winding up, for which you can temporarily remove the clothespin. Make sure that the liquid gets into all parts of the element, otherwise cleaning it will be useless.
- Take the dismantled spool with one hand so that the plastic guide along with the spring can be supported with one finger. Using your other hand, pull and wrap the safety element several times. Also pull it a few times until the device itself engages. Next, hook it on the reel one more time. These steps should be repeated several times.
At this point, the cleaning process of the mechanism can be considered complete. You should carry out all further assembly in reverse order. Do everything correctly, because an incorrectly assembled mechanism will cause breakdowns in the near future with regular use of the straps.
Replacing the rear seat belt on a VAZ 21099
Note! Just for fun, if you also want to learn how to replace the seat belt on VAZ 2108, VAZ 2109 cars, then see “Replacing the rear seat belt on hatchback cars”!
How to replace the rear seat belt?
Removal: 1) Before starting work, perform a small operation to fold out the back of the rear seat. (see "Rear seat layout")
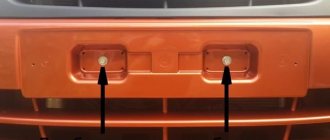
2) Now that the backrest is completely unfolded, use a screwdriver and use it to remove the plug from the main belt bracket mounting bolt.
3) Next, when the plug is removed from the head of the main bolt, take a wrench in your hands and use it to unscrew this very bolt securing the lower part of the belt, and then remove the bolt from the bracket.
Note! When unscrewing the bolts, try not to confuse them with each other, because all the bolts that secure the seat belt are of different lengths, for example, the longest bolt is the bolt that secures the seat belt at the bottom of the car!
4) Next, using a screwdriver, remove the plastic cover that sits on the top bolt securing the belt bracket to the car.
5) Then use a wrench to unscrew the single bolt that holds the seat belt bracket to the car body, and then remove the bolt from the bracket.
6) Now climb into the trunk, and by hand push the plastic lining through which part of the seat belt passes to the top.
7) Next, having found the belt reel in the luggage compartment, unscrew the bolt that holds it.
 And at the end of the work, move back into the car interior, and while in it, pick up the seat belt and insert it completely into the trunk, through the hole that is located in the speaker shelf.
9) Next, if you need to remove the seat belt buckle, then to do this, unscrew the bolt that holds the seat belt buckle to the car body, and then remove it.
Note! In the photo, one of the locks has already been removed, so the arrow points to the place where it was previously attached!
Installation: 1) Firstly, if you previously removed the seat belt buckle from the body, now install it back by tightening the bolt that holds it.
2) Next, approaching the trunk of the car, insert the upper part of the belt, as well as its trim, through the hole that is located in the speaker shelf.
Note! The cover will most likely not be installed on the new seat belt, so in this case, remove it from the old belt and put it on the new one!
3) Then install the seat belt reel in its place, and then tighten the bolt holding it until it stops.
4) Now smoothly move into the car interior, and while in it, take the seat belt trim with your hand and install it in its place.
5) Next, move the tip of the seat belt through the hole in the bracket, and then install the bracket in its place, and then screw the seat belt bracket with its fastening bolt until it stops.
Note! After tightening the bolt, place a plastic cover over the belt bracket!
6) And at the end of the operation, tighten the bolt that secures the lower part of the belt.
Note! After screwing, install a small plug on top of the bolt, which was also removed earlier!
Video “How to repair seat belts?”
The video shows how to properly repair your vehicle's seat belts.
Any mechanism in a car can sooner or later fail and cause trouble for the driver. Sometimes this is not noticeable, but sometimes it immediately causes inconvenience. For example, this happens with seat belts. They serve to protect the driver and passengers from dangerous movements during an accident or sudden braking, thereby preventing injury. This device was invented a long time ago, and throughout its use it has saved many people’s lives. A non-functional seat belt must be urgently replaced or repaired, as driving with it is dangerous. Moreover, this is a violation of the Traffic Rules. When the seat belt does not extend, the problem can be solved using simple DIY methods.
Main causes of failure
If the seat belt in your car does not extend, it means it is jammed. To fix the problem, you need to understand how the mechanism works. Most likely the blocker has failed. Inside there is a sensitive element that performs blocking and is made in the form of a ball. It moves with levers and engages with gears. If it retracts quickly, the flywheel exerts more force on the screw surface and blocks the ball.
When the lock jams, even slowly pulling the belt does not help. Let's look at the possible causes of breakdowns.
- Most often, the belt does not extend due to excessive wear and tear on the locking system. This is due to failure due to wear of some parts of the mechanism. It’s good if such a malfunction is detected only when the driver is fastening it. It is more dangerous if the coil jams while the car is moving.
- The device is blocked due to a traffic accident. The design of the blocking device is made in such a way that if there is a strong impact, the squibs that are installed on some car models can be triggered. In this case, the lock is completely jammed and there is no way to unlock it.
- Breakage of some parts. There is only one way out - replace the defective parts or the assembled mechanism.
The driver may receive a signal that the seat belt is faulty. The type of signal depends on the vehicle model: in the form of a burning light or sound.
Coil problem
Modern seat belts are equipped with a special reel on which the belt is wound. It has a complex device that allows you to block the belt from being pulled out during a sudden jerk or a road accident. A problem may arise with such a reel if parts wear out, dirt gets in, starts to jam, or parts break.
In such cases, it is necessary to take immediate action, as this puts the driver and passengers in danger while driving. You can fix the problem yourself if you follow certain recommendations, which will be discussed in the following sections. But how can you check that the coil is working properly and that there are no problems before driving the car? There are methods for this.
Seat belts not working? – Several solutions for repairs!
If the seat belt in the car does not function, it is necessary to urgently eliminate the cause of the breakdown, since driving with faulty or problematic belts is dangerous and is contrary to the rules of the road.
1 The main causes of failure of inertial belts
Among the common breakdowns that occur during the operation of seat belts and the mechanisms that control their operation are the following:
- jamming of the belt when trying to fasten, even if pulled out smoothly;
- belts do not stretch due to frost or wear of the roller mechanism;
- the straps do not retract when unfastened;
- The spool lock is broken or the main mechanism is damaged.
Of course, there are other problems, but they are less common, which means that the risk of encountering such a breakdown in your car is minimal. Many people believe that in case of some breakdowns it is possible to drive with faulty seat belts, but, according to traffic rules, if a vehicle is operated with a faulty seat belt mechanism, an administrative fine may be imposed on the driver.
Faulty seat belt mechanism We recommend that you read
- Fest children's seat belts - reliable protection for small passengers
- Installing undercar lighting – effective solutions!
- Chevrolet Lanos radiator grille - tuning and replacement options!
- Auto scanner for self-diagnosis of any car
In addition, the car manufacturer is not responsible for a traffic accident, even if the car is under warranty if the owner does not contact specialists to replace the seat belts. Therefore, before you repair belts with your own hands, you need to understand that all changes are made, as they say, at your own peril and risk.
Most often, owners decide to do their own repairs due to the very expensive maintenance. For example, replacing a belt mechanism or completely replacing belts on a standard middle-class passenger car will cost the owner at least 15 thousand rubles. Not everyone is ready to pay that kind of money, especially if it is a simple breakdown, for example, the need to lubricate or replace the gear of the main mechanism.
2 The principle of operation of the mechanism and tools for repair
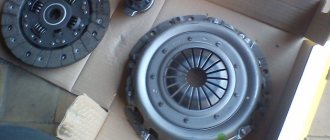
In every modern car, seat belts operate on a fairly simple principle - a reel with a locking mechanism based on a gear mechanism, which rotates the reel. The gear mechanism itself is closed by a small pendulum with a ball or spheroid support with a system of levers. When the belt is pulled out smoothly, the support rotates along with the reel gear, and with a sharp jerk the flywheel is blocked. This locking system is where the malfunction most often lies.
Reel with locking mechanism based on gear mechanism
Thus, to repair the coil and other mechanisms, it is necessary to remove it, for which on almost all cars it will be necessary to remove the trim, and on some models, the seats on the side on which the belt is faulty. To remove and repair it yourself, you will need tools that should include:
- a set of flat and Phillips screwdrivers;
- a set of spanners of various diameters;
- lubricant, wire, wipes and material to protect seats and upholstery.
Depending on the complexity of the repair (sometimes a complete replacement of the coil is required), other additional tools may be required for the job. It is much easier to do DIY repairs on a VAZ, especially on older versions, since these cars do not have side airbags, the trim can be easily removed and installed, and there is no need to remove the seats.
3 Do-it-yourself seat belt reel repair
Every motorist should have a universal device for diagnosing his car.
You can read, reset, analyze all sensors and configure the car’s on-board computer yourself using a special scanner.
Diagnostic methods
Let's look at the procedure and methods for checking the condition of seat belts. For example, let's look at how to carry out diagnostics on a Ford Focus car.
Insufficient belt retraction
If the belt does not retract well, check how the decorative covers are installed to make sure they are not touching the belt tape. Also check to see if the belt is rubbing against the retractor. If this is the case, then loosen the fastening bolt and align the device so that the tape is in the middle.
Most cars have 2 front and 3 rear retractable seat belts. They are equipped with double protection by sensitive elements.
- Vehicle motion sensor – blocks the belt during braking, sharp turns, descents, and ascents.
- Belt movement sensor – blocks it when pulled sharply.
These systems must function properly. To check them, special control methods are used.
How to check a car motion sensor
There are two ways to test this sensor.
Checking the condition of the seat belt
To ensure proper operation of seat belts, they should be checked periodically.
In order to do this, you need:
- check the condition of the straps for mechanical damage;
- find out if the straps are twisted (to do this, the belt must be pulled out to its full length, if necessary, correct it and return it to its original position);
- check the movement of the belt - it should retract on its own (otherwise, you should inspect the place where it enters the retractor and, if there is dirt in it, clean it with a soap solution);
- check the locking force of the lock - it should firmly hold the metal tip of the belt, preventing it from being removed without pressing the button.
If during such a check damage is discovered that cannot be eliminated by washing and blowing with air, the entire device should be replaced.
It is recommended to check the condition of seat belts at least once a month.
How to repair
After finding out the reasons for the malfunction of the seat belt reel, we will figure out how to repair it and what is needed for this. In this procedure, the main thing is to thoroughly clean the belts.
Required Tools
To resolve a malfunction of the seat belt buckle, the device will need to be cleaned. This will require certain tools and accessories.
- Short shaped screwdriver.
- A 17 mm wrench is better than a socket type.
- Flathead screwdriver.
- Clothes pin for office work.
- A syringe with a thin tube.
- Gasoline for lighters.
- A piece of polyethylene to protect the seats from dirt.
- A piece of steel wire.
How to remove front seat belts
First, unscrew the two bolts located at the bottom of the plastic box.
Then use a flat screwdriver to pry up and remove the plug. Underneath there is a bolt that needs to be unscrewed.
There is one more bolt left on top of the plastic box, which also needs to be unscrewed. Next, unscrew the top fastening.
Now you need to open the plastic window on the box and pull out the textile element along with the coil.
To remove belts on a foreign car, for example a BMW, you first need to remove the plastic covers. They are attached using four clips, two of which are attached at the bottom. The other two are fixed on top.
The fastening elements are unscrewed using a TORX key.
Then you need to unscrew the bolts of the fixing metal part. In this case, only one bolt can be unscrewed.
The plastic cover is removed using a special tool. You can also pry out the plastic with a regular screwdriver. There will be quite a lot of dust inside.
Now all that remains is to unscrew the bottom bolt.
After unscrewing the bolt, the belt should come out easily.
To wash the belt, the removed mechanism must be disassembled. Next, installation is performed in reverse order.
Useful videos on the topic:
How to remove the front seat belts on a Volkswagen Polo
How to remove the front seat belts on a Toyota Camry
How to remove the seat belt on a VAZ 2110, 2111, 2112
We will tell you step by step how to remove the belt on VAZ models.
First you need to use a screwdriver to pry and remove the decorative trims of the lower and upper seat belt fastenings.
There will be bolts under the covers that need to be unscrewed with a 17mm wrench.
Next, remove the upper belt fastening bracket.
Next, you will need to remove the plastic cover to free the coil. To do this, you need to unscrew several screws on it:
- two on the lower pillar, near the sills;
- one - in the central part of the pillar, near the seat belt guide;
- and another one at the top of the counter.
Next, you need to remove the coil - it is located at the bottom of the rack. To do this, use a 17mm wrench to unscrew the bolt holding it in place. Afterwards the coil is simply removed.