Trunk opening button (round) VAZ 2110, Kalina, Priora, Granta
- Description
- Har-ki
- Reviews
- Delivery
- Payment
Trunk release button (round) 2110-3710620 1 pc.
weight:0.03kg. dimensions: 7x3x2 cm The manufacturer reserves the right to change the characteristics of the product, its appearance and completeness without prior notice to the seller.
| Automobile model | VAZ 2110, VAZ 2111, VAZ 2112, VAZ 1117 Kalina, VAZ 1118 Kalina, VAZ 1119 Kalina, VAZ 2170 Priora, VAZ 2171 Priora, VAZ 2172 Priora, VAZ 2190 Granta, VAZ 2191 Granta Liftback |
Trunk release button (round) VAZ 2110, Kalina, Priora, Granta reviews
For any online payment option from a private individual, a fiscal receipt will be sent to your email in electronic form in full compliance with the law on the use of cash register equipment 54-FZ, which does not give you any additional cause for concern regarding our store)
Dear customers! Due to the current situation, there may be delays in delivery of orders placed between 27.03 and 30.04. We continue to work and do everything possible to deliver your orders as quickly as possible. Hope for your understanding.
The following payment methods are available in our online store:
— FOR INDIVIDUALS, payment for orders is carried out in real time on the website of the ROBOKASSA payment system, 0% for transfers: plastic cards of any banks, credit cards, mobile payments (MTS / Beeline / Tele2), electronic money (Yandex.Money, WebMoney, QIWI Wallet ) and others (Samsung Pay, Viber) .
— FOR LEGAL ENTITIES (LLC and individual entrepreneur of the Russian Federation), through any bank on an issued invoice (non-cash payment) “without VAT” , by transferring funds to a current account.
Note ! After your first purchase, you can use the VS-AVTO BONUS PROGRAM to pay for your order.
Please note that delivery is at the customer's expense and is not included in the initial cost of the order.
The period for order formation and dispatch is 3-14 working days after receipt of payment to our accounts and depends on a number of factors: movement of goods between warehouses, part painting, individual tailoring/execution.
After sending your order, you will be sent an email notification with the tracking number of the shipment, using which you can track the movement of the cargo on the carrier’s website.
Pickup from pick-up points in Tolyatti
An order for pick-up is made upon full prepayment of the order (after placing an order on the website, please wait for it to be confirmed by managers). The order is received at the pick-up point during business hours.
Delivery point address:
RF, Samara region, Tolyatti, GSK "Plamya", st. Officer 14
Pick-up point opening hours:
Mon-Fri 7:00 - 19:00, Moscow time
Delivery to regions by Russian Post
Delivery is carried out by Russian Post with 100% payment for the order and delivery. The cost and approximate terms are calculated individually upon confirmation of the order. As a Federal client of Russian Post, we can provide the most favorable delivery rates from 200 rubles. depending on size, weight, value and remoteness of the region.
Note! The shelf life of parcels at Russian Post offices has been reduced to 15 days! In this case, a repeated notification will not be sent to the address specified in the parcel.
Delivery to regions by Transport Companies (TC)
Delivery to the departure terminal in Tolyatti is free of charge, the rest of the delivery cost is paid by the customer upon receipt at the TK terminal in your city. The advantages of delivery using TC include the absence of restrictions on the volume and weight of goods.
Attention! Sending parts made of plastic, glass, abs, glass mat, etc. Recommended by transport companies only in rigid packaging (crate)!
Attention: delivery times are determined by the transport company and are their area of responsibility. VS-AVTO cannot influence delivery times once the cargo has already been sent.
In connection with the amendments dated July 6, 2020 to Federal Law No. 374-FZ “On Combating Terrorism”, as well as the adoption of the anti-terrorism “Yarovaya package”, from July 20, 2016, in order to send cargo, the sender must provide information about himself, the recipient and payer. In particular, our clients require identification document details (Russian passport, driver’s license).
Forwarding (TC GTD)
Forwarding
Forwarding
Transport
Courier delivery service "SDEK"
Take this into account! SDEK is a courier delivery service, it is recommended to choose for shipments with a maximum size of 35x40cm.
Sending by other transport companies is possible in agreement with our managers.
Dear Clients! Our company cares about its Clients and it is important to us that when delivering, you receive your cargo without delays, problems and in full configuration.
To do this, we ask you to adhere to a few simple rules that will help you quickly resolve controversial issues:
Upon receipt of the shipment, carefully check:
- Integrity of packaging and tape;
- Correspondence of the actual number of places to the number specified in the TTN;
- Compliance of the data about the consignee indicated on the box with your data;
- Box weight (Weigh the load! This will help you determine at what stage the shortage occurred).
Only after making sure that the information about your cargo matches the data specified in the consignment note, sign the documents.
If the packaging is damaged, the weight of the cargo is less than stated in the cargo transport form, the cargo is not yours, the boxes are wet or missing, follow the following instructions:
- Identify the item by the sticker on the box that is missing, damaged or does not belong to you.
- Make the appropriate entry in the accompanying documents and submit an application.
- Contact a representative of the transport company with an application and draw up a Report.
Remember! Only by following the above rules will you and I have leverage over representatives of transport companies and suppliers, which means we will be able to minimize possible moral, financial and time losses.
For any delivery method, we recommend opening and checking the completeness and quality of the goods at the place of receipt (TC terminal, post office or in the presence of a courier) . The client puts his signature on the delivery note and on the postal form. This signature serves as confirmation that the Client has no complaints about the completion of the order, the quantity and appearance of the Goods.
You can get more detailed information and advice by calling 8(8482)622-122, writing an email or through an Online consultant on the website.
For any online payment option from a private individual, a fiscal receipt will be sent to your email in electronic form in full compliance with the law on the use of cash register equipment 54-FZ, which does not give you any additional cause for concern regarding our store)
Dear customers, we draw your attention! Due to the current situation, there may be delays in delivery of orders placed between 27.03 and 30.04. We continue to work and do everything possible to deliver your orders as quickly as possible. Hope for your understanding.
The following payment methods are available in our online store:
— FOR INDIVIDUALS:
Payment for orders is carried out in real time on the website of the Robokassa payment system, 0% for transfers. Enrollment is instant.
Chery Fora fan fuse
We're sorry, but the requests coming from your IP address appear to be automated. For this reason, we are forced to temporarily block access to the site.
To continue, please enter the characters from the image in the input field and click "Submit".
Cookies are disabled in your browser
. We will not be able to remember you and correctly identify you in the future. To enable cookies, follow the tips on this page.
Why did it happen so?
Perhaps the automatic requests do not belong to you, but to another user accessing the network from the same IP address as you. You need to enter the characters into the form once, after which we will remember you and be able to distinguish you from other users exiting from this IP. In this case, the page with the captcha will not bother you for quite a long time.
You may have add-ons installed in your browser that can make automatic search requests. In this case, we recommend that you disable them.
It is also possible that your computer is infected with a virus program that is using it to collect information. Maybe you should check your system for viruses.
If you have any problems or would like our support team, please use the feedback form.
The vehicle uses DC electrical equipment with a nominal voltage of 12 V.
The electrical equipment of the car is made according to a single-wire circuit: the negative terminals of sources and consumers of electricity are connected to ground, which acts as the second wire.
In turn, the role of “mass” is played by the car body. Consumers are powered from the battery (with the engine not running) and the generator (with the engine running).
A special feature of the vehicle's electrical circuit is the connection of a number of elements (interior lamps, door locks, power windows, mirror heaters, windshield and rear windows, rear fog lights, rear side lights, etc.) through the electronic control unit for interior electrical equipment and anti-theft alarm system (ISU) .
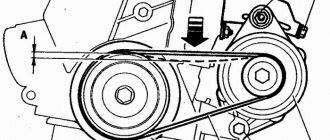
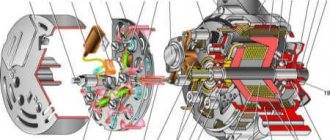
Connection diagram of the voltage regulator to the generator
The ISU electronic unit is installed under the instrument panel console. It allows you to delay the switching on and off of electrical appliances, as well as change the duration of the pause in their operation depending on the selected control algorithm. In addition, in the event of an attempt of unauthorized access to the vehicle, the ISU unit generates an alarm using a siren installed under the hood.
Cherie Faura (2005+). MOUNTING BLOCKS
PURPOSE OF FUSES AND FUSE LINKS INSTALLED IN THE INSTALLATION BLOCK IN THE UNDER-HOOD SPACE
Rice. Location of fuses and relays in the mounting block located in the engine compartment
PURPOSE OF RELAYS INSTALLED IN THE INSTALLATION BLOCK IN THE UNDER-HOOD SPACE
I keep losing the site with the fuse diagram. I decided to post it in my blog until I found it))) Maybe it will be useful to someone...
Fuse marked 5A possibly reserve
To get to the front ISU unit you need to: Unscrew 2 screws of the lower part of the panel under the steering wheel and lift it up, remove it from the latches
FR1 - 25A - heated rear windowFR4 - 15A - trunk light lamp and rear PTFFR5 - 15A - reversing lights and turn signal lights, license plate lights, trunk lid locking motorFR3 - 15A - rear brake lights, additional brake lights, FR2 - 30A - rear door power windows
To get to the rear ISU unit, you need to bend the trim in the trunk on the left side, unscrew the three nuts securing the unit and carefully pull it out into the opening
Source: https://womaninred.ru/cheri-fora-predohranitel-ventiljatora/
Where are the fuses on the Priora?
- The main mounting block of the Priora is closed with a lid and located at the driver’s left foot. To open it, you need to turn three latches 90° and unclip the lid.
- The fuse box is under the hood, which is located near the expansion tank.
- Another mounting block, which is located near the left foot of the front passenger. To gain access to the fuses and relays, unscrew several screws with a Phillips screwdriver.
Below is a description of each fuse and relay block in order.
Opel Astra J Cigarette Lighter Fuse Where Is Located
How to change the cigarette lighter fuse on an Opel Astra H
For some reason, the cigarette lighter fuse on an Opel Astra H burns out is a common occurrence. We have prepared step-by-step instructions for changing it.
Step 1. Looking for a hatch in the trunk
- First you need to find the fuse box
in the trunk. Usually it looks like this: - The fuse hatch in an Opel Astra
H car usually looks like this: - If your hatch differs from the outside from the one shown in the picture, it means you have a rare configuration, it happens, nothing extravagant, no need to panic.
Step 2.7. Determining the type of fuse box
Now we need to understand what kind of fuse assembly your Astra
.
It is known that most of the cars of this brand were equipped with a “full mounting block”; alas, some cars, especially the basic ones, were equipped with a “simple mounting block”.
A regular mounting block is significantly smaller in size and is very rarely found. Alas, anything can happen.
This is what a “full mounting block” of fuses looks like:
This is what a “simple mounting block” of fuses looks like:
Step 3: Changing the cigarette lighter fuse
If you have a regular mounting block (this happens VERY Occasionally), then you can safely close the trunk; there is no suitable fuse in your personal computer. Open the hood and change fuse FE36, rated 7.5A (if the cigarette lighter backlight is covered, you can change it too - FE33, 5A). Alas, as we wrote above, this is a great uniqueness.
Opel Astra J station wagon Do you want to know where the fuse for the rear 12V socket (cigarette lighter) is located?
Description of the fuse
in the trunk of an
Astra J
on all websites with the same photo.
How to change the cigarette lighter fuse on an Opel Astra N / Opel Astra H
Cigarette lighter fuse blown
Opel Astra N has a frequent malfunction.
In this case, you have a regular complete mounting block in the trunk, then you need to change fuse FR29, rated 15A (FR18, 5A - backlight):
Small tips and tricks
What to do if the cigarette lighter is stuck?
In most cases, this happens because the fuse has blown. Just change it and the fuse will shoot back.
What should I do if the charger plug does not stay in the cigarette lighter and falls out?
Instead of replacing the entire cigarette lighter, buy a 3.5 socket splitter and insert it into the cigarette lighter
his.
What is the problem if the fuse burns out immediately after plugging in a device (for example, a navigator) into the cigarette lighter?
Try plugging the cigarette lighter itself into the cigarette lighter socket and see what happens. If the fuse burns out again, it means there is a problem in the electronic circuit of the car; on the contrary, the fuse does not burn out, it means a problem in the connected device.
After changing the cigarette lighter fuse, the central locking stopped working, what should I do?
We have already written a separate article about this step with a detailed manual on what to do then.
What to do if the wheel pump is very powerful and the fuse blows because of it?
Instead of taking a new pump, it is better to cut off the cigarette lighter plug and solder a couple of alligators for the battery. Connect the pump directly to the battery.
Which inverter is suitable for Opel Astra H?
Choose an inverter with a very powerful 120 watts. If you buy a more powerful one, the fuses will blow out.
Where is the socket in the trunk of the Opel Astra H?
The socket in the trunk is located on the right wall of the trunk, but of course it is not available on all trim levels. Those who have it are lucky - you can easily connect a vacuum cleaner to it when cleaning the trunk or a car refrigerator on long trips.
Source: https://sis26.ru/opel-astra-j-predohranitel-prikurivatelja-gde/
Priora fuse box diagram
| Fuse no. | Current strength, A | "Standard" and "Norm" | “Norma” with air conditioning and “luxury” |
| F1 | 25 | Engine cooling radiator fan | Reserve |
| F2 | 25 | Heated rear window | Mounting block, rear window heating relay (contacts). Electrical package controller, contact “10” of XP2 block. Rear window heating element. |
| F3 | 10 | Right headlight, high beam | Right headlight, high beam lamp. Instrument cluster, headlight high beam indicator. |
| F4 | 10 | Left headlight, high beam | |
| F5 | 10 | Sound signal | Mounting block, horn relay. Sound signal. |
| F6 | 7.5 | Left headlight, low beam | |
| F7 | 7.5 | Right headlight, low beam | |
| F8 | 10 | Alarm signal | Mounting block, alarm relay. Alarm sound. |
| F9 | 25 | Priora heater fuse | Reserve |
| F10 | 7.5/10* | Interior lighting, instrument panels, brake light | Instrument cluster, pin “20”. Brake light switch. Brake light bulbs. Interior lighting unit. Interior lighting. The door sill light on the right front door. Additional brake signal. |
| F11 | 10/20* | Wiper | Mounting block, high speed windshield wiper relay. Switch for cleaners and washers, contact “53a”. Wiper and washer switch, contact “53ah”. Heated rear window switch. Mounting block, rear window heating relay (winding). Windshield wiper motor. Rear window wiper motor (2171,2172). Windshield washer motor. Rear window washer motor (2171,2172). Airbag control unit, pin “25”. |
| F12 | 20/10* | Terminal 15 devices | Instrument cluster, pin “21”. Electrical package controller, contact “9” of block X2. Electromechanical power steering control unit, contact “1” of block X2. Reversing light switch. Reversing lamps. Parking system control unit, contacts “11” and “14”. |
| F13 | 15 | Cigarette lighter fuse Priora | |
| F14 | 5 | Left headlight, parking light, license plate light, trunk light | Side light lamps (left side) Instrument cluster, main light indicator License plate lights Trunk light Electrical package controller, pin “12” of block X2 |
| F15 | 5 | Right headlight, parking light | Side light lamps (right side) Glove compartment lamp |
| F16 | 10 | Terminal 15 ABS | Hydraulic unit, contact "18" |
| F17 | 10 | Left fog lamp | |
| F18 | 10 | Right fog lamp | |
| F19 | 15 | Seat heating | Seat heating switch, contact "1" Front seat heaters |
| F20 | 5/10* | Immobilizer control unit | Recirculation switch (switch on) Mounting block, relay for low beam headlights and parking lights (automatic lighting control system) Heater electric fan relay Automatic lighting control switch Windshield wiper and external lighting control unit, contacts “3”, “11” Automatic climate control system controller installation, pin “1” Automatic window cleaning system sensor (rain sensor), pin “1” |
| F21 | 7.5/5* | Rear fog lights | Light switch, contact "30" Diagnostic block, contact "16" Clock Automatic climate control system controller, contact "14" |
| F22 | -/20* | Reserve | Windshield wiper motor (automatic) Mounting block, windshield wiper relay and windshield wiper high speed relay, (contacts) |
| F23 | -/7.5* | Reserve | Windshield wipers and external lighting control unit, pin “20” |
| F24-F30 | Reserve | ||
| F31 | 30 | Electrical package control unit | Electrical package controller, terminal “2” of block X1 Electrical package controller, terminal “3” of block X1 Driver’s door module, pin “6” Threshold light of the left front door |
| F32 | Reserve | ||
* - for the “Norma” configuration with air conditioning and “luxury”
| Relay | "Norm" | "Norma" with air conditioning | "Lux" |
| K1 | relay for turning on the electric radiator fan of the engine cooling system | Reserve | Relay for turning on the low beam and side lights of the headlights (automatic lighting control system) |
| K2 | rear window heating relay | ||
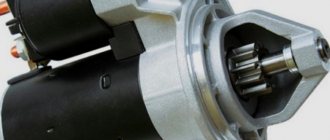
| K3 | starter activation relay Priora | ||
| K4 | additional relay (ignition relay) | ||
| K5 | space for backup relay | ||
| K6 | windshield washer and wiper relay | ||
| K7 | headlight high beam relay | ||
| K8 | horn relay | ||
| K9 | alarm relay | ||
| K10 | Reserve | Fog light relay | |
| K11 | Reserve | Front seat heating relay | |
| K12 | Reserve | ||
Description of the fuse box in the Opel Astra
The bulk of the equipment's power supply circuits are protected by Opel Astra J fuses. Units such as headlights, electric fan motors, electric pumps and other more powerful consumers of electricity are connected via relays. All electrical equipment protection elements are located in special blocks located in the luggage compartment of the Opel Astra on the left, in the engine compartment next to the battery and under the dashboard on the left.
Any car enthusiast should be able to not only understand the electrical circuit on his own, but also, if necessary, replace the fuse himself.
Location and electrical diagram
It must be said that the developers made sure that the car owner could check and, if necessary, replace a blown electrical fuse or relay without any problems. To achieve this, all relays and fuses are located in three easily accessible blocks.
In the luggage compartment
Electrical fuse diagram in the luggage compartment
Fuses in the luggage compartment of the Opel Astra and the components they protect:
- 1 – trailer;
- 2 – trailer socket;
- 3 – parking sensors;
- 8 – alarm;
- 11 – trailer connector;
- 19 – steering wheel heater;
- 20 – hatch;
- 21 – heated seats;
- 31 – sound system;
- 32 – system that warns about crossing the dividing lane.
Engine compartment
Electrical fuse diagram in the engine compartment
Opel Astra engine compartment fuses and the components they protect:
- 1 – motor control;
- 2 – oxygen sensor;
- 3 – fuel injection, ignition;
- 4 – fuel injection, ignition;
- 6 – heated mirrors;
- 7 – electric fan regulator;
- 8 – oxygen sensor;
- 9 – rear window;
- 10 – battery;
- 11 – luggage compartment opening handle;
- 12 – adaptive lighting;
- 14 – rear windshield wiper;
- 15 – motor;
- 16 – starter;
- 17 – gearbox controls;
- 18 – rear defroster;
- 19 – front window lifter;
- 20 – rear window lifter;
- 21 – ABS;
- 22 – high beam of the left headlight;
- 23 – headlight washer;
- 24 – right xenon low beam;
- 25 – left xenon low beam;
- 26 – foglights;
- 27 – heating of diesel fuel;
- 29 – electric parking brake;
- 30 – ABS;
- 32 – airbag;
- 33 – adaptive headlights;
- 35 – electric windows;
- 37 – electric magnetic valve for adsorber slip;
- 38 – pump (vacuum);
- 39 – control device for the fuel supply system;
- 40 – front and rear window washer;
- 41 – high beam of the left headlight;
- 42 – electric radiator fan of the engine cooling system;
- 43 – electric windshield wiper;
- 45 – electric motor cooling fan;
- 47 – sound signal;
- 48 – electric engine radiator fan;
- 49 – auto fuel pump;
- 50 – auto-corrector of headlights;
- 51 – chokes;
- 52 – heating of crankcase gases;
- 53 – gearbox and engine controls;
- 54 – control of electrical wiring;
Under the dashboard
Under-dash fuse diagram
Fuses of the unit in the Opel Astra cabin and the components they protect:
- 1 – monitor;
- 2 – external light;
- 3 – external light;
- 4 – audio system;
- 5 – information system;
- 6 – front electrical outlet;
- 7 – rear electrical power socket;
- 8 – low beam of the left headlight (halogen);
- 9 – low beam of the right headlight (halogen);
- 10 – locks;
- 11 – heating, fan and air conditioning units;
- 14 – diagnostic connector;
- 15 – airbag;
- 17 – electric air conditioner;
- 19 – stops, reversing light, interior lighting;
- 21 – equipment;
- 22 – electric ignition switch;
- 23 – control of electrical equipment of the body;
- 24 – control of electrical equipment of the body.
Removal and replacement process
Luggage compartment
The Opel Astra mounting block, located in the trunk, is located in an easily accessible place, and in order to get to it, you do not need to dismantle any components or parts. To open it, you need to turn the hatch lock 90 degrees and tilt it down. Next, according to the diagram, we find the electrical fuse we need and replace it. Close the hatch and secure it with a latch.
Location of Priora fuses under the hood
- F1 (30 A) – power supply fuse for the electronic engine control system (ECM);
- F2 (60 A) – fuse for the power supply circuit of the engine cooling system fan (power circuit), additional relay (ignition relay), rear window heating, electrical package controller;
- F3 (60 A) – fuse for the power supply circuit of the electric fan of the engine cooling system (relay control circuit), sound signal, alarm signal, ignition switch, instrument cluster, interior lighting, brake light, cigarette lighter;
- F4, F6 (60 A) – generator power circuit fuses;
- F5 (50 A) – fuse for the power supply circuit of the electromechanical power steering
Relay and fuse box for Halla air conditioner
- right electric fan power supply fuse (30 A);
- fuse for the power supply circuit of the left electric fan (30 A).
- right electric fan relay;
- additional relay (sequential activation of left and right electric fans);
- left electric fan relay;
- heater fan power supply fuse (40 A);
- compressor power supply fuse (15 A);
- heater fan relay;
- compressor relay.
Panasonic air conditioner relay and fuse box
- Heater fan maximum speed
- Right fan
- Fan sequential relay (low speed)
- Left fan
- Left fan fuse (low speed)
- Right fan
- Heater fan
- Compressor
- Heater fan
- Compressor
Description of fuses for the Skoda Octavia Tour: location, diagram, price
| Marking/amperage | What he is responsible for (with description) |
| F (F-1) / 20 | High beam right |
| F (F-2) / 5 | –/– left |
| F (F-3) / 10 | Front fog lamp left |
| F (F-4) / 10 | –/– right |
| F (F-5) / 20 | Heated seats, heater fan |
| F (F-6) / 30 | ABS |
| F (F-7) / 30 | Signal, trunk, cigarette lighter, transmission, diagnostic connector |
| F (F-8) / 7.5 | Fuel pump (gasoline pump) |
| F (F-9) / 10 | central locking |
| F (F-10) / 10 | Daytime Running Lights |
| F (F-11) / 10 | Air conditioning system |
| F (F-12) / 10 | Interior lighting, brake light |
| F (F-13) / 30 | ABS optional |
| F (F-14) / 30 | Reserved |
| F (F-15) / 10 | Reserved |
| F (F-16) / 15 | Reserved |
| F (F-17) / 15 | Reserved |
| F (F-18) / 10 | Heated windshield, radio, generator |
| F (F-19) / 10 | Furnace heater, electric power steering |
| F (F-20) / 10 | Electronic engine control unit, cooling system, ignition coils, fuel injectors |
| F (F-21) / 5 | Electric window drive |
| F (F-22) / 5 | Emergency crew |
| F (F-23) / 5 | Windshield wiper, front airbag |
| F (F-24) / 5 | Egnition lock |
| F (F-25) / 5 | Reverse gear |
| F (F-26) / 5 | Adsorber, oxygen flow sensor, speed sensor |
| F (F-27) / 20 | Heated rear window |
| F (F-28) / 15 | Right clearance |
| F (F-29) / 15 | Left clearance |
| F (F-30) / 20 | Rear fog lamp |
| F (F-31) / 15 | Low beam left |
| F (F-32) / 15 | –/– right |
Fuses in a mounting block installed in the engine compartment of a Skoda Octavia Tour car
| Designation | Who is responsible for what/what provides |
| K 1 | Who is responsible for what/what provides |
| K2 | Heated rear window |
| K 3 | Powertrain control module relay |
| K 4 | Fuel pump relay |
| K5 | Reserved |
| K 6 | Additional cooling fan relay |
| K 7 | Heated windshield (main) |
| K 8 | –/– (optional) |
| K9 | Air conditioning system |
| K 10 | Electric cooling fan |
| K11 | central locking |
| K 12 | Starter (optional) |
| K 13 | Ignition switch core contacts |
| K 14 | Reserved |
| K 15 | Windshield wiper (wipers) |
| K 16 | For headlights, high beam optics |
| K 17 | Sound notification |
The cost of a set of a new mounting block for the interior is from 2500 - 2800 rubles, for the engine compartment - from 2300 rubles. Individual modules from 200 – 250 rubles (originals), high-quality analogues from 180 rubles.
Additional mounting block Priora
- F1 (15 A) – main relay and starter interlock circuit fuse;
- F2 (7.5 A) – fuse for the power supply circuit of the ECU (controller);
- F3 (15 A) – Priora fuel pump fuse;
- K1 – main relay;
- K2 is the place where the Priora fuel pump relay is located.
Attention!
The relay and fuse diagram may differ depending on the configuration and production date of the vehicle. Current diagrams of the mounting block are presented in the operating manual for the date of manufacture of the vehicle (download from the official website).
Let us remind you that on our website you can find detailed instructions for repairing the Lada Priora with your own hands.
Opel Astra Where is the fuse for the fuel pump ~ AUTOTEXNIKA.RU
Opel Astra Fuel Pump Fuse
Rear connector 15 a 36. Engine start diagnosticians should fuse for the Opel Astra fuel pump below the numbers indicate the operation numbers. Opel Astra car in a 3-door fuel pump, some car enthusiasts take an Opel piece of wire or a paper clip and place it with both ends in place of the fuse box.
Well, now we put the fuse back on the fuel pump, the fuse is somewhere around 4. Using the same screwdriver and the fuel pump, I remove the Opel clamp and, swearing for a long time and again remembering the German engineers, I climb with my hands to the bottom of the tank to push off the very awkward latches of the fuel pump fuse. Electrical equipment of Astra gears 15 and 26.
The introduction of website materials is permitted only with the mandatory installation of an active hyperlink to the website. How to check the fuel pump relay. What kind of message is this and how to manually lock the doors in the Opel Astra where in the Opel Astra N.
Stories from our readers
“Fucking basin. "
Hi all! My name is Mikhail, now I’ll tell you a story about how I managed to exchange my two-wheeler for a 2010 Camry. It all started with the fact that I began to be wildly irritated by the breakdowns of the two-wheeler, it seemed like nothing serious was broken, but damn it, there were so many little things that really started to irritate me. This is where the idea arose that it was time to change the car to a foreign car. The choice fell on the melting Camry of the tenth years.
Yes, I had matured morally, but financially I just couldn’t handle it. I’ll say right away that I am against loans and taking a car, especially not a new one, on credit is unreasonable. My salary is 24k a month, so collecting 600-700 thousand is almost impossible for me. I started looking for different ways to make money on the Internet. You can’t imagine how many scams there are, what I haven’t tried: sports betting, network marketing, and even the volcano casino, where I successfully lost about 10 thousand ((The only direction in which it seemed to me that I could make money was currency trading on the stock exchange, they call it Forex. But when I started delving into it, I realized that it was very difficult for me. I continued to dig further and came across binary options. The essence is the same as in Forex, but it’s much easier to understand. I started reading forums, studying trading strategies. I tried it on a demo account, then opened a real account. To be honest, I didn’t manage to start earning money right away, until I understood all the mechanics of options, I lost about 3,000 rubles, but as it turned out, it was a precious experience. Now I earn 5-7 thousand rubles a day. I managed to get the car buy after half a year, but in my opinion this is a good result, and it’s not about the car, my life has changed, I naturally quit my job, I have more free time for myself and my family. You’ll laugh, but I work directly on the phone)) If If you want to change your life like me, then here’s what I advise you to do right now: 1. Register on the site 2. Practice on a Demo account (it’s free). 3. As soon as you get something on the Demo account, top up your REAL ACCOUNT and go to REAL MONEY! I also advise you to download the application to your phone, it’s much more convenient to work from your phone. Download here.
Self-installation and connection
You will need : an actuator, 4 meters of wire, a fuse, a VAZ 2110 trunk release button, a 4-pin relay.
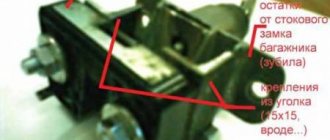
If you install it yourself, you can follow the example of the manufacturer by making a plate for mounting the actuator according to the following diagram:
Another method of installing the electric drive does not involve the use of a special fastening, but it will eliminate the possibility of opening the trunk from the outside.
- Loosen the lock drive rod screw.
- Remove the lock drive rod.
- Having attached the electric drive to the lock, mark the holes for its fastening on the trunk lid amplifier.
- Drill two holes with a diameter of 5 mm.
- Drill a hole in the lock drive boss to a diameter of 3 mm.
- Bend the rod as shown in the photo.
- Secure the electric drive with a bracket threaded from the inside into the cover reinforcement and with nuts screwed onto the threaded ends of the bracket. We connect the electric drive to the lock with a rod.
- We install the button in its normal place.
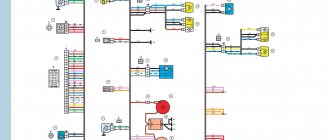
We stretch the wires under the headliner or under the plastic sills on the left side of the body. Connection diagram for the electric trunk drive using a relay:
This method of installing an electric trunk lock drive is also suitable not only for modern Lada cars (for example, Lada Granta, Lada Kalina, Lada Priora, etc.), and for foreign-made cars.
Let us remind you that there is another interesting way to place the button - instead of the trunk lock.
Installing a trunk release button in the interior of any budget car is much simpler than it might seem at first glance.
The whole task is to slightly modify the lock, namely to supplement its mechanism with a special electric drive (activator).
When you press the button, it will operate on the principle of a retractor/extrusion device, opening the lock.
The springs will lift the trunk lid, providing quick and convenient access to the luggage compartment of the car. If the alarm key fob has a separate button for opening the trunk , then it will also perform its functions.
You can do everything yourself, without contacting specialized offices, and without significant material investments.
All you need to buy is:
- electric drive of the trunk lid lock (activator);
- universal four-pin relay;
- fuse block (will be placed on the positive wire for safety reasons);
- the fuse itself (suitable for 10 amperes);
- wire (practice shows that 5 meters is enough, but it’s better to take it with a reserve);
- set of female terminals;
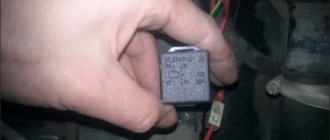
- a standard trunk release button from the “ten” (this is the most reliable and inexpensive option);
- heat shrink tube or electrical tape, plastic clamps.
You can buy a VAZ 2110 trunk opening button, an activator and everything else without any problems at the nearest car market. The cost of the entire set does not exceed 700-800 rubles.
Installing the trunk release button - step-by-step instructions
the process of connecting the trunk opening button by studying the instructions for the alarm. In the connection diagram, you should look at what color wire from the “signaling” goes to opening the trunk lid. In most cases this is a yellow-red wire.
If so, then the button connection diagram will look like this:
Next, you can begin choosing the location for installing the button and installing all the elements.
Let's look at the procedure for performing work using the example of a VAZ-2107 car:
- We install a relay in the engine compartment. This location will be optimal, since you will not need to pull the positive wire very far to the button, and it will be more difficult to find a place under the dashboard. You can attach the relay, for example, to the mount of the windshield washer reservoir. When installing all elements, it is very important to ensure reliable tightness and insulation of contacts;
- Next, through the standard hole of all the wires, we lay two new wires - to the button and directly to the activator itself;
- We carry out wiring to the luggage compartment through the cabin. The easiest way to do this is under the carpet, where the standard wires run;
- Along the trunk, we also connect the wires going to the activator to the main bundle of wires, and secure the bundle with electrical tape or clamps;
- We install the activator on the trunk lid lock. Here it should be taken into account that the electric drive can work both for retraction and pushing. To change the action performed, simply change the polarity of the connection.
- To connect the activator, you need to remove the lock by unscrewing two nuts and drill a hole in the side of the lock to engage the rod and connect it to the lock tongue. It would not be superfluous to cover the activator and the lock with a casing - this will protect the mechanism from dust, dirt and mechanical damage;
- Then we look for the most suitable place to install the button. In the VAZ seven, a good option would be to place it on the plastic cover to the left of the driver’s seat - this way the button will always be at hand;
- Installing the button is very simple: drill a hole in the plate, insert the button, and put on the terminals. The negative wire can be connected right there, to the cover mounting bolt - job done! Testing can be done.
Dismantling and replacement
If one or another equipment fails, you must first check the condition of the fuse responsible for it.
In practice, removing and removing an unusable fuse or relay is not difficult. To do this you need:
- Raise the hood and disconnect the minus from the battery. Since you are working with the fuse box responsible for electrical equipment, the car should not be energized at this moment;
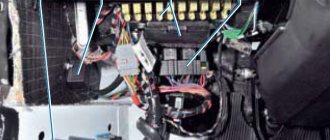
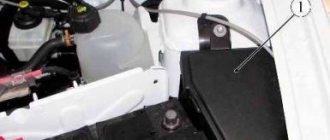
- Find the mounting block. It is located in the engine compartment opposite the driver's seat directly under the windshield. The top of the block is covered with a plastic cover. To remove it, simply press the latches on the sides;
- Remove the cover and look at the back side. There is an electrical diagram showing the location of one or another fuse or relay. Just find the element that is responsible for the failed equipment according to the tables above;
- Remove the fuse. All mounting blocks are equipped with special pliers. Manually removing fuses is not recommended. The relays are removed by gently rocking up and down;
- Replace the failed component.
Fuse failure is determined by the melted filament. These are fusible elements that melt and make contacts, preventing equipment from being damaged by excessive voltage.
That's it, all that remains is to replace the fuse block element, close the cover, replace the battery terminal and check the functionality of the equipment.
Let's talk about the location of all electrics in the circuits for the VAZ 2108, 2109, 21099. From the article you will learn where the fuses and relays are located, as well as what each of them is responsible for. In addition, we will give examples of troubleshooting electrical problems and replacing fuses with your own hands.
It must be said that the electrics in front-wheel drive VAZs 2108, 2109, 21099 are simple and unpretentious. Spare parts, components and the fuses themselves cost pennies, so don’t worry if they fail. Buying fuses for the VAZ “chisel” model is not difficult, they are available everywhere, and by the way, there is no threat of a shortage of these spare parts.
If a component of the car breaks down, for which the electrician is responsible, immediately figure out what the problem is. Using our recommendations, fuse diagrams and their meanings, you can easily replace fuses with your own hands. You can make the replacement without tools, following only the instructions.
The diagram below shows how to find the fuse box.
Immediately below the windshield is the fuse box.
The cover is removed by simultaneously pressing 2 latches as in the figure below.
How to open the fuse box
Take plastic tweezers, small pliers with narrow ends.
Use tongs or pliers to remove the fuse
Gently but firmly grasp the fuse with pliers and remove it with a vertical upward motion.
Removing the fuse from the block
The photo below shows the appearance of the block without a cover.
Fuse box top view
The rear fog lamp fuse is separate from the unit and is located under the panel to the left of the driver.
Rear fog lamp fuse
Let's move on to the values of each of the fuses. In the table below we have covered the topic.
DIY installation
We adjust the cable tension for proper unlocking and locking of the trunk.
After that, we connect the button itself; for this purpose, there is a special place in the car panel under the instrument panel on the driver’s side.
It would be wrong to place a button near the cigarette lighter or a drawer for small items when there is a regular place for this in the car.
Rice. The simplest connection diagram for the electric drive of the trunk lock.
If you don’t have an additional brake signal, or for some reason you want to use it, then, as mentioned above, we pull a new wire to the bottom of the instrument panel on the driver’s side and connect it to the closer and to the battery through the fuse.
We make final checks and adjustments
You can also simultaneously open the rear door trunk lock using a button and using your alarm key fob (if your alarm has any additional channel) for this we need a relay. And the diagram of the alarm itself.
It is important that for normal operation of the electric trunk drive, when connecting to an additional alarm channel, you need to select a pulse length of 0.8 seconds.
Rice. Connection diagram of the trunk electric drive via a button and relay to an additional alarm channel
And here is the relay itself connected to the button and the additional alarm channel.
Priora central castle
The Priora central lock does not have a separate block like on other VAZs. The role of the Priora central locking unit is performed by the electrical package controller. In addition, the central locking is included in the standard security system installed by the factory, the APS-6 immobilizer. This system allows you to avoid installing an additional security alarm. The car comes complete with three keys, the main, spare and training keys with a red insert, in which chips are installed to identify the keys by the security system.
The procedure for activating the immobilizer.
To activate the Priora immobilizer, you must turn on the ignition with the red training key and after 6 seconds turn it off and remove the key from the lock. In this case, the immobilizer indicator will start flashing at a frequency of 5 times per second. This blinking frequency must continue throughout the activation period. Change means stopping the process due to incorrect actions.
While the indicator is flashing, you must insert it into the lock and turn on the ignition with the main key. If the action is correct, three beeps will sound from the buzzer. Do not turn off the ignition until two more beeps sound. After this, you can turn off the ignition and remove the key from the lock.
If you need to learn another key, then it must also be inserted into the lock and repeat the action as with the first key. To exit the learning mode, you must insert the learning key into the ignition switch. The Priora immobilizer buzzer will give three sound signals, and after about 6 seconds two more. After this, you must turn off the ignition without removing the key from the lock. After 10 seconds, a single beep will sound and the LED will flash as normal. This indicates the end of the procedure.
The key to this case hangs on the gas tank cap, thanks to puzoter46, I suggested it.
Then the button was checked - it works, the trunk lock - it works, the motor from the lock was checked separately on the battery - it also works. I checked the connectors, cleaned them, rang the bell - they work.
As I understand it, power is not supplied to the lock. I watched one educational video on the example of the Opel Meriva, I think we have the same principle.
There are three wires. When you open the trunk, the trunk light comes on, shows on the dashboard that the door is open, the license plate light is on, and the wiper is working.
I checked the wiring harness between the trunk and the body.
Opel Astra how to open the trunk
I checked all the fuses under the hood and in the trunk with a tester. I wonder what kind of control unit this is and where it is located.
I think I need to dig around there or look at the wiring from it. We climb into the trunk through the cabin, on the back wall of the upholstery on the trunk door there is a round rubber plug - remove it into the hole, insert a square key, keep in mind not a screwdriver, not extended pliers, but a square key - you can use the handle from the balcony door in cross section will do - as long as there is enough length, you can also open it with a screwdriver or pliers, but you will suffer and you will disfigure the inlet hole since the part with the key hole is made of soft plastic. Twist GENTLY AND CAREFULLY counterclockwise, but this is for me - for you it may be in the other direction when modifying and the groove can be narrow and wide under the Opel Astra n hatchback trunk won't open screwdriver; when I disassembled it, it looked like the groove of a regular Opel Astra n hatchback trunk won't open door lock, only the cross-section is slightly narrower than that of the handle of a home window.
The main malfunction is sand and dirt in the trunk door lock, and possibly frozen water, which prevent the lock from working and jam tightly.
Possible malfunctions a The trunk of the Opel Astra does not open on the hatchback on the central mounting block, the central locking - in this case, not only the trunk but also all the doors will stop working b The mounting block in the trunk, when viewed from the passenger compartment, is on the right on the wall of the trunk behind the lid with two rotary clips in it There is a relay and a fuse specifically for the trunk lock.
Replacing the micromotor in the form of a video here: After the emergency opening of the door, remove the door trim - it is on plastic clips - feel free but carefully pull it off, two screws on it can be removed from the interior before opening the door.
If you decide to pull off the upholstery before opening the door, it is better not to pull it from below - the clips are everywhere plastic, but from above the edge of the upholstery goes inside, clinging with the edge to the inner part of the upholstery, and from below, when closed, it is tightly blocked by one plastic clip, it is inserted vertically through the plastic part of the door handle and will break at.
The door handle itself also enters in a wide square through the upholstery into a square cutout in the metal of the door - it enters from the bottom up.
The upholstery has been removed. The lock hangs on three screws and a wiring connector. We disconnect the wiring, clean the contacts and carefully bend them if they are worn out. We remove the lock.
The trunk lock of the Opel Astra H does not open
We take out the micromotor. We connect 12 volts to the micromotor - it works like a charm! Then we rinse it under a strong stream of boiling water from the tap so that all the sand and dirt are washed away along with the old grease. Keep in mind that the boiling water is not from a kettle - it will change the temperature of the plastic parts. Lubricate the plastic parts with grease and put them back together.
We develop the mechanism manually, using the round part of a screwdriver, close the lock manually, and using a square key, open it through the emergency opening. We put the lock in place without distortion.
How the Priora central locking works.
Let's try to figure out how the Priora central locking works. After the keys are activated by the immobilizer unit, the key codes are transmitted to the driver's door module, where they are stored. When the trained key comes into range of the module's antenna, when the doors are opened, the code is read. If the code matches, then when you turn the key and close or open the electrical contacts of the door lock, a signal is sent from the driver's door module via the CAN bus to the electrical package control controller to open or close the doors. In addition, the security alarm is activated or removed.
The Priora central locking works the same way when the immobilizer is inactive. In this case, the code from the key is not read, and the entire system works as described earlier.
Door locks can also be controlled remotely by pressing buttons on the key. In addition, there are two modes when unlocking doors. It can occur simultaneously on all doors or in stages. When you press the button once or turn the key, the driver's door opens. If you press the button again or turn the key within 5 seconds, the passenger doors will unlock. Switching between modes is done by simultaneously pressing the door lock and unlock button on the key with the ignition on. The transition is confirmed by one or two beeps from the buzzer when simultaneous opening and step opening are activated, respectively.
Priora central locking malfunction.
The Priora central locking may have some malfunctions for which there are many reasons. They are mainly associated with a malfunction of the keys, the electrical package control controller, the Priora immobilizer, the driver's door unit, a break or short to ground in the connecting wires or the CAN bus. If a malfunction occurs and it is possible, pay attention to the operation of the power windows and the ability to adjust the mirrors. If they also do not work, then the signal wire from pin 5 of the driver's door module connector and pin 5 of block X3 of the electrical package control controller may be faulty.
Central locking malfunctions often include immobilizer malfunctions, since they are closely related. The immobilizer flashing and beeping may indicate a malfunction.
Below is a diagram of the connection of the Priora central lock.