Checking the pump on a car engine
The pump is a key component of the cooling system. In terms of design, this is a rather primitive pump that drives coolant around the circuit. As soon as the transportation of the refrigerant stops, the motor overheats and critical wear of the components occurs. The motorist should know how to check the pump without removing it from the engine in order to avoid lengthy handicraft diagnostics followed by dismantling the components. The ability to navigate the fault markers will help minimize the number of necessary diagnostic procedures.
How to replace the pump on a CFMOTO ATV
The ATV's cooling system pump is designed to circulate coolant between the engine and radiator. According to statistics from CFMOTO owners, this is a rather capricious element, and the pump leaks for many ATV riders. This is expressed in a constant green puddle on the left step and a decrease in the level of antifreeze in the expansion tank.
Repair is possible in two options: either replacing the entire pump (which is more expensive, but very simple), or repairing it (which is cheaper, but more difficult). In this article I will talk about the first option, and about the second in another, a little later.
This is the pump we have on the CF500-A (CFMOTO X5, CFMOTO X6). Pump article number 0180-081000.
I also encountered a leakage problem on my CFMOTO CF500-A ATV, although I can’t say that it had a significant effect on me. Well, yes, it was a little dripping - sometimes more, sometimes less. It wasn't particularly annoying, I just kept an eye on the level in the reservoir and added antifreeze to it. In 4 years I have only added about 1 liter of antifreeze, this is nonsense. I have already taken measures by replacing the radiator cap, this helped quite noticeably, at least the intensity of the dripping decreased by 5 or 10 times.
As a matter of fact, antifreeze can leak there from only three places: either the gasket between the halves of the pump body is to blame, or the rubber on the lower pipe, or the seal inside the pump (usually this is what leaks). And there is no need to completely change the pump due to leakage. I've already figured this out. But in winter, even though I had nothing to do, I still didn’t study the hardware, so I freaked out a little and bought a new pump. Which, of course, cost me much more than the oil seal and gasket. True, considering that I hate changing oil seals, I’m not particularly worried. Of course, installing an assembled pump is much easier than disassembling the old one and changing the oil seal, especially without theoretical (and even more so practical) training.
So, how to replace the pump of the CFMOTO CF500-A ATV.
The procedure is generally very simple, but is complicated by the fact that you will need to drain the antifreeze from the cooling system and the engine oil from the engine. True, if you have the opportunity to overturn the ATV on its right side, you don’t have to drain the oil. But this is not my case. First of all, I can't lift the ATV. Secondly, it’s just time to change the engine oil, so I still have to drain it.
I also read the CFMOTO ATV owner's manual and read that you need to change the coolant every two years. This turned out to be a surprise for me - I always thought that if it is in place, then you can drive for at least 5 years and not think about anything. This is, in principle, true - modern antifreezes have been able to withstand them for five years without any problems. And my quad is 4 years old, and as you know, I have never changed the antifreeze. In general, everything worked out well - in fact, for me, not a single procedure turned out to be superfluous.
So, we remove all the side plastic on the left side, including the step. As you can see, my engine is quite clean, because I previously washed it with an acid-containing toilet cleaner like Toilet Duck, only weaker. Nothing else can wash off the dirty deposits.
Here's the pump.
We also remove the front trunk, hood cover and open the radiator cap.
Using a 17 wrench, unscrew the oil pan drain screw.
And drain the oil.
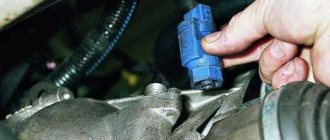
When I brought the new pump close to the old one, I discovered an unexpected surprise: the new pump had some kind of fitting that was not there before. What kind of nonsense this is, why it is needed and what to do with it is still unclear. But looking ahead, I will say that the Chinese have finally slightly modified the design of the pump in order to avoid the formation of air pockets when replacing the coolant. Judging by the functionality, this is an air outlet fitting.
We prepare the container and unscrew the coolant drain screw using a 8mm wrench, here it is.
Antifreeze will flow out of the drain hole. I wasn't expecting an intense flow, so I wasn't prepared for it.
As soon as you remove the screw, the antifreeze starts gushing out in a powerful stream. It was necessary to prepare the cut part of the bottle in advance, with its help it would be convenient to catch the stream and direct it into the container.
The antifreeze has been drained (about 2 liters), now you can remove the pump. It is held on by two horizontally positioned screws with a shiny head. We unscrew everything with the same key number 8.
You need to take a screwdriver and pry the pump off from different sides. It comes out quite easily.
That's it. Everything is ready.
Now you need to unscrew the clamping screw of the lower pipe holder with a size 8 wrench. This screw got very stuck on me, I couldn’t unscrew it with the wrench, but the cordless impact wrench dealt with it in half a second. When reinstalling, you will need to lubricate the threads with copper grease.
The upper pipe is held on a clamp.
Remove both pipes from the pump.
The pump is in our hands.
Now pay attention to the rod that rotates the pump impeller shaft. When installing a new pump, it is necessary that the rod aligns with the slot on the pump shaft, otherwise it will not be possible to install it.
Therefore, we immediately set the shaft to the desired position.
In addition to the pump, I also purchased two o-rings: one goes to the pump body (larger, part number 0180-080002), the other (smaller, part number 0180-080001) goes to the lower pipe. It is better to replace these rubber bands just in case.
Here is one ring on the pump.
The second is put on the pipe. By the way, this is one of those places where antifreeze can leak.
Well, that’s all, we screw the pipes and put the pump in place.
We fasten it with two screws. I put a transparent tube of sufficient length on the still unclear fitting - I will see what happens in it.
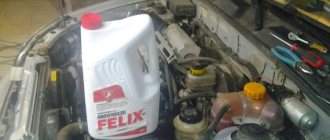
The main secret to properly filling antifreeze is to pour it in a thin stream to avoid the formation of air pockets. To do this, I took a nozzle that is used for drip watering flowers in pots. I cut off the spout and it turned out to be a hole about 3 millimeters in diameter. I screwed the nozzle onto half of the bottle. But you can simply drill a hole with a diameter of 3-4 mm in the bottle cap.
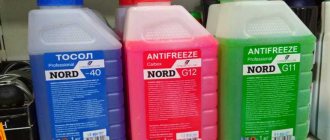
Everything is ready for refueling. About 2 liters of antifreeze will be required. It is sold in containers not by volume, but by weight (at least the Nord antifreeze I bought). This is a 3-kilogram container, you need to take exactly this, since after filling there will be little left. There is no need to worry about which antifreeze to buy - any will do.
And I just like the color green.
Liquid slowly fills the cooling system. And antifreeze appeared in my pipe and went up. But the main thing is that first all the air came out of there.
You need to pour up to the neck. After this, close the radiator cap.
Don't forget to add antifreeze to the tank.
All that remains is to fill in the engine oil. I have already changed the filter.
Now start the engine and monitor the level in the transparent tube. It hardly grows at idle, but as soon as you accelerate, a slight pressure appears in the tube - however, even your finger can easily hold it. During gassing, several air bubbles appear in the tube. That's all I had in my system. Therefore, I did not experience any torment with air locks.
If your pump does not have such a useful outlet fitting, then when filling in antifreeze it is absolutely necessary to lift the front of the ATV up, and the higher the better. For example, pull it up with a winch, or drive your front wheels onto a high ramp. Otherwise, air will remain in the pump, since it is located higher than the inlet pipes. And be sure to remember that you need to pour the liquid in a thin stream. After refueling, you need to start the engine and rev it up several times.
The air will come out of the system, after which you will need to open the radiator cap again (be careful not to get burned) and add antifreeze to the level.
What to do with this fitting? I didn't find any information about him. Experimentally I found out that there is still pressure in it, so you can’t just leave the tube like that. But the pressure is small, fortunately. I took a piece of a thicker rubber tube and secured it to the fitting with a clamp. The other end of the tube was bent and the bend was tightened with another clamp. It turned out like this - I’m quite sure that this is a reliable solution, no amount of pressure will break the tube.
I assembled the ATV and at the same time changed its footrest, the old one was cracked.
Now you need to drive and monitor the coolant temperature gauge. If it suddenly rises to the red zone, this means that there is air in the system. To eliminate it, you will need to lift up the front part of the ATV and in this position apply the gas several times. Then add antifreeze to the radiator to the level. But I didn’t have any problems: the temperature was at the same level as it always was.
So, replacing the CFMOTO ATV pump with a new one was successful. But I’ll tell you how to disassemble the old pump and what needs to be changed in another article a little later.
Please note: This article and the images in it are subject to copyright. Partial or complete reproduction on other resources without permission is prohibited.
Signs of trouble
I would like to immediately note that in order to determine faults in the water pump, you will need to remove the unit and disassemble it. Only this method provides a real opportunity to see the resulting traces of corrosion, signs of cavitation and contamination.
Practice clearly shows that this happens on a wide variety of machines:
- VAZ 2107;
- Volkswagen Passat;
- FF2, that is, Ford Focus 2nd generation;
- Lada Granta;
- Kia Spectra;
- Chevrolet Aveo;
- Audi A5;
- Nissan Qashqai;
- Mitsubishi Outlander;
- Toyota Camry;
- Skoda Octavia, etc.
Moreover, the situation is approximately the same everywhere. That is, it is impossible to determine whether there are problems without disassembling and looking inside the cooling system water pump.
Therefore, the main emphasis is on indirect signs. With their help, the driver gets the opportunity to diagnose the problem in advance and prevent serious consequences.
The following indirect signs are distinguished:
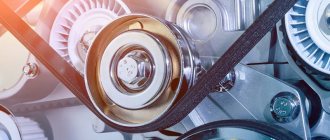
- A thin whistle appears without interruption during engine operation. Moreover, it comes from the area of the camshaft pulley of the internal combustion engine. A whistle indicates that a higher bearing is failing;
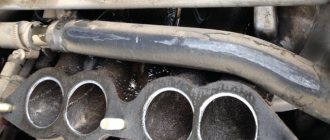
- Coolant leaks. Traces of antifreeze can be seen directly on the power unit, or under the bottom of the car, that is, on the asphalt;
- Pump play. To check for its presence, simply grab the pump pulley with your hand and try to swing the device up and down.
Do not forget about the possible airing of the system, due to which the antifreeze does not fully perform its functions, the engine overheats and a number of resulting breakdowns occur. Here it would be correct to remind you about removing the air lock from the cooling system. Also, be sure to read the material about checking the cap of the expansion tank, which is directly related to the engine cooling system.
I won't talk about how the pump changes. Usually replacement is carried out according to the owner's manual from the car manufacturer. The point is to drain the cooling liquid, disconnect the pipes, first turn off the power to the car, and dismantle the problem unit.
The design and location of all pumps are different, therefore there is no universal instruction. You can find a video online, or simply take the car to a car service center.
Signs of a pump malfunction
There are only six main signs of a “dying” pump, by which one can judge that the pump is partially (or even completely) out of order and needs to be replaced. So, these symptoms include:
Extraneous noise. Often, a partially faulty cooling system water pump produces “unhealthy” noisy or “howling” sounds when operating. They can be caused by significant wear of the bearing and/or the fact that the pump impeller touches the pump body when rotating. This also occurs due to partial bearing failure.
Pump pulley play. It occurs due to damage or natural wear of its rotation bearing. Diagnostics in this case can be carried out quite simply, just shake the pump shaft from side to side with your fingers. If there is any play, it will be tactilely felt
Please note that the formation of play brings closer the moment when the pump seal will become leaky and will leak coolant.
The appearance of a leak. So, antifreeze can leak both from the seal and from other places, for example, the housing and impeller
Antifreeze or antifreeze in this case can be seen on the pump body, its mounting location, some elements of the engine compartment under the pump (depending on the design of a particular car) or simply on the ground under the car.
Antifreeze smell appears. In particular, it can be felt not only in the engine compartment (when the hood is opened), but also in the cabin, since its fumes will enter the cabin through the ventilation system. Antifreeze has a sweetish smell, sometimes with a taste of alcohol.
Mounting misalignment. In particular, in relation to timing gears, as well as tension rollers. This can be seen visually, or by placing some flat object (for example, a ruler) in the same plane as the rollers and pump. In this case, a situation often arises when the belt eats up.
Significant increase in engine temperature. And not only the engine, but also the coolant, as indicated by the warning light on the dashboard. In critical cases, a banal boiling of antifreeze occurs, and steam will come out of the radiator. However, this is critical and if it occurs, it is prohibited to use the car!
If at least one of the above symptoms of a car water pump malfunction appears, it is necessary to perform additional diagnostics, both on the pump and on the pump. When the first signs of a dying pump appear, you can still drive, but for how long is unknown, and it’s better not to tempt fate. In some cases, a car can last 500...1000 kilometers, while in others it won’t last even hundreds. In any case, the cooling system is not something to joke about, and it needs to be diagnosed and repaired on time and in full.
Often the pump is replaced along with a double (second) replacement of the timing belt according to the vehicle regulations. In this case, it is useful to replace the antifreeze with a new one.
Depending on the brand and quality of the cooling system water pump, the regulations require its replacement after approximately 60 thousand kilometers (depends on each specific case, and is prescribed by the car manufacturer; the relevant information can be found in the manual).
Checking the condition of the water pump
Checking the pump on a car is not that difficult. First, you need to warm up the engine so that it reaches operating temperature. After this, follow these steps:
- Pinch the upper pipe at the radiator outlet with your hand. When the pump is working, you will feel the pressure it creates. Be careful during this task as coolant temperatures are typically 90°C or more. If the antifreeze in the system does not pulsate or the pulsation is barely felt, perform a more detailed check.
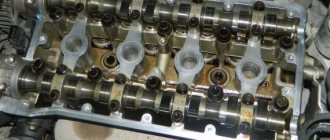
- It is necessary to remove the timing mechanism protection and inspect the pump visually. Sometimes coolant leaks, which can be caused by a damaged seal, are immediately visible. In addition, signs of pump malfunction may include grayish or red-colored deposits in the area where it is located. In this case, the part will have to be removed.
- If you hear the characteristic sound of a faulty bearing while the motor is running, you need to check the pump for play in the shaft area. Just rock the pump drive gear. Sometimes everything is “cured” by simply replacing the bearing.
Checking the pump status
There are several ways to check the pump's health. One of the simplest methods is considered to be one in which it is necessary to squeeze the upper hose coming from the radiator, after preheating the car engine. If the water pump is in working order, then clear pulsations of coolant should be felt inside the hose.
When checking in this way, be careful not to touch the water pump blades with your hands, as the engine is heated to a high temperature.
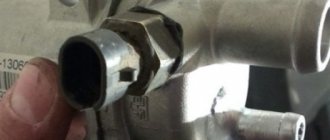
In the event that the oil seal fails, coolant will begin to flow from a special hole on the water pump. It is necessary to remove the timing belt cover and inspect the control vent hole. If there are brown deposits on it, the oil seal must be replaced without the pump itself or together with it.
The procedure for replacing the oil seal is not very labor-intensive and complicated, but it greatly affects the health of the cooling system as a whole, so it should not be neglected.
If the pump shaft bearings are damaged, during operation of the engine you can hear a howling sound in its front part.
To determine bearing wear, it is necessary to check the shaft play by loosening the pump drive sprocket. If there are no external signs of wear on the water pump, it is recommended to still remove the pump and conduct a more detailed inspection. This must be done, since you often see blades damaged by corrosion on the reverse side of the rotor. In such a situation, the performance of the cooling system as a whole is at risk.
Technical features
First, let's look at the main technical characteristics and features of the water pump; this will allow us not only to make a correct diagnosis, but also to understand why the breakdown occurred. Antifreeze is pumped using an impeller, which is mounted on a shaft. The drive is carried out from the crankshaft of the motor; a belt drive is used for this. Here it is worth clarifying that in practice there are 2 drive methods used for the pump:
- Directly from the crankshaft. This method is used on engines with a timing chain. Usually one belt drives the generator and pump, sometimes the power steering and air conditioning pump are also connected here;
- Another option is timing belt drive. There is one serious drawback here. When the bearing jams in the pump, the belt breaks, which leads to breakdown of the gas distribution system, and under certain conditions, to a complete overhaul of the engine. In this case, you should carefully monitor the condition of the pump.
The pump housing is usually located at the front of the motor. This allows for the most optimal pumping of coolant through the system. It is also precisely this approach that makes it possible to use the crankshaft pulley as a moving element. In addition, placing the part at the front makes it easier to access for repairs. The main malfunctions of the pump are directly related to its technical features; accordingly, this must be taken into account when carrying out diagnostic actions. As a rule, all signs of a malfunction are completely related to the characteristics of the various elements that ensure the operation of your car's cooling system.
12.6.4. Replacing the coolant pump
12.6.4. Replacing the coolant pump
| GENERAL INFORMATION |
The pump must be removed for repair or replacement if noise levels exceed normal levels and coolant leaks occur.
The bearing and oil seal are located in the pump cover, which should be replaced as an assembly.
| Pump installed at the front of the engine on the right: 1 — pump cover |
| The pump cover is secured to the housing with four nuts (the generator drive belt and pulley have been removed). |
| You will need | |
| |
| Replace the cover gasket. | There is a marking on the lid. |
Before installing the new cover (assembly), be sure to check the clearance between the impeller blades and the pump housing.
| EXECUTION ORDER | ||||||||||
Checking the gap between the impeller blades and the pump housing
The gap between the impeller blades and the pump housing should be 0.9-1.3 mm. The procedure for replacing the coolant, removing, installing and adjusting the tension of the generator drive belt is set out in subsection 3.1.4..
| ||||||||||
Causes of malfunction
The following reasons are identified that affect the deterioration of the mechanism:
- Damage to the rotating components of the impeller : during intensive operation, small wings of the rotating part break off. This is especially true for plastic impellers. When the wings break off, the pump can no longer pump antifreeze at the required intensity - the engine constantly overheats.
- Drain hole clogged . This problem leads to the fact that antifreeze cannot fully circulate through the circuit. Clogged drainage can be easily tracked without removing the pump. If you suspect that the drain holes are clogged, simply turn on the cabin heater.
- De-synchronization of element and timing pulleys . In this case, the seals and bearings work in extreme conditions and wear out extremely quickly. The reason for such a breakdown is a manufacturing defect: either low-quality materials were used during assembly, or an unreliable assembler was used.
We need to speak in more detail about the third reason. No car owner is insured against manufacturing defects. But in this case, everything is serious with the prefix “hyper”. If you install a pump with potential out of sync, then the use of such a defective unit will lead to a sharp increase in timing wear. In the best case, the driver may encounter a broken belt, in the worst case, the valves “knock”.
Chronic overheating of the internal combustion engine caused by other factors can also lead to wear and tear of the cooler.
Another marker of wear (which, however, can only be seen after disassembling the mechanism) is play in the rotating parts. Backlash indicates imminent failure of the pulleys, displacement of the central axis and damage to the seals.
The last life hack for motorists who do not want to remove the pump, but want reliable information about its functional condition. Carefully inspect the junction of the cooler and the internal combustion engine. If there are significant antifreeze leaks, then the water pump does not have long to live.
Symptoms of malfunction
The malfunction of the water pump on the four can be determined by characteristic symptoms or a combination of them. Most often this is evidenced by:
- Coolant smell in the cabin. This symptom may indicate a pump failure. But the characteristic “amber” can also occur with other malfunctions.
- Frequent overheating of the motor. The vehicle's dashboard will indicate that the engine temperature is too high. Under normal conditions, it should not exceed 90 degrees.
- Uneven or regular wear on the timing belt. The crankshaft pulley may also look very worn.
- Coolant leak near the pump and timing belt. Traces of this liquid may be visible in the engine compartment and under the car. It is worth noting that sometimes the problem occurs when the oil seal wears out or is installed incorrectly.
- Pump noise and vibration. Unpleasant sounds are heard from under the hood when the engine is running. This symptom does not always indicate a failure of this part; it can also be caused by other reasons.
The appearance of one or more of the above symptoms or a combination of them is a reason to immediately check the pump. After all, its breakdown is very dangerous. As a result, the timing belt may break and, as a result, the valves and pistons of the engine will meet if the pistons are installed without recesses. The motor will jam. And only expensive and complex repairs will help restore its functionality.
The service life of the part for this AvtoVAZ model is about 100,000 km. But sometimes it can break even earlier. Therefore, on long runs, it is recommended to regularly monitor its operation.
How to fix the problem?
If a malfunction is identified, it should be eliminated as soon as possible. Here it is worth understanding that the pump is still a consumable, and in most cases it is easier to completely replace it. If there is a leak through the gasket, simply remove the pump and replace the gasket. Please note that normal tightness is required here. Therefore, be sure to carefully tighten the fastening nuts.
Many drivers lubricate the gasket with sealant; such a precaution will not be superfluous. This will significantly reduce the risk of leakage. After some time, you should check the tightness of the nuts; they may loosen due to engine vibration. If the cause is the bearing or impeller, then the best solution is to replace the water pump. Repair in this case is complicated, but its effectiveness is low, so it is better to buy a new part and install it.
Don’t forget to bleed the cooling system after replacing the pump; this will remove all air pockets, which will increase its efficiency. Conclusions. The cooling system must operate at maximum efficiency, otherwise engine problems will occur. Therefore, it is simply necessary to know how to check the pump without removing it from the engine. This will avoid costly repairs to the power unit and save you a lot of money.
Comments
Repair manuals
Saveliy Porfiryev
wrote on 06/02/2014 Personally, I think that if you have a new car in operation, it is extremely important not to forget about a friend, comrade or just an acquaintance who is well versed in all the insides of any car. There are people who will tell you what needs to be replaced by the sound of the engine running. For example, you can change the pump yourself, again it is advisable to do this guided by special literature, or the advice of a reputable specialist. And if you get down to business headlong, closing your eyes without taking off your gloves, you can simply forget that there are marks on the pulleys and not even know why they are applied. So, you can replace the pump yourself, but you need to approach this extremely seriously.
Vadim
wrote on 12/06/2014 As the proud owner of a domestic car, I have had to do urgent repairs myself more than once. Last summer, while driving up to my place of work, steam suddenly poured out from under the hood. I open it and realize that the pump has been covered with a copper basin. On the “classic”, changing the pump is not so difficult. I did this for the first time and it took all of three hours. I changed the pump completely (although supposedly you can somehow re-rivet the impeller), but in my opinion it’s not worth it, because... the issue price was 800 rubles. It will be difficult for those who have thick and large hands, because the area of work is narrow. Otherwise, patience, keys, a pry bar and a book on repair and operation will be enough.
Vahit
wrote, 01/01/2015 Please help me in the evening I came home and parked the car in the parking lot and in the morning I wanted to call but I couldn’t start it, they told me the pump needs to be changed, I changed the pump and it still wouldn’t start, then I bought a new engine and installed it and it still won’t start if I turn on the ignition, my diesel engine comes out through the pump, go to the injector, and then you open the injector, diesel flows like from a faucet, what could it be?
Zhanat
wrote on 08/16/2015 How to change the pump on Rexton yourself
Tim
wrote on 12/28/2015 how to change the pump on a Mitsub space car
How to check the pump without removing it from the engine? Read about the ways
Quite a lot of car owners are wondering how to check the pump without removing it from the engine.
After all, it is highly not recommended to mess around with the cooling system, so it’s worth learning how to check it directly on the car. Please note that this will minimize repair time and also make it possible to avoid unnecessary costs for unnecessary components. Even a completely inexperienced driver can carry out such diagnostics, which will make his task easier, especially if the engine suddenly heats up. Do not delay carrying out diagnostic work; remember that overheating of the power plant leads to its rapid failure. How to check the pump without removing it from the engine is actually a fairly simple question. There shouldn't be any problems with this. But, you need to know how this system works. Careful study of the work process will greatly simplify the diagnostic process. Another point that should not be forgotten is the ability to carry out such diagnostics at any convenient time. Even if you are on the road in a deserted area, you can conduct a check and decide on further movement.
Which water pump should I install on the VAZ 2107?
Original number 2101 1307011.
- Luzar LWP01014 — 1065 rub.
- Bautler BTL-0001WP — 597 rub.
- Pilenga WP-P 2101 — 578 rub.
The necessary set of tools.
Before proceeding with this procedure, you will need to completely drain the coolant from the system.
After this, take a screwdriver and loosen the hose clamp that is connected to the pump.
Then pull it off, pulling it towards you with a certain amount of force.
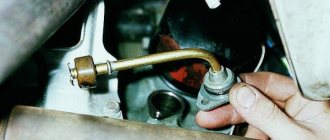
Now you should pay attention to the thin tube that is connected to the water pump, and it is attached to two studs. This means you need to unscrew two nuts, and it is most convenient to do this with a ratchet handle.
Then carefully move this tube to the side, without unnecessary movements, since its metal is very delicate and it can break, especially if the ball’s cooling system is filled with water (corrosion does not spare the tube).
Next, you can begin to unscrew the bolts securing the VAZ 2107 pump housing to the engine block. To do this, you need to unscrew the longest top mounting bolt, as is clearly shown in the photo below.
And remove the bolt by hand.
Now all that remains is to unscrew the two bolts from below; here it is best to use an open-end wrench, it will be more convenient.
After this, you can remove the VAZ 2107 pump housing, of course, after first removing the alternator belt, loosening it and throwing it off the pump pulley.
The final result of the work is shown in the photo below, when the water pump is completely removed from the car.
Technical features
First, let's look at the main technical characteristics and features of the water pump; this will allow us not only to make a correct diagnosis, but also to understand why the breakdown occurred.
Antifreeze is pumped using an impeller, which is mounted on a shaft. The drive is carried out from the crankshaft of the motor; a belt drive is used for this. Here it is worth clarifying that in practice there are 2 drive methods used for the pump:
- Directly from the crankshaft
. This method is used on engines with a timing chain. Usually one belt drives the generator and pump, sometimes the power steering and air conditioning pump are also connected here;
- Another option is timing belt drive.
There is one serious drawback here. When the bearing jams in the pump, the belt breaks, which leads to breakdown of the gas distribution system, and under certain conditions, to a complete overhaul of the engine. In this case, you should carefully monitor the condition of the pump.
The pump housing is usually located at the front of the motor. This allows for the most optimal pumping of coolant through the system. It is also precisely this approach that makes it possible to use the crankshaft pulley as a moving element. In addition, placing the part at the front makes it easier to access for repairs.
The main malfunctions of the pump are directly related to its technical features; accordingly, this must be taken into account when carrying out diagnostic actions. As a rule, all signs of a malfunction are completely related to the characteristics of the various elements that ensure the operation of your car's cooling system.
Replacing the pump at VAG Auto Service
The VAG Auto Service technicians professionally perform manipulations to replace the water pump. A discount program is provided for car service clients. Special prices apply. Discounts are provided for maintenance and repair work.
How to check?
An important point is to check the pump. Many car enthusiasts believe that in order to diagnose it, it is necessary to dismantle the part, but in most cases you can do without this. There are a number of signs by which you can understand that the problem is in the pump. To begin with, it is worth noting that most manufacturers recommend replacing the water pump after 60-80 thousand kilometers
. In some cases, regulations indicate the need to replace simultaneously with the timing belt. Therefore, if the pump on your car has gone through such a mileage, then it makes sense to replace it at the first opportunity.
Please note that using low-quality antifreeze or mixing incompatible types of coolant can lead to increased wear on the pump. Therefore, always pay attention to the composition of the liquid you use for cooling.
Diagnostics is carried out in the following order
:
that goes from the radiator to the pump with your hand. When the pump is fully operational, you will feel the pressure it creates. Usually, this is felt in the form of fairly strong tremors. If they are, then there are no problems with the water pump;
Replacing the pump: instructions for various modifications of Gazelle engines
After the coolant has been drained, you can begin to dismantle the device:
- The first step is to remove the cooling radiator.
- Next, after access to the timing belt is opened, you will need to unscrew the three bolts of the water pump pulley.
- It is recommended to keep the pump from turning with a long bolt or a special blade.
- Remove the pump drive belt.
- Then remove the unscrewed pulley and reflector.
- From the pump body, unscrew the fitting of the pipe through which antifreeze is supplied.
- Loosen the fastening clamps and disconnect all hoses and pipes from the mechanism.
- After this, use a hex key to unscrew the four screws that secure the device to the motor housing.
- There is also another fastening bolt under the pump - it needs to be unscrewed last.
- Remove the water pump.
- Remove the seal from the landing site.
Article on the topic: Top 10 fastest cars of 2020
Installation of a new pump is carried out in the reverse order. Moreover, it is necessary to correctly set the marks on the pulley and roller so that the timing belt does not break when the engine is first started.
Possible faults
Now let's look at the main malfunctions of the pump; all problems have their own signs, knowledge of them will allow us to make more competent diagnostics. So, most often drivers face the following reasons:
- Depressurization of a part
. In this case, the coolant leaves through the shaft seal or through the gasket. Here there is a decrease in the efficiency of the pump; part of the pressure is lost due to a leak. With such a malfunction, antifreeze drips are often observed, and it also quickly leaves the system; - Bearing wear
. The shaft on which the impeller is mounted has a bearing, which wears out over time and may fail. Bearing jamming, as already mentioned, on some engines can lead to a number of serious breakdowns. It is worth considering that this problem can manifest itself in different ways. Most often, the bearing begins to howl, this is due to the depletion of lubricant, as well as a high level of wear of the race. But sometimes a breakdown manifests itself as a knock. This happens when the bearing is completely or partially destroyed. Another possible malfunction is a jammed bearing, in which case the pump cannot be turned; - Impeller destruction
. This is a rare malfunction, but it does happen. The reason is the poor quality of the part. With such a breakdown, a strong roar is observed immediately after starting the engine, and the car quickly overheats.
Causes of pump malfunction
How to choose coolant for a car
What are the possible causes of pump failure? This question interests not only beginners, but also quite experienced car enthusiasts. The following are the main reasons, from the most common and frequently occurring to the “exotic”. Among them:
- Faulty bearing. This unit wears out for natural reasons as it is used. However, accelerated wear is possible due to additional negative factors. This, for example, is an incorrect (stronger) belt tension, which causes more force to be exerted on the bearing. Another reason for significant wear is the ingress of antifreeze onto the rubbing vapors due to depressurization of the gasket and leaks of coolant.
- Seal failure. The pump has two seals - an oil seal and a rubber cuff. And it is the oil seal (gasket) that most often fails. This happens for two reasons - natural wear and tear (tanning of rubber) and the use of low-quality cheap antifreeze without appropriate gentle additives, or even water. In the long term, these liquids “eat up” the gasket, it begins to leak, which leads, firstly, to a decrease in the level of coolant in the system, and secondly, antifreeze or water gets into the bearing, washing out the lubricant from it and the troubles described above.
- Mounting misalignment. This is possible for two reasons - incorrect installation and manufacturing defects. However, incorrect installation is a fairly rare occurrence, since the case has ready-made mounting holes, which are very difficult to miss. Another reason is uneven fit to the engine block (due to dirty, rusty or warped mating surfaces). But, unfortunately, factory defects, especially with budget pumps, are not such a rare phenomenon. Misalignment leads to the pulley rotating misaligned, which, in turn, leads to accelerated wear of the loaded part of the belt, as well as wear of the bearing. In the most critical cases, the belt may break and a collision of valves and pistons may occur. Sometimes misalignment occurs as a result of the car being involved in an accident, which resulted in the displacement of individual elements of the body and/or engine.
Often, a decrease in pump performance, and accordingly, a decrease in pressure in the cooling system, is observed after applying a sealant used to eliminate radiator leaks. So, its composition mixes with the coolant and clogs the honeycombs (channels) of the radiator, and also sticks to the pump impeller. If such a situation occurs, then it is necessary to drain the antifreeze, dismantle the pump, and then flush the cooling system using special or improvised means.
How to fix the problem?
If a malfunction is identified, it should be eliminated as soon as possible. Here it is worth understanding that the pump is still a consumable, and in most cases it is easier to completely replace it.
If there is a leak through the gasket, simply remove the pump and replace the gasket. Please note that normal tightness is required here. Therefore, be sure to carefully tighten the fastening nuts. Many drivers lubricate the gasket with sealant; such a precaution will not be superfluous. This will significantly reduce the risk of leakage. After some time, you should check the tightness of the nuts; they may loosen due to engine vibration.
If the cause is the bearing or impeller, then the best solution is to replace the water pump. Repair in this case is complicated, but its effectiveness is low, so it is better to buy a new part and install it. Don’t forget to bleed the cooling system after replacing the pump; this will remove all air pockets, which will increase its efficiency.
conclusions
. The cooling system must operate at maximum efficiency, otherwise engine problems will occur. Therefore, it is simply necessary to know how to check the pump without removing it from the engine. This will avoid costly repairs to the power unit and save you a lot of money.
Sanitizing your pump at home
Before replacing the pump on the bottle, wash your hands well. When dialing, do not touch the faucet with the container into which the water flows.
When replacing the bottle, it is necessary to rinse the pump components with running water. It is recommended to put the pump on the bottle after the mechanism has completely dried. Otherwise, active proliferation of microbes may begin. This will be indicated by the appearance of a slippery coating with a yellowish tint.
It is recommended to thoroughly sanitize the pump once every two to three months. To do this you need:
Remove the pump and disassemble it, separating the spout and tubes.
Wash the parts in water at a temperature of 40 degrees. In this case, you should use dishwashing detergent.
Immerse pump parts in disinfectant solution for 30 minutes. To prepare the solution, you will need to pour 0.25 kg of citric acid into 2 liters of water.
To place the water bottle, it is better to use a place protected from direct sunlight. The ideal air temperature should not exceed 20 degrees Celsius.
How to check the water pump on a car without removing the water pump
The water pump (water pump) of the engine cooling system is an important component that ensures constant circulation of coolant through the channels of the cooling jacket, pipes, lines, cooling radiator, etc. Even a slight decrease in the performance of a car pump can cause the engine to overheat, especially in the warm season.
Another reason to check whether the pump is working or not is possible extraneous noise in the water pump drive. In this case, the specified pump requires increased attention on some car models. The fact is that the pump can be driven by the timing belt. If the water pump jams, then the timing belt breaks, resulting in valve bending on most engines. Next, we will look at the available methods that allow you to check the water pump yourself.
Causes of pump damage
Pumps or water pumps of different car models are similar to each other: a shaft is fixed in a cover on bearings, on one side of which there is an impeller, and on the other there is a drive pulley, through which the pump rotor is driven by a timing belt. A special oil seal is built between the impeller and the housing. If it is damaged, coolant will begin to seep into the bearings and wash out their lubricant. For this reason, the water pump bearings are noisy and may seize. The wear process of bearings is not the fastest, but you should not postpone repairs for a long time, otherwise such carelessness can cost expensive engine repairs.
How to check the serviceability of the pump on a car
Timely diagnostics of the pump allows you to avoid costly repairs or problems with constant overheating of the engine. To answer the question of how to check the pump’s performance yourself, let’s consider diagnostic methods using the example of domestic VAZ cars (model 2109, 2110).
Let's start with the fact that the pump is a kind of “consumable”, which on cars with a pump driven by a timing belt is recommended to be changed every 60 thousand kilometers traveled or 48 months, whichever comes first. These are the regulatory requirements of many automakers.
In simple words, a good pump lasts as long as two timing belts last. It is also worth adding that using spare parts or low-quality antifreeze, mixing different types of coolant, etc. can lead to pump failure ahead of schedule. For this reason, it is advisable to check the pump regularly.
How to check the pump's operation
You should check the water pump on your car using a common method. For diagnostics on a VAZ and a large number of other cars, the engine should be warmed up until it reaches operating temperatures.
- After warming up, you need to hand pinch the upper pipe coming from the radiator. If the pump is working properly, then the coolant pressure created by the pump will be felt. This is the main answer to the question of how to check whether the pump is working or not without removing the pump from the car. During such a check, care must be taken, since the coolant in the system gets very hot. If the fluid pulsation is weak or absent, then you should proceed to a detailed inspection.
- To check, you need to remove the protective casing of the gas distribution mechanism, which will allow for a visual inspection. If the rubber seal (pump seal) in the area of the seat begins to leak, then drips of antifreeze or antifreeze will be visible. Also, leakage and problems with the pump will be indicated by deposits around the seat, which may have a reddish-brown or grayish color. If they are present, you need to drain the antifreeze and remove the pump for troubleshooting and replacement.
- If engine operation is accompanied by a characteristic “howling” sound, then the problem may be in the pump bearing. In this case, the pump is checked for play in the shaft area. To check by hand, you can rock the pump drive gear. In some cases, you can replace the worn bearing or immediately install a new pump.
Replacing the pump on a Gazelle
As soon as problems with the pump begin, the car owner is recommended to immediately replace this device. Firstly, over time, the water pump one way or another begins to wear out - accordingly, it can no longer fulfill its main purpose. And secondly, you cannot risk the performance of the engine - after all, it is easier to replace a cheap pump than to carry out a major overhaul of the internal combustion engine later.
Where is the water pump located?
The pump is switched on together with the motor. Accordingly, in order for the pump shaft with the impeller installed on it to begin to rotate, some action must be applied to it. The energy for rotation is supplied through the pump pulley thanks to the hydraulic timing belt drive.
Article on the topic: Why you should carry a regular flashlight in your car
To make work as convenient as possible, the pump is located in the timing device. On the one hand, this is the most comfortable place to start the pump. But on the other hand, in cases of replacing the mechanism, you will have to remove the timing belt, which makes its subsequent installation difficult.
The pump pulley is one of the most important elements of the timing system.
Preparing the tools
To remove and install the pump you will need the following set of tools:
- wrench 12;
- open-end wrench 24;
- wrench 27;
- flat screwdriver with a thin blade;
- hexagon 6;
- container for draining coolant.
Experienced drivers always keep such kits on hand, since the tools they contain are needed in all cases of self-repair of the car.
How much antifreeze to drain/fill when changing the pump
If the pump has exhausted its service life, it is recommended to drain all the coolant that is in the system. In this way, the system is cleared of impurities in the antifreeze, which also has a beneficial effect on the performance of the new device.
It is best to drain the antifreeze simultaneously from the expansion tank and from the radiator by disconnecting the pipe from it. You need to place containers under the drainage points. When draining antifreeze, it is necessary to take into account that it will not be possible to completely dry the cooling system using this method. Therefore, when filling in new coolant, it is worth remembering that there is still some amount of antifreeze in the system. It is recommended to first fill the fluid to the MIN mark on the tank, then start the engine and warm up the car. After this, evaluate how much antifreeze has gone through the system. Add the required amount, following the MIN and MAX marks on the tank.