Lada 2107 “dp.ua” › Logbook › Replacing the gear lever repair kit
The gear lever turned along with the handle, in the end I got tired of it!
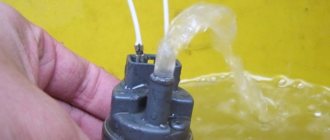
I bought a repair kit for the gearbox lever at an automagazine and so I got down to business. I removed the beard (console) I removed the decorative cover I removed the boot (pulling it up) The process of removing the lever. I picked up the locking sleeve with an awl and thereby took it out of the groove on the lever rod and removed the lever rod. The process of removing the old repair kit. Using two screwdrivers, I carefully opened the petals of the spacer bushing and removed it, and then the elastic and locking bushings.
Parts of the gear shift lever: 1 - tension spring bolt; 2 — washer; 3 — tension spring; 4 - gasket; 5 — guide cup; 6 - gasket; 7 — washer; 8 — limit bolt; 9 — gear shift lever; 10 — ball joint; 11 - spherical washer; 12 - spring; 13 — support washer; 14 — retaining ring; 15 — gasket; 16 - flange; 17 — spring washer; 18 - nut; 19 — cuff; 20 — inner cover; 21 — lever rod; 22 — handle; 23 - thrust pad; 24 - elastic bushing; 25 — spacer sleeve; 26 — elastic bushing; 27 - locking sleeve
In the same sequence as in the photo I installed a new repair kit on the gear shift lever. And using the pulling method, I pulled the rod onto the lever, but at the same time I used an awl to pick out the locking sleeve so that the rod sat in its proper place. The foam rubber slightly removed the noise from the gearbox.
I installed the beard (console) back in its place. The gear lever rod handle no longer rotates.
Repair manual for Toyota Corolla (Toyota Corolla)
ADVICE:
PARTS: See pages 40-31 and 71-9
1. REMOVE UPPER FLOOR TUNNEL TRIM PANEL
(a) SEDAN/ESTATE: (See Page 71-14)
(b) HATCHBACK: (See page 71-23)
2. REMOVE DRAWER BOTTOM 3. REMOVE REAR FLOOR TUNNEL HOUSING
(a) SEDAN/ESTATE: (See page 71-14)
(b) HATCHBACK: (See page 71-23)
4. REMOVE PARKING BRAKE LEVER HOLE COVER 5. DISCONNECT SHIFT LEVER CABLE
(a) Disconnect the end of the cable from the floor lever pin.
(b) Using a screwdriver, disconnect the control cable from the shift lever plate
6. DISCONNECT THE PARKING BRAKE LEVER CABLE
(a) Disconnect the end of the cable from the lever shaft.
(b) Using a screwdriver, disconnect the parking brake cable from the floor lever.
7. REMOVE GEAR SHIFT LEVER
(a) Using a screwdriver, disconnect the connector
(b) Disconnect both connectors.
(c) Remove the 2 wire harness clips from the floor arm.
(d) Remove the 4 bolts and floor arm.
8. REMOVE FLOOR SHIFT KNOB
(a) Disconnect the secondary lock.
(b) Release the locking tab of pins 5 and 6, and pull out the pins. (Right-hand drive)
(c) Release the locking tab of pins 2 and 4, and pull out the pins. (Left-hand drive)
(d) Remove 2 screws and shift knob
COMMENT:
Be careful not to apply excessive force to the main switch overdrive (O/D) wiring harness.
9. REMOVE FLOOR SHIFT LEVER KNOB COVER
(a) Remove the shift lever handle cover.
10. REMOVE TRANSMISSION MODE SWITCH
(a) Using a small screwdriver, remove the switch.
11. REMOVE SHIFT KNOB BUTTON
(a) Remove the shift knob button and spring.
12. REMOVE TIGHT LIGHT WIRE
(a) Remove the backlight wire.
13. REMOVE UPPER SHIFT POSITION HOUSING
(a) Remove the upper part of the position indicator housing.
14. REMOVE SHIFT POSITION INDEX SCALE
(a) Separate the position indicator scale from the top of the indicator housing.
15. REMOVE SHIFT POSITION SLIDER
(a) Remove the slider.
16. REMOVE LOWER SHIFT POSITION HOUSING
(a) Remove the 2 screws.
(b) Remove the lower part of the position indicator housing.
(c) Disconnect the lock release link from the bottom of the position indicator housing.
17. REMOVE SHIFT LOCK CANCEL BUTTON
(a) Remove the shift lock cancel button and spring.
18. REMOVE SHIFT LOCK SWITCH
(a) Remove the screw.
(b) Release the clamping tab and remove the shift lock switch together with the lock solenoid from the shift lever plate.
19. REMOVE SHIFT LOCK SOLENOID
(a) Disconnect the solenoid connector from the shift lock switch.
20. REMOVE No. 1 SHIFT LOCK RESET TRANSFER LEVER
(a) Disconnect the No. 1 SHIFT LOCK RESET TRANSMIT LEVER from the lever plate.
21. INSTALL NO.1 SHIFT LOCK RESET TRANSFER LEVER
(a) Connect the No. 1 SHIFT LOCK RESET LEVER to the lever plate.
22. INSTALL SHIFT LOCK SOLENOID
(a) Connect the solenoid connector.
23. INSTALL SHIFT LOCK SWITCH
(a) Install the shift lock switch along with the lock-up solenoid and screw to the shift lever plate.
24. INSTALL SHIFT LOCK CANCEL BUTTON
(a) Apply $$MP$$ lubricant to the spring.
(b) Install the spring and shift lock release button.
25. INSTALL THE BOTTOM OF THE SHIFT LEVER POSITION HOUSING
(a) Connect the lock release link to the bottom of the position indicator housing.
(b) Install the lower part of the position indicator housing.
(c) Install 2 screws.
26. INSTALL SHIFT LEVER POSITION SLIDER
(a) Install the slider.
27. INSTALL SHIFT POSITION SCALE
(a) Install the scale to the top of the position indicator housing.
28. INSTALL UPPER SHIFT POSITION HOUSING
(a) Install the upper position indicator housing.
29. INSTALL TIGHT LIGHT WIRE
(a) Install the wire.
30. INSTALL SHIFT KNOB BUTTON
(a) Apply $$MP$$ lubricant to the spring.
(b) Install the shift knob button.
31. INSTALL TRANSMISSION MODE SWITCH
(a) Insert the wire harness inside the shift knob in the direction of the arrow and install the transmission mode switch into the shift knob.
32. INSTALL FLOOR SHIFT LEVER COVER
(a) Install the cover.
33. INSTALL FLOOR SHIFT LEVER KNOB
(a) Attach the shift lever knob with 2 screws.
ADVICE:
Coat the screw threads with sealant.
Sealant: No. 08833-00080, THREE BOND 1344, LOCTITE 242 or equivalent.
COMMENT:
Make sure the wire harness is not touched.
(b) Attach the wire harness to the shift lever plate with the clamp.
(c) Insert 2 pins into the connector.
(d) Attach the wire harness to the shift lever plate with a clamp.
34. INSTALL TRANSMISSION LEVER
(a) Attach the lever with 4 bolts.
Torque: 12 N*m (122 kgf*cm, 9 ft-lbf)
(b) Install 2 wire clamps on the lever plate.
(c) Connect 2 connectors.
(d) Install the connector onto the lever plate.
35. INSTALL SHIFT LEVER CABLE
(a) Connect the cable to the shift lever plate.
(b) Connect the end of the cable to the shift lever pin.
36. INSTALL PARKING BRAKE CABLE
(a) Insert the slider into the indicator inspection slot and secure.
(b) Insert the lever shaft into the hole at the end of the cable.
37. CHECK KEY LOCK OPERATION (See page 40-29)
How to dismantle the gearbox lever of a VAZ 2107
If you had problems with play in the bushings, then you need to purchase a repair kit for the VAZ 2107 gearbox handle in advance and after dismantling it.
Before starting work, prepare a screwdriver.
- Set the box to neutral.
- Slide the cover.
- Push the damper locking sleeve down with a screwdriver.
- Remove the rod with the knob.
- Remove the remaining bushings from it.
- Replace them in reverse order as shown in the picture.
Before reinstalling, fully assemble the rod and bushings, slide it onto the lever, and push down sharply to seat it in place.
After repair or replacement, assembly is performed in the reverse order.
The quality of bushing repair kits leaves much to be desired and the backlash of the rod remains quite large, so some, instead of plastic and rubber bushings, simply select a simple hose according to size and attach it to it.
Beautiful cover for the gear knob: make it yourself or buy it
Hello, dear friends! For many people, having a car is not just a means of transportation, but also a kind of outlet, an opportunity to do something with their own hands, modernize and tune it. Moreover, many prefer easy external tuning without significant intervention in the technical component. It is these elements that include the cover for the gearshift knob.
It will be useful: A copy of the Mercedes-Benz Sprinter will be produced in Belarus
The only question is what exactly do you want to get. Nowadays it’s not a problem to buy a silicone or leather ready-made version, order tailoring from a studio, or do everything yourself. It is the last option that we will focus on.
If the automatic transmission is not used so often, then the manual transmission is constantly in use by the motorist. Long service life leads to the appearance of cracks, tears and other signs of wear. This is not only unsightly from an aesthetic point of view, but also impractical. It is unpleasant for the driver to cling to scratches, loose threads, etc. Therefore, there is a desire to improve the condition of the gearbox lever.
Lever tuning
The gear lever is located on the “seven” somewhat poorly, some believe that it is too long, others stretch far, and a general remark when turning on the reverse gear is added to the main ones, that we hit our hand on the passenger’s knee.
Some select levers from foreign cars that are suitable in size and secure them. The second, and easiest, thing to do when upgrading the handle yourself is to simply make it shorter. To do this, the lever rod is sawed off to 5 - 7 cm in length and the thread is re-cut.
The most radical way of tuning is to move the lever closer to the driver and reduce its travel when changing gears. It looks, when brought to its logical conclusion, solidly.
Read more about this procedure on the website.
The above tuning of the lever makes the interior of your car unique, but do not forget about driving safety because the given examples have their pros and cons, and it’s up to you to decide whether to do them or not.
Removing and replacing the gear shift lever
Replacement of the gear shift lever is required relatively rarely. It is not surprising that many car owners who are faced with the need to carry out this procedure experience certain difficulties. However, there is nothing complicated in such an operation. Next we will talk about how to remove the gearshift lever, as well as what subtleties and nuances need to be taken into account.
Read in this article
Choice of material for upholstery: leather, leatherette or textile?
Wear resistance, attractive appearance, comfort and pleasant texture are the main requirements for upholstery materials. In addition, the driver will constantly be in tactile contact with the lever: the sensations should be pleasant. The choice of a specific material is influenced not only by the taste and preferences of the car enthusiast, but also by his financial capabilities.
It will be useful: Changing the oil in a robot box: what you need to know
Various materials are used to cover the gear shift lever. Most often, leather is used for such purposes - it is an ideal option in terms of price-quality ratio. Genuine automotive leather is considered the most popular: in terms of its qualities and characteristics, it is much better than haberdashery or furniture analogues - it is wear-resistant, moisture-resistant and durable. The average service life of automotive leather is at least five years, while ordinary haberdashery leather will last no more than two to three months.
Car leather is most often used to reupholster the gearshift lever.
Automotive leather is covered with a layer of polymers, which protects it from damage and increases resistance to ultraviolet rays, chemical influences, paint abrasion and stretching.
Faux leather and eco-leather are often used as alternative materials. The latter consists of 70% polyurethane, while the basis of leatherette is polyvinyl chloride. Thanks to polyurethane, eco-leather is able to “breathe”, which is its advantage over artificial leather. Eco-leather is more popular than natural materials, since the cost of artificial materials is lower.
Material for covering the gearshift knob
One of the materials for re-upholstering the gearshift lever
In addition to leather and leatherette, artificial suede is used to cover the gear shift lever. This material has a pleasant, rough surface that does not slip under the palm. Handles covered with such fabric look aesthetically pleasing and keep warm, which is especially important in the cold season.
An inexpensive option is a rubber material with an adhesive base - it is easy to cover the handle with, and is characterized by a long service life and wear resistance.
The best option is perforated automotive leather: it is soft and elastic. It is advisable to choose a material whose pores are small in size, otherwise dirt and debris will accumulate in them. Smooth leather is more wear-resistant. The thickness of the material for tightening the lever varies from 1.2 to 1.4 mm. The color can be any and is selected to match the color scheme of the interior and in accordance with the preferences of the car owner.
The difference between the gearshift lever and the rocker
The gearshift lever is the only gearbox part with which the driver is in direct contact and which can be seen without disassembling the gearbox itself. At the same time, some car enthusiasts mistakenly identify the lever with the rocker. In fact, the rocker is a separate structure that connects the lever to the box.
Such problems do not pose any particular danger, but comfort is lost, since the entire lever vibrates strongly while driving. This is the main sign when a lever needs to be replaced. The appearance of vibrations occurs due to wear of the plastic bushing, through which this part is connected to other parts of the gearbox.
In addition, sometimes the driver replaces the gearshift lever at his own discretion (the gearshift lever is changed to a longer or shorter one, it is necessary to remove an element to replace it with a new one, it is planned to cover the gearshift lever handle with leather, etc.).
How to remove the gearshift lever
To remove the lever, you will need a not very wide flat-head screwdriver, and in some cases, 13 and 10 wrenches, a Phillips screwdriver (for example, when you need to remove the gearbox lever of a VAZ 2110). The procedure is almost the same for most cars. The first two points are carried out in any case:
- Set the gearshift lever to neutral position.
- Unscrew/remove the decorative handle (knob) from the lever, if possible.
- Remove the decorative boot or simply roll it up, then remove the rubber boot covering the drawstring.
Further options are possible, depending on the make and model of the car. Using the VAZ 2110 as an example, you will have to do the following:
- Using the appropriate keys, you need to unscrew the nuts securing the lever to the rocker. Then, using a Phillips screwdriver, unscrew the screw connecting the gearshift lever and the guide.
- Press the lever all the way to the right so that the bolt and guide can be removed.
- Remove the retaining ring from the ball joint and pull out the lever. At the same time, you can turn it a little to make it easier to pull.
What's the result?
As you can see, there is nothing difficult in removing the gear shift lever and installing a new one in its place. It should be borne in mind that in some cases it will also be necessary to replace plastic bushings and rings. The specified parts in the form of gearbox lever repair kits are sold in car dealerships.
As a result of this integrated approach, the driver receives clear gear engagement, as well as the absence of vibrations, backlash and other defects that affect the quality of the gearbox and reduce comfort during vehicle operation.
What is a gearbox rocker: the design of the gearbox rocker, signs of malfunctions. Adjusting the gear shift link. Recommendations.
How to adjust the gear shift drive of a manual transmission. In what cases is adjustment of the scenes necessary, the main signs. Useful tips and tricks.
Removing the gearbox: dismantling the manual transmission and automatic transmission. The procedure for removing the gearbox, what needs to be taken into account, recommendations.
Automatic transmission selector: basic functions. Types of automatic transmission selectors: steering column, push-button, floor. Malfunction of the automatic transmission selector.
Why is it necessary to check and adjust the automatic transmission cable when jerking occurs during automatic transmission gear shifting? Adjusting the automatic transmission cable.
How to replace an automatic transmission with a manual transmission, as well as replacing a manual transmission with an automatic transmission: nuances. Useful tips and tricks.
Ford Escort gear shift mechanism
- Repair manuals
- Repair manual for Ford Escort 1980-1990.
- Gear shift mechanism
8.1.3.3. Gear shift mechanism
Gear shift mechanism
| 1 – gear shift lever; 2 – decorative cover; 3 – retaining ring; 4 – elastic rubber element; 5 – gasket; 6 – cover; | 7 – stabilizer; 8 – gear shift mechanism rod; 9 – locking pin; 10 – body; 11 – elements of the guide bushing; 12 – guide sleeve |
Removal
| EXECUTION ORDER | ||
| Assembly and installation Assembling and installing the gear shift mechanism is carried out in the reverse order of removal. Adjustment
|
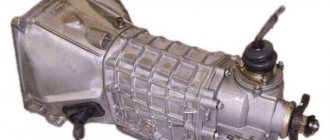
Self-replacement of the VAZ 2107 gearshift lever
The VAZ 2107 gear shift lever is used to enable the driver to control the car, which is possible using a gearbox. The gearbox, in turn, is a mechanism inside which there are gears of different diameters. This device is the link between the engine and the drive wheels of the car. For rear-wheel drive cars, which is the VAZ 2107, the manual transmission is typically located under the lever itself. To connect the lever to the gearbox, no additional link is required, as is typical for front-wheel drive car models. The VAZ 2107 rocker is presented in the form of a small half-bent tube onto which the gearshift lever itself is placed. In the material we will pay attention to the question of how to replace it, as well as the features of dismantling.
Main faults on the VAZ 2106 gearbox and how to fix them
Malfunctions of the “six” gearbox have more than one cause. Accordingly, the methods for eliminating them will vary.
Cause of malfunction
Presence of noise in the gearbox (may disappear if you depress the clutch pedal)
There is no noise, but the speeds are difficult to switch on
Between third and fourth gear there is no way to lock the gear lever in neutral
Spontaneous gear shutdown
There is a noise, crackling or squealing sound when shifting gears
Device location and characteristics
The gearshift lever of the VAZ 2107 is located directly in the car's interior. It is used to be able to change gears while moving. The gear lever fails only in rare cases, and the reason for this is negligence towards the product. If the product fails, it must be replaced. But before replacing, it is necessary to remove the product in question. We’ll find out in more detail how to remove it, as well as replace it on the “seven”.
On the “seven” the gear shift knob has a common problem - rattling and chattering. If you fix such a malfunction using improvised means, then replacing the device will not be necessary. Before you begin replacing the device, you will need to find out the exact causes of the malfunction. After all, sometimes not only the part in question can “fail,” but also the gearbox or clutch.
If you are convinced that it is the gearshift lever that is faulty, then only then should you start replacing it.
Replacement features
Before you begin the replacement, you need to stock up on tools such as wrenches and a screwdriver. We start with the following steps:
- Set the lever to neutral position.
- After this, you need to slide the top cover up. There is no need to completely remove the cover.
- The next step is to move the cover, which is located below, to the top. This cover is also called a thermal protection valve. In the photo below it is shown with a red arrow.
- Now you need to press the device, pushing it to the bottom. After this, you need to insert a screwdriver into the lower part of the product, where the plastic sleeve is located. The bushing is located at the very bottom of the device, as shown in the photo below.
- It is necessary to move the locking sleeve to the lower part, and then remove the product from the box.
- If the device emits strong vibrations, it needs to be replaced with a new one. In this case, you can exchange the part for a product of shorter length, as on foreign cars. A short device is much more comfortable to operate than a standard product.
Many motorists replace the standard gear shift levers with more modern ones, which allows them to uniquely customize the interior of the Seven.
After the standard product is dismantled, we install a new handle in its place. Let's look at what the installation is.
Installing the device on a VAZ 2107
After the standard mechanism has been removed, you will need to remove the rubber bushing from it, if it remains inside. To remove the bushing, you need to use a screwdriver or hook. By prying the sleeve, we remove it from the device, as shown in the photo above.
Additionally, you can make the gear shifting process more convenient by slightly reducing the length of the standard handle. To do this, you need to remove the lever, cut it with a hacksaw to 5-6 cm in length and cut a thread at the end, the same as it was on the cut piece (if you wish, you don’t have to cut the thread). These upgrades are advisory in nature and have their pros and cons. Each driver decides for himself whether to produce them or not.
When choosing products for foreign cars, you should make sure that it can be reliably installed on the VAZ-2107. Otherwise, an incorrectly secured mechanism will lead to an emergency situation while driving.
Replacement of the gear lever housing and gear knob
First of all, it should be noted that on many cars, especially budget ones, the factory gearshift lever cover is made of leatherette. The quality of such material is average, that is, after 30-40 thousand km. After active use, this material becomes unusable.
The lever handle is often made of rubberized plastic. Although the material is more resistant to wear, replacement may also be necessary at 50-60 thousand km. mileage (especially if used carelessly).
The only thing is that when reinstalling a previously removed handle, you need to be prepared for the fact that the fit will deteriorate somewhat. The fastening is implemented in such a way that the rod has teeth for fixation, however, after twisting the handle, the material of the handle itself is damaged.
For this reason, when reinstalling an old handle (for example, after re-covering it with leather or restoration), special glue or liquid fixatives are additionally used.
- So, before installing the cover, you should separately note the position of the tie. At first glance, it may seem that the screed is in the wrong position. Do not twist the tie, pull it, or try to put it in the correct position. After the cover is turned inside out to secure the coupler to the gearshift lever, the coupler will be in the desired position.
- To remove the old cover, you need to carry out all the work in a warm garage or room, since at sub-zero or near-zero temperatures the plastic in the interior may burst as it becomes brittle.
- To remove the cover, you need to press on one of the corners in the front, then use a plastic spatula, a ruler, or simply press the latch with your finger to unhook it. After the latch is snapped off, the second corner is raised and the second latch is snapped off.
- Now the base of the cover can be pulled forward and lifted up. Next, you need to turn the case around the axis of the box handle to reveal the plastic tie lock. The lock is cut using wire cutters, and the old cover is removed from the handle.
- Next, you need to bend the staples using a chisel from the inside (you can also use a flat-head screwdriver), after which the staples are pulled out from the outside.
- In the front part of the plastic base, the latches are located at a slightly greater distance from each other than in the rear. The case will also have slots that are slightly wider at the front and narrower at the back.
- Having decided on the front and back parts, the front edge of the cover must be attached to the base, after which, placing it on a support or on a table, the cover is attached to the base with a stapler.
- Please note that if you use a cheap stapler and low quality staples, the staples may bend. To prevent this from happening, you should try to place the bracket in the existing holes.
- Having secured the case with staples in the front, back, left and right, as well as in the corners, you need to check whether the staples have pierced the plastic through. If this is the case, the protruding ends of the staples will need to be bent inward.
- Next, you need to turn the cover inside out, making sure that the tie also turns inside out and does not twist. To keep the tie in place, you need to hold it with your fingers while simultaneously turning out the gear lever cover itself.
When installing the gasket, it is important to achieve such a result that, on the one hand, the lever mechanism does not rub the cover from the inside during operation, and on the other hand, the mechanism itself works normally, that is, the gasket should not affect the performance and quality of operation of the gearbox lever mechanism.
How to remove the gear shift lever?
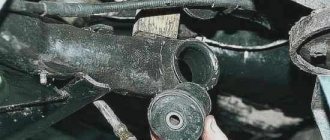
Sometimes car owners are faced with the problem of removing the gear shift lever. This procedure must be carried out when replacing the silent blocks of the lever or extension, as well as when replacing the lever itself. The extension is removed to replace the silent blocks on it or to completely disassemble the front suspension. Since these repair procedures are not very difficult, you can remove the lever yourself rather than contact a service station for help.
Advice: it is advisable to carry out the work in the presence of an inspection hole or a lift.
To remove the gearshift lever on a VAZ 2110, follow these instructions:
- Remove the engine splash guard.
Disconnect the ball joint from the lever or remove it altogether.
We hold the extension with a “24” wrench and use a wrench of the same size to unscrew the extension nut.
Next, knock out the bolt and remove it.
Using two “19” keys, unscrew the nut from the bolt that secures the lever to the body.
We remove the lever from the bracket, having previously knocked out the bolt.
The next step is to remove the washer from the stretcher, as well as the lever.
Behind the large washer on the extension there are three washers for adjusting the angle for the longitudinal inclination of the steering axis.
To unscrew the brace from the cross member of the front suspension, use a pair of 24mm wrenches, unscrew the nut, remove the washer and remove the brace from the silent block.
Adjusting washers can also be installed on the extension at the front.
To replace the silent block of the lever, you need to press it out in a vice with pieces of pipe. Before installing a new silent block, you need to moisten it with soapy water to make it easier to press it back into the lever.
The silent block is knocked off the guy wire with a chisel.
The second one is dismantled in the same way.
We press the new silent block into the cleats and, striking the drift, press it to the end (the diameter of the drift is 8 mm). We place the drift in the windows in layers of rubber (there are 3 of them).
- Assembly is carried out in the same reverse order. All connections are tightened only when the car is on its wheels.
Removing the gearshift lever handle:
- To make this procedure easier, you will need to first follow the shift lever removal instructions above.
Once the lever is removed, clamp it in a vice.
We wrap the neck under the handle with tape and install an open-end wrench on the tape at “32”.
Lightly hit it with a hammer from below in order to knock the handle with the holder away from the lever.
When the handle comes out a little, remove the tape and remove the handle, first pressing the latches on the holder with a thin screwdriver. Tip: Be careful, as there is a spring under the handle, do not lose it.
Do-it-yourself gear knob reupholstery
Such minor tuning of the interior can be carried out both by the car enthusiast himself and in special workshops. If the car owner is not sure that he can handle it on his own, then he can turn to specialists who will do all the work quickly and efficiently.
Required Tools
It is impossible to reupholster the gear shift lever without the following materials and tools:
- pencil, marker or pen;
- scissors;
- scalpel or stationery knife;
- cling film;
- scotch;
- sewing machine;
- glue;
- nylon or silk thread;
- thimble - to avoid damaging your hands;
- hot sewing needles;
- leather, suede or any other covering material.
Tools and materials required for tightening the gearshift knob
The optimal material for reupholstering the handle is high quality genuine leather. All work must be done carefully and carefully so as not to damage the skin and not to redo everything several times. To create an attractive case, you can combine smooth and perforated leather.
Step-by-step reupholstery
The first stage of reupholstery is removing the lever itself along with the cover. An old case is used to create a new one: it is carefully ripped into pieces and patterns are made from them. The new cover is sewn either by hand or using a sewing machine only from the wrong side. In the case of handmade work, the parts are pierced with an awl in advance to facilitate the sewing process, because the needle may not pierce the skin. The finished case is attached to the frame using superglue.
Handle wrapping can be done in several ways. One of them is carried out according to the following scheme:
- The gearshift lever is covered with plastic film.
The gear knob is covered with plastic film - The film is attached on top with regular or masking tape. It is best to use the latter as it is easier to mark lines with a marker or pencil.
A layer of tape is wound over the film - The lines of future seams are marked with a marker.
The lines of the parts are marked with a marker on the tape. - Using a sharp scalpel or a stationery knife, carefully cut the winding along the marked lines.
Using a scalpel or a sharp knife, the model is carefully cut along the drawn lines. - The dummy created in this way is carefully removed and leveled. The parts may not retain their evenness and accuracy, but you can ignore this. The steps described above allow you to create a pattern for the future case. The cut parts are removed from the gearshift lever The finished patterns are carefully straightened The straightened patterns can be used to cut out parts from leather
- Using ready-made patterns, parts are cut out from leather or any other material. The space on each side of the part should be at least 5 mm - this will make it easier to stretch the leather.
The details of the case are cut out of leather or other material according to patterns. - All parts are stitched manually or using a sewing machine at a distance of 5 mm from the edges.
The parts are stitched with thread by hand or on a sewing machine. - The parts are sewn together after they are fixed relative to each other using glue.
The parts are attached with glue to the handle and sewn together - Silk or nylon threads are carefully pulled into the seams and pulled tight.
Threads are pulled into the holes and pulled tight - After all the seams are completed, the cover is moistened with water - this will make it easier to pull it onto the lever and make the skin soft and elastic.
The sewn cover is moistened with water and carefully pulled onto the gearshift lever.
The second method of re-upholstering the gearshift knob is practically no different from the first, only to create a new cover, parts from the old one are used as patterns: it is carefully cut at the seams. Individual parts are used as patterns for a new case. The finished product is pulled onto the handle and secured. The gear diagram, if available, is installed in place.
Video: reupholstering the gear lever
Car interior tuning is one of the most popular and sought after procedures. Small changes to the appearance of the car's interior can be made by tightening the gear shift lever. The upholstery procedure is simple: just have the necessary materials and tools on hand to create a new pen cover and give the interior a fresh and aesthetic appearance.
Good afternoon. My name is Michael. (1 vote, average: 5 out of 5)